Unlocking Texture in Abstract Art: My Tactile Journey & Techniques
Uncover the power of texture in abstract art. Join my personal journey exploring impasto, mixed media, and sgraffito to transform canvases into rich, tactile landscapes. Learn techniques, materials, and troubleshooting for deeper artistic connection.
Unlocking Texture in Abstract Art: My Journey into Tactile Landscapes
For the longest time, my understanding of abstract art felt incomplete, confined solely to the visual plane. I'd arrange colors, compose shapes, and chase light, yet there was a persistent whisper, a quiet dissatisfaction that something profound was eluding me. It was like appreciating a beautiful melody but never feeling its vibrations in your chest. I often felt like the art was holding a secret, a layer of communication that remained just out of reach. That's when I truly fell in love with texture. It's the secret handshake of the art world, the whisper that pulls you closer, inviting you not just to look, but to feel, to imagine. For me, it was like unlocking a whole new language on my canvases, allowing me to express depths and emotions I hadn't quite touched before. But beyond my personal revelation, texture holds a universal power, transcending the visual to forge a deeper, more primal connection for any viewer, turning a mere painting into an immersive experience.
It's funny, isn't it? We live in such a tactile world. We touch our coffee mugs, feel the rough grain of wood, the softness of a pet's fur. Yet, sometimes, we forget that art can, and perhaps should, engage more than just our eyes. For me, exploring texture became a revelation, a way to add another dimension, a living pulse to my canvases. It transformed them from flat surfaces into miniature landscapes, each with its own hills, valleys, and secrets.
But let's pause for a moment on that word, 'texture.' In art, we often talk about two kinds: actual texture and implied texture. Actual texture is what we're diving deep into today – the physical, palpable surface that you can literally feel with your fingertips, the bumps, ridges, and valleys that stand proud from the canvas. Implied texture, on the other hand, is the visual illusion of texture. It's when a painter uses brushstrokes, color variations, or lines to suggest that a surface is rough or smooth, even if it's perfectly flat. Think of a hyper-realistic painting of a craggy rock; you see the texture, but you can't feel it. My journey, though, was always about breaking through that illusion, about bringing the physical world onto my canvases, demanding a tactile engagement from the viewer. It's about making the art not just seen, but touched, truly felt.
After all that talk of unlocking secrets and universal connections, it's time to get down to the brass tacks: preparing your canvas and your mindset. Because while the conceptual side of texture is thrilling, the practicalities are what make the magic happen (or, well, prevent a glorious mess from becoming a total disaster).
Before You Start: Essential Prep & Mindset
Before you dive headfirst into the glorious mess of texture, a little preparation goes a long way. Trust me, I've learned this the hard way – nothing's worse than paint not sticking, or a beautiful textured piece cracking down the middle a week later! It's also about setting yourself up for success, and safety.
First, a foundational tip: always ensure your canvas or surface is properly primed with gesso, especially when planning to apply heavy textures. This provides a stable, archival base that prevents your paint and mediums from soaking in unevenly and ensures better adhesion for thicker applications, laying the groundwork for your textured masterpiece.
Workspace & Ventilation: Textural work can be messy and sometimes involves mediums with fumes. Work in a well-ventilated area, opening windows or using a fan. This isn't just about comfort; it's about protecting your lungs from paint and solvent fumes, especially with oil paints or spray varnishes.
Protecting Yourself & Your Tools: Wear gloves to protect your skin from paints and mediums, especially if you have sensitive skin or are working with certain chemicals. Nitrile gloves are excellent for chemical resistance. Also, if working with solvent fumes or spray varnishes, consider an appropriate respirator or mask. Have a dedicated set of tools for texture – palette knives, old brushes, and found objects. Cleaning brushes and palette knives after working with heavy body paints and textural mediums requires promptness. For water-based acrylics and mediums, clean immediately with warm water and soap, ensuring all material is removed from the bristles or blade base to prevent hardening. For oil paints, wipe off excess paint with a rag, then clean with an appropriate solvent (like mineral spirits or turpentine substitute), followed by soap and water. Never let thick paint dry on your tools; it's a battle you'll likely lose, and your tools will suffer.
Embrace the Mess & The Unexpected: This is less about prep and more about mindset. Texture is inherently unpredictable. Be ready for happy accidents, for things not going exactly as planned. That's where the real magic often happens! My infamous dried spaghetti attempt, for example, was a crunchy disaster, but it taught me invaluable lessons about material absorption and the unpredictable nature of art. Sometimes, the 'mistakes' lead to the most exciting discoveries. And honestly, if you're not making a bit of a mess, are you really having fun?
Why Texture Isn't Just for Touching (But It Helps!)
Why bother with texture? Well, aside from satisfying my own restless creative spirit, it does wonders for abstract art. It's the kind of thing that elevates a piece, making it more dynamic, more compelling. When you add texture, you're not just painting; you're sculpting with paint, building layers of meaning and depth. But beyond the purely aesthetic, what profound impact does texture truly hold in the realm of abstraction?
The Emotional Resonance of Texture
It's fascinating to consider that the exploration of texture in art isn't a modern phenomenon. From the sculptural relief of ancient civilizations to the expressive brushwork of Impressionism, the sumptuous, layered impasto of masters like Rembrandt, and the raw, visceral surfaces of Abstract Expressionists like Jackson Pollock, artists have long understood the power of the tactile to deepen connection and convey meaning. The ultimate guide to Abstract Expressionism reveals just how central texture became to this influential movement.
Think about it: texture can convey emotion. A rough, jagged surface might evoke turmoil or strength, while a smooth, flowing one could suggest calm or fluidity. But it goes deeper; a delicate, almost brittle surface might speak of fragility or the passage of time, while a yielding, soft touch could imply quiet vulnerability or gentle introspection. In my own work, I often find myself building up broken, almost scarred textures to convey a sense of resilience or the quiet aftermath of struggle, whereas gentle, undulating surfaces might speak to moments of fluid contemplation or serenity. It adds a physical presence that color and form alone can't quite achieve. It grounds the abstract, making it feel more real, more immediate.
Texture's Dance with Light and Color
Beyond its direct emotional resonance, texture acts as a silent collaborator with color and light. A brilliant crimson, when applied thickly with impasto, might ripple with an inner fire as light catches its peaks and valleys, transforming from a flat hue into a living flame. Conversely, the same red, rendered with a delicate, almost velvety texture, could evoke a deep, hushed warmth. Texture invites light to dance across the canvas, creating ever-shifting shadows and highlights that alter the perceived intensity and mood of the colors, weaving them into a more profound, sensory tapestry. This rich interplay is a crucial part of art elements that artists master.
https://live.staticflickr.com/65535/52756888197_ece375ce5f_b.jpg, CC BY-NC-ND 2.0
This interplay of elements, much like how the emotional language of color in abstract art speaks to us, allows texture to tell its own story. It's a fundamental part of what makes abstract art compelling – that invitation to engage on a deeper, more sensory level.
Materials & Tools That Love to Get Textured
So, what's in my texture toolkit? Let's dive into the materials and tools that truly sing when given a chance to build! Choosing the right materials is key. Some paints and mediums are just begging to be textured. Your essential toolkit will typically include:
- Heavy Body Acrylics and Oils: These are your go-to paints for texture. Their thicker consistency means they hold their shape beautifully when applied thickly. If you're wondering how to layer colors in acrylic painting, remember that layers of different textures can add even more depth. For mastering basic brushstrokes for acrylic painting, consider how different stroke types can also create varied texture.
- Modeling Pastes and Gels: The Unsung Sculptors: Oh, these are my absolute heroes! They are specifically designed to create volume and texture. You can mix them with your paint, or apply them first and paint over them once dry. They come in various consistencies – some are gritty (like pumice gel, perfect for a sandy, abrasive feel), some are smooth and translucent (heavy gel medium for clear, sculptural forms), some are transparent (glass bead gel for a subtle, shimmering effect), and some dry opaque and matte (like standard modeling paste). Brands like Golden, Liquitex, and Winsor & Newton offer excellent ranges. They're like the unsung heroes of the texture world, allowing you to build incredible relief on your canvas. One thing to keep in mind: while these mediums are magical for building volume, they can also significantly extend drying times, especially when applied thickly. This patience is crucial to prevent cracking, a topic we'll touch on in the FAQs.
- Found Objects & Natural Materials: Unexpected Guests: As mentioned, don't be afraid to think outside the tube! Sand, coffee grounds, small stones, dried leaves, even crumpled aluminum foil can all be incorporated. When venturing into the exciting realm of found objects and natural materials, the question of archival quality becomes paramount. This isn't just a fancy art term; it’s about longevity. Materials that aren't archival can degrade over time, leading to discoloration, mold, or even disintegration of your artwork. While the temptation to incorporate anything and everything is strong, exercise caution. If longevity is your goal, research and test materials thoroughly. Consider sealing porous items, using non-acidic glues, and for organic matter, perhaps treating or preserving them before incorporation. It's a balance between spontaneous discovery and the desire for your art to endure. Artists who use found objects in their work often demonstrate this beautifully. Eco-friendly tip: Consider sourcing materials responsibly! Repurpose household waste like cardboard, plastic mesh, or old fabric scraps. Look for natural materials from your own garden that don't harm the environment during collection.What to Avoid (for Archival Quality)To ensure your textured artwork lasts, be cautious with certain materials:
- Highly acidic papers or cardboard: These can yellow, become brittle, and degrade over time, affecting surrounding paint.
- Untreated organic matter: Fresh leaves, flowers, food scraps can rot, mold, or attract pests. Always dry and potentially seal them first.
- Non-archival glues: Standard craft glues can yellow, become brittle, or lose adhesion. Use artist-grade acrylic mediums or PVA glues.
- Metals that rust: Untreated iron or steel can rust and stain your canvas. If using metal, consider sealed or non-reactive types.
- Materials that leach color: Some dyed fabrics or natural items might bleed into your paint over time, causing discoloration.
- Tools for Application & Creation: Your Extended Hands: Beyond the versatile palette knife, don't limit yourself! Sponges can create dappled, porous effects. Combs can drag through wet paint for parallel lines. Stencils offer repetitive patterns. Consider also silicone shapers for precise control, rubber sculpting tools for unique impressions, or stiff bristle brushes specifically designed for impasto. And then there are the truly unconventional household items: forks, bubble wrap, old toothbrushes, crumpled paper, even a cleaned-up sole of an old shoe can become your next favorite texture-making tool. Each one offers a unique imprint and a fresh perspective on how to manipulate paint and mediums. Remember that an old, stiff brush can create fantastic dry-brush texture, and even your own fingers can be surprisingly effective for blending or creating organic smears.
My Favorite Techniques for Creating Tactile Worlds
Okay, so you've got your materials, you've prepped your canvas, and you're feeling adventurous. This is where the fun really begins! Over the years, I've dabbled, experimented, and occasionally made glorious messes (which, sometimes, turned into happy accidents). Here are a few of my go-to techniques:
Impasto: The Art of the Thick Paint (Bold, Sculptural Textures)
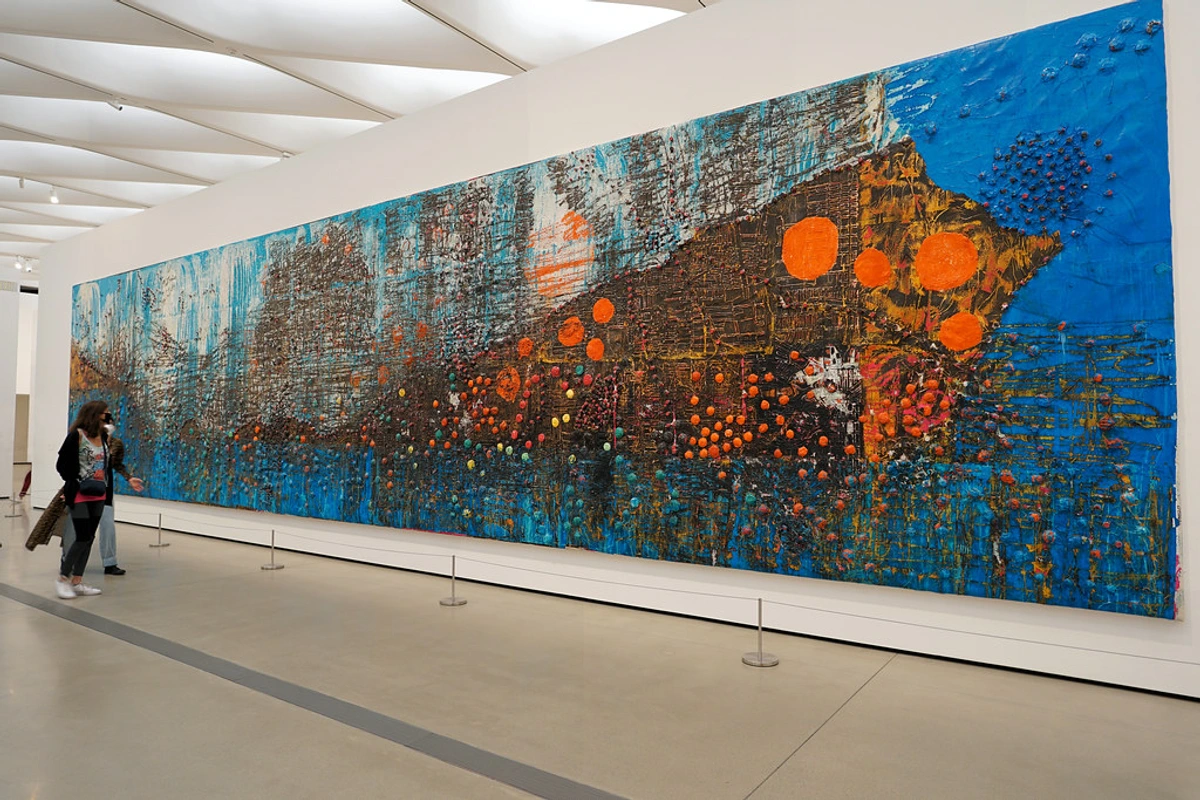
This is probably the most straightforward way to get texture. Impasto simply means applying paint thickly, so it stands out from the surface. It's like building mini-mountains on your canvas. I love the raw energy it conveys, the way the light catches the peaks and valleys. I remember the first time I really loaded up a palette knife with paint, feeling the sheer joy of building those miniature mountains. It was then I realized the canvas wasn't just a flat surface, but a landscape waiting to be explored. You can vary the effect by using smooth, thick strokes for a more controlled, undulating surface, or rough, broken strokes for a more spontaneous, energetic feel. The directional drag of your tool can also create different patterns, from sharp ridges to soft waves.
https://live.staticflickr.com/65535/53064827119_1b7c27cd96_b.jpg, CC BY-NC-ND 2.0
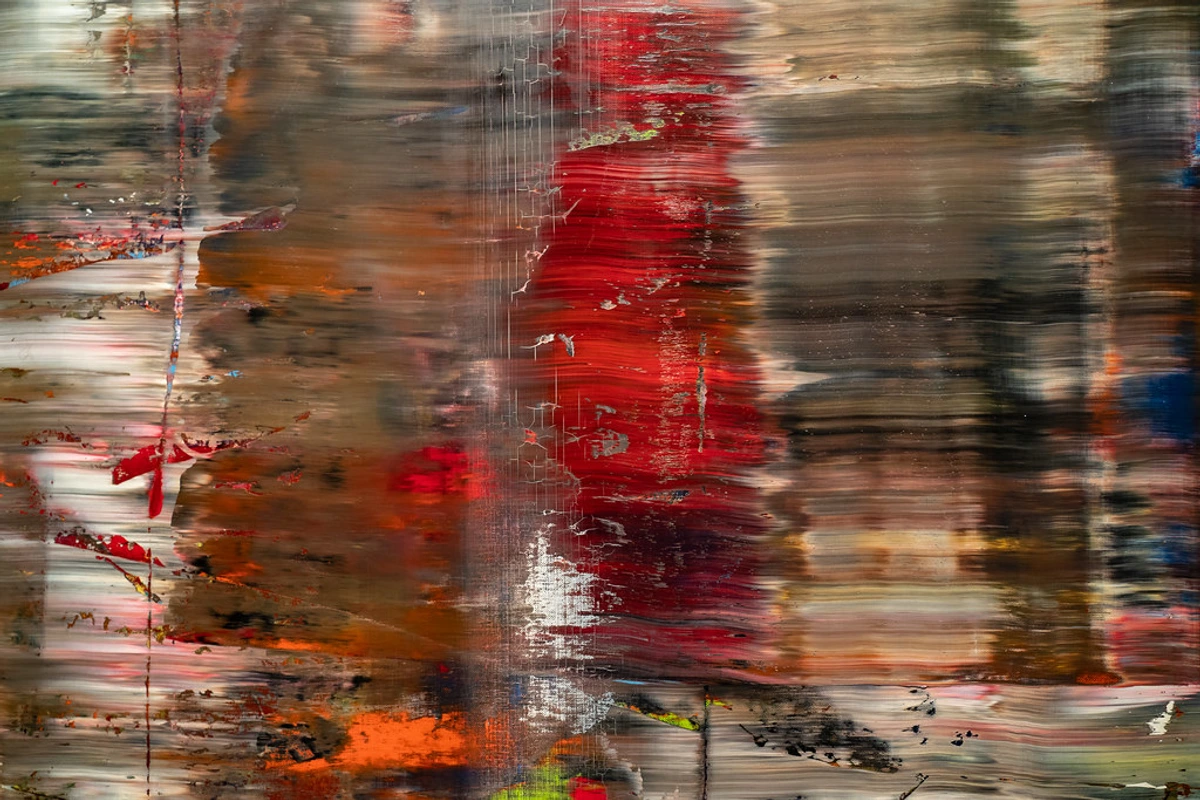
Richter's masterful use of impasto, particularly the way his powerful scraped textures simultaneously convey both controlled chaos and a surprising depth of emotion, was a profound early inspiration in my own journey into the world of texture. You can learn more about his incredible work in the ultimate guide to Gerhard Richter. It showed me how texture could embody not just form, but a narrative of creation and deconstruction.
You can use a brush, but a palette knife is your best friend here. It allows you to scoop, spread, and drag paint, creating those delicious peaks and ridges. We've talked about what impasto painting is before, and truly, it's one of the most expressive ways to use paint.
- Try it: Create a small study using only a palette knife and heavy body paint. Focus solely on the peaks and valleys, varying your stroke direction and pressure to see what kind of "mini-mountains" you can build. Challenge yourself to use just one color and let the texture speak.
Collage and Mixed Media: The Unexpected Guest (Varied, Layered Textures)
Sometimes, the best texture comes from things that aren't paint at all. This is where exploring mixed media in contemporary abstract art comes into play, and it often involves elements of collage art. I've used everything from sand (yes, really, from a beach trip!) to old bits of fabric, even crumpled paper. The trick is to glue them securely and then integrate them with paint. It creates incredible contrasts – smooth paint next to gritty sand, or a delicate fabric peeking through bold strokes. I once created a piece where I integrated dried leaves from a walk in the woods, and the way their brittle edges contrasted with the smooth paint created an unexpected tension – a conversation between nature and abstraction. It's like inviting a bunch of interesting characters to a party on your canvas! Artists who use found objects in their work often demonstrate this beautifully.
When incorporating found objects, remember that preparation is key. Ensure materials are thoroughly cleaned and completely dry to prevent mold or degradation. Porous items like wood or paper might benefit from sealing with an archival medium before painting to prevent discolouration or chemical reactions with your paints, ensuring your mixed-media piece stands the test of time.
- Try it: Gather five random, small, clean objects from your home (a piece of cardboard, a bottle cap, some string, a feather, a crumpled receipt). Glue them onto a small board and then try to integrate them using paint, allowing their inherent texture to shine through and inform your composition.
Sgraffito and Scratching: Revealing What Lies Beneath (Intricate, Hidden Textures)
This technique is super satisfying. Sgraffito involves scratching through a layer of wet paint to reveal the color or texture underneath, or even the canvas ground itself. It's like excavating a hidden history on your canvas. You can use the blunt end of a paintbrush, a palette knife, or even your fingernail (though I don't recommend it for longevity of manicure). Beyond the blunt end of a paintbrush or a palette knife, don't hesitate to experiment with skewers, combs, rubber sculpting tools, or even sharpened sticks. Each tool will create a unique type of groove or line, adding further complexity to your 'uncovered' layers. This creates fine lines and textures that add a subtle, intricate quality. There's a quiet satisfaction in scratching away a layer to reveal the history beneath. I remember a piece where I used sgraffito to 'uncover' subtle patterns, almost like ancient glyphs, beneath a stormy top layer. Other related techniques include frottage (rubbing over textured surfaces with a crayon or other tool to create a pattern) and stamping (pressing textured objects onto wet paint). Even controlled pouring or dripping can create unique, organic textural effects.
- Try it: Apply a thin, even layer of one color of paint onto a small board. While it's still wet, experiment with different tools to scratch lines and patterns, revealing the surface beneath. Try a comb, a toothpick, the handle of a brush, or even a credit card edge. Observe how each tool creates a distinct mark.
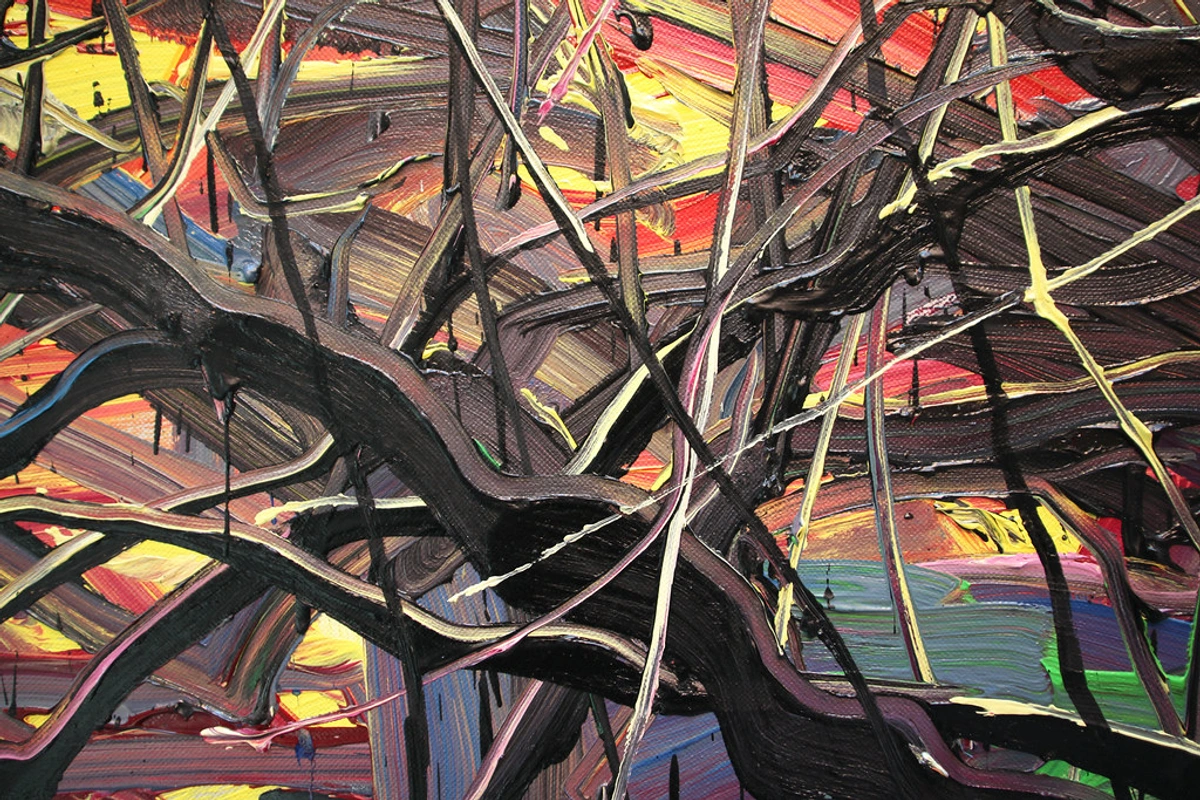
Building with Textural Mediums & Gels (Controlled Volume and Diverse Effects)
But sometimes, you want to sculpt with pure volume, to build forms that stand proud from the canvas. This is where textural mediums and gels become your best allies. These versatile substances can be applied thickly with palette knives to create smooth, undulating waves or sharp, geometric peaks. They can be brushed on for subtle, almost ethereal textures, or even squeezed directly from the tube for bold, worm-like lines. Mixed with paint, they extend your palette's possibilities, or used alone, they create a fascinating foundational landscape for subsequent layers of color.
https://live.staticflickr.com/2875/8866942510_439379d853_b.jpg, CC BY 2.0
- Try it: Get a small tub of modeling paste or heavy gel. Apply it to a surface with a palette knife, trying to create different kinds of raised surfaces – smooth hills, sharp ridges, broken textures. Once dry, try painting over it to see how the texture interacts with the color.
Techniques at a Glance
Technique | Primary Effect | Key Tools/Materials |
|---|---|---|
| Impasto | Bold, sculptural, expressive volume | Palette knife, heavy body acrylics/oils |
| Collage & Mixed Media | Varied, layered, unexpected contrasts | Found objects, fabric, sand, archival glue |
| Sgraffito & Scratching | Intricate, revealing hidden layers, fine lines | Skewers, combs, blunt tools, wet paint |
| Textural Mediums & Gels | Controlled volume, diverse surfaces, foundation for paint | Modeling paste, pumice gel, glass bead gel, palette knife |
Beyond the Surface: Texture and Composition
It's easy to get lost in the sheer joy of making cool textures, but how do these tactile elements truly integrate into the larger story of your painting? Texture isn't just an add-on; it's a powerful compositional tool. Think of it as another way to guide the viewer's eye, to create focal points, and to add a sense of movement or balance.
A highly textured area naturally draws attention, almost like a visual magnet. You can use this to your advantage by placing your most compelling textures where you want the eye to linger. Imagine a smooth, calm expanse of color suddenly meeting a jagged, tumultuous ridge – that contrast creates a moment of tension, a focal point. Texture can also suggest direction or rhythm. Repeated textural patterns can lead the eye across the canvas, while varied textures can create a sense of dynamic energy or a harmonious balance between different elements. It's about using the physical qualities of your surface to enhance the narrative and visual journey of your abstract piece, making it more than just a collection of shapes and colors, but a truly immersive experience.
Common Pitfalls and Troubleshooting
Even with the best intentions and the most adventurous spirit, working with texture can throw a few curveballs. I’ve certainly had my share of head-scratching moments! Here are some common issues and how to navigate them, saving you some frustration (and maybe a few ruined pieces).
- Cracking Textural Layers: As mentioned in prep, patience is key. Very thick impasto or modeling paste layers can take days or even weeks to fully cure. To prevent cracking, apply thick layers in stages, allowing each layer to dry thoroughly before adding the next. Also, avoid extremely rapid drying (e.g., direct heat from a hairdryer) or significant fluctuations in environmental factors like humidity and temperature, as these can cause the surface to crack. Using flexible mediums and gessoing your canvas properly also helps. Think of it like baking a really thick cake – you wouldn't rush it, would you? And trust me, nobody wants a cracked cake (or a cracked painting).
- Paint Peeling or Not Adhering: This usually comes back to inadequate priming or incompatible materials. Ensure your canvas is properly gessoed. If you're painting over found objects, make sure they are clean, dry, and potentially sealed or primed themselves to provide a good surface for the paint. Always use a good quality adhesive for mixed media elements that is compatible with your paints.
- Colors Changing When Mixed with Mediums: Some clear gels and pastes can slightly dull or whiten colors, especially when mixed in high ratios. Test your mixtures on a scrap surface before applying them to your main artwork. If color integrity is crucial, apply the medium first, let it dry, and then paint over it.
- "Over-textured" Areas / Lack of Balance: Sometimes, in the excitement of building texture, you might find an area that feels too busy, or overwhelms the rest of the composition. Don't panic! You can often scrape away excess wet medium, or, once dry, carefully sand down (with proper ventilation and dust mask!) or apply a new, smoother layer of gesso or paint over the area to subdue it. Remember, texture is powerful, so use it judiciously. Sometimes less truly is more, especially when you've gone a bit wild with the modeling paste.
Finding Your Textural Voice: Inspiration and Experimentation
My own artistic journey has been a constant dance with texture. From the early days of trying to figure out how to abstract art to now, texture has become an integral part of my expressive language. It's a personal signature, really. If you've ever explored my art for sale, you might notice how I play with different textures to evoke different moods. It's part of my creative process – constantly pushing boundaries, seeing what new tactile experiences I can bring to life.
And for you, the aspiring texture explorer, my advice is simple: experiment! Don't be afraid to make a mess. Some of my favorite textures came from happy accidents, from trying something completely bonkers just to see what would happen. I once, completely on a whim, dragged an old, cleaned-up scrubbing brush across a thick, wet layer of paint, expecting it to ruin everything. Instead, it left behind this incredible, organic pattern of fine grooves that became the starting point for a whole new series on natural erosion! Conversely, I once tried to incorporate a beautiful piece of lace, expecting delicate transparency, but it absorbed the paint entirely, turning into a muddy, unrecognizable blob. It was a failure, sure, but it taught me invaluable lessons about material absorption and the unpredictable nature of art. It's these kinds of 'failures' that truly push you forward.
Where to Find Textural Inspiration
Inspiration for texture is everywhere, once you start looking. It’s about cultivating a tactile eye. Take a walk and observe: the peeling paint on an old wall, the rough bark of a tree, the intricate patterns of a dried leaf, the worn texture of concrete, the ripples on water, or even the texture of fabric on your clothes. Urban decay, natural landscapes, microscopic images, magnified textiles – they all offer a wealth of patterns and surfaces to translate onto your canvas. Keep a 'texture journal' or create small sample boards. Document the mediums you used, the tools, the paint ratios, and the drying times. This provides a valuable reference library for future projects and helps you replicate happy accidents (and avoid less happy ones!).
https://commons.wikimedia.org/wiki/File:%27Abstract_sky%27,1993-_small_acrylic_painting_by_Dutch_artist_Fons_Heijnsbroek;_free_download_abstract_art_image,_CCO.jpg, http://creativecommons.org/publicdomain/zero/1.0/deed.en
Your Texture Challenge: Grab a canvas (and if you're curious about choosing the right canvas for acrylic vs oil, we've got you covered there too!), some paint, and just start playing. Try creating a small piece using only texture, without relying on color or recognizable forms, or find inspiration from an unexpected, everyday texture and translate it onto your canvas. Drag a fork through wet paint, press bubble wrap onto it, or even use the sole of an old shoe (cleaned, of course!). The possibilities are truly endless. And if you create something amazing, I'd love to see it! Tag me on your favorite social media, or drop a line via my contact page!
Frequently Asked Questions About Texture in Abstract Art
General Techniques & Materials
- What kind of paint is best for creating texture? Heavy body acrylics and oil paints are ideal because of their thick consistency. They hold their form well when applied in layers or with expressive strokes. You can also mix them with various mediums to enhance texture, giving you endless possibilities to explore.
- Can I use household items to create texture in my abstract art? Absolutely! This is one of the most exciting aspects of exploring texture. Items like sandpaper, sponges, cardboard, plastic wrap, bubble wrap, old toothbrushes, combs, and even crumpled paper can create unique and interesting textural effects. Just be mindful of how they might affect the longevity of your artwork, as discussed previously regarding archival quality.
- How do I clean brushes and tools after using thick paints and textural mediums? Promptness is key here! For water-based acrylics and mediums, clean immediately with warm water and soap, ensuring all material is removed from the bristles or blade base to prevent hardening. For oil paints, wipe off excess paint with a rag, then clean with an appropriate solvent (like mineral spirits or turpentine substitute), followed by soap and water. Investing in good brush cleaner can also extend the life of your tools, saving you money in the long run.
Care and Preservation of Textured Artwork
- How long do textured layers take to dry, and how can I prevent cracking? Drying times vary significantly based on paint type, thickness, and environmental factors like humidity and temperature. Very thick impasto or modeling paste layers can take days or even weeks to fully cure. To prevent cracking, apply thick layers in stages, allowing each layer to dry thoroughly. Also, avoid extremely rapid drying (e.g., direct heat) as this can cause the surface to crack. Using flexible mediums and gessoing your canvas properly also helps. Patience truly is a virtue here, and it will pay off with a durable piece!
- How should I frame or display highly textured artwork? Highly textured pieces often benefit from float frames or shadow box frames, which protect the surface without touching it. Avoid traditional frames with glass that would press against the texture. For display, choose a location where the artwork won't be easily bumped or rubbed, and gentle dusting with a soft, dry brush is usually sufficient for cleaning. Think about how light will hit the texture, too – angled lighting can really make it pop!
- How do I protect textured abstract art? Textured art can be more delicate. Once dry, applying a good quality varnish is crucial. A spray varnish can be easier to apply evenly on highly textured surfaces than a brush-on varnish. Consider different varnish finishes like matte, satin, or gloss – each subtly alters how light interacts with the texture, affecting the perceived depth and vibrancy. This protects the surface from dust, UV light, and minor abrasions. For general care, remember best practices for cleaning acrylic paintings – gentle dusting is key! A good varnish is like a shield for your hard work.
- How can I repair minor damage (e.g., chips, cracks) to textured artwork? Minor chips or cracks can often be carefully repaired by applying a small amount of matching paint or medium. For chips, build up layers gradually, allowing each to dry, and then carefully match the original texture with a small tool. For cracks, if superficial, a flexible varnish might fill them. For significant damage, especially with oils or older works, consulting a professional art restorer is always recommended to avoid further damage. Sometimes, a tiny 'imperfection' can even add character, but it's good to know your options!
- What are the long-term storage considerations for highly textured artwork? For highly textured pieces, avoid storing them face-down or against any flat surface that could compress or damage the relief. Ideally, store them upright, in a climate-controlled environment (stable temperature and humidity) to prevent warping or cracking due to environmental fluctuations. Use acid-free materials for wrapping or backing, and ensure there's no pressure on the textured surface. Custom-built crates with internal supports are best for long-term or shipping storage. Treating your art like precious cargo will ensure it lasts a lifetime.
Other Common Questions
- How do I photograph highly textured artwork effectively? Photographing textured art can be a challenge, as flat lighting can diminish the very quality you've worked so hard to create. Use diffuse, angled lighting (e.g., two lights at 45-degree angles to the canvas) to emphasize shadows and highlights, bringing the relief to life. Consider taking both full shots and detailed macro shots to showcase the intricate tactile qualities. Natural indirect light near a window can also work wonders. Avoid direct flash, which flattens everything. It's all about playing with light to reveal the hidden depths!
The Tactile Invitation
In the end, texture in abstract art isn't just about making something look cool (though it certainly does that!). It's about inviting a deeper engagement, a more primal connection to the artwork. It’s about building a bridge between the visual and the tactile, turning a flat surface into a living, breathing landscape of emotion and form. For visually impaired individuals, texture offers an even more profound and crucial avenue for engagement, allowing them to experience the artist's intention and emotional landscape through touch alone. For me, it truly was like unlocking a whole new language on my canvases, transforming my practice and enriching my connection to the work. It's a continuous exploration, a conversation with the material itself, constantly revealing new possibilities. So go on, get your hands (and your palette knife) dirty! Explore the wonderful world of texture. Your canvases – and your creative spirit – will thank you for it. Perhaps it will even lead you to visit my museum in 's-Hertogenbosch, where you can see some of these textural explorations up close!


