Mastering Cross-Hatching: The Ultimate Guide to Line Art, Tone, and Texture in Drawing
Unlock the definitive guide to cross-hatching! Explore foundational techniques, rich history, essential tools, and how this powerful method sculpts depth and texture in drawing. Elevate your line art with this comprehensive resource for artists.
Mastering Cross-Hatching: The Ultimate Guide to Line Art, Tone, and Texture in Drawing
There’s a quiet magic that unfolds when the pen meets paper, especially when you’re building an entire world, stroke by careful stroke, with nothing but intersecting lines. You might be thinking a blank page feels like an intimidating void, an empty canvas waiting for meaning. Honestly, it often feels that way to me too, a vast, white silence. But for me, the journey of cross-hatching transforms that emptiness. It’s more than just a technique; it’s a conversation between lines, a dance of shadows and light built from the simplest, most repetitive gestures. It's how a flat, lifeless drawing suddenly finds its breath, its volume, its very soul. What if I told you this ancient method isn't just about shading, but about sculpting with ink, making your drawings feel real, making them breathe?
The First Stroke: What Cross-Hatching Truly Is
At its simplest, cross-hatching is the art of drawing lines that intersect to create tonal values, textures, and the illusion of three-dimensionality on a flat surface. Imagine sculpting with ink, carving out form and shadow with nothing but repeated strokes. That’s the magic we’re talking about—a visual language that has defined art across centuries. It works by exploiting how our eyes perceive density: more lines packed together appear darker, while fewer lines create lighter areas. This interplay of dark and light, built from distinct marks, tricks the brain into seeing depth and form where only lines exist. For me, it bridges the gap between those initial, timid lines and the profound depth I strive for in my own abstract art for sale.
It matters because it's a foundational skill that informs our understanding of how light interacts with form. When you master cross-hatching, you're not just shading; you're learning the fundamentals of chiaroscuro (the use of strong contrasts between light and dark) and atmospheric perspective (creating the illusion of depth by modulating color, intensity, and distinctness of objects). This isn't just a technical exercise; it's a key to unlocking richer, more believable compositions, allowing you to tell a story with light and shadow. It's also an incredibly economical way to add dimension, often achieving more impactful results than simply blending, which can sometimes look muddy.
The Foundational Building Blocks: Form, Tone, and Texture
Every cross-hatching masterpiece, from a quick sketch to an intricate engraving, relies on these three pillars. I often think of them as the grammar of lines, without which our visual sentences would fall flat.
- Form: This is the game-changer, the structural integrity of your drawing. When your lines follow the curves and contours of an object, they visually wrap around it, making it appear round, angular, or whatever its inherent shape demands. It’s like mapping the topography of your drawing, giving it substance and weight. For example, on a simple cylinder, lines curving around its circumference immediately suggest its roundness, whereas straight horizontal or vertical lines would make it appear flat. Imagine a sharp-edged cube versus a perfectly smooth sphere; cross-hatching allows you to delineate these distinct forms, truly breathing life into two-dimensional space. This is where a drawing stops looking like lines on paper and starts feeling like a real, tangible object.
- Tone (Value): This is where cross-hatching truly shines, controlling the light and shadow. By varying the density and angle of your intersecting lines, you can create a full spectrum of light and shadow, from the lightest whispers of grey to the deepest, most velvety blacks. It's about how much white space you leave or cover, directly influencing the value of an area. More lines, closer together, mean a darker tone; fewer lines, spaced further apart, result in a lighter tone. Think of a grayscale from pure white to absolute black, with infinite shades of grey in between. This is a beautiful, granular control over luminosity, achieved through the discrete nature of each line, much like the subtle shifts in light I aim for in my abstract compositions. The psychological impact of tone is fascinating: dense, dark areas can evoke mystery, drama, or a sense of weight, while lighter, sparser areas might feel airy, open, or tranquil. To truly grasp this, I suggest creating a personal value scale using only cross-hatching—a simple yet profound exercise in visual control. This also helps understand lost and found edges, where varying tonal density defines where one form meets another or where a form merges with its shadow.
- Texture: Beyond just shading, cross-hatching allows you to mimic the tactile qualities of surfaces. Think about the rough bark of a tree, the soft folds of fabric, the sleek gleam of metal, the shimmering quality of water, the porous surface of a sponge, or the brittle texture of dried leaves – different patterns, pressures, and even the direction of lines can evoke all of these. It's a brilliant way to explore the physical sensation of a surface through purely visual means. For instance, short, jagged, irregular lines could create the prickle of coarse fabric, while long, smooth, undulating lines might evoke the coolness of polished stone. This is a principle I often explore in my exploring-texture-in-abstract-art:-techniques-and-materials.
My Toolkit for Line and Light: Essential Cross-Hatching Techniques
There's more to cross-hatching than just drawing an 'X'. The nuance is in the approach, in how those lines interact, and the story they tell. Let me share a few variations I've grown to appreciate—my preferred methods for unlocking the potential of cross-hatching, from the absolute basics to more intricate considerations for building depth and capturing form. Each technique builds on the last, adding new layers of complexity and expression.
1. Basic Hatching: The Unsung Hero
This is your absolute starting point: simply drawing parallel lines, close together, in a single direction. Think of it as laying down the first, lightest wash of a shadow, a gentle whisper of tone. The closer the lines, the darker the tone you create. It’s straightforward, meditative, and the essential foundation for everything else, a fundamental aspect of the the-art-of-mark-making:-expressive-lines-and-gestures-in-abstract-painting.
2. True Cross-Hatching: Building Layers of Depth
Here’s where the real magic begins, where lines start to have a deeper conversation. You take your basic hatching and layer another set of parallel lines directly over the first, but at a different angle. While a 45-degree angle is a classic, don't be afraid to experiment! The more layers you add, and the closer those lines are, the darker the tone and the deeper the shadow. It’s a bit like weaving, where each thread contributes to the overall fabric, adding both density and a tactile quality. This technique is core to understanding the-definitive-guide-to-understanding-value-in-art-light-shadow-and-form.
3. Contour Hatching: Sculpting with Your Pen
This is where drawings truly come alive. Instead of strictly straight lines, you follow the curves and forms of the object you're depicting. This technique is a game-changer for conveying three-dimensional form, literally making things pop by creating the illusion that your lines are wrapping around the object, emphasizing its roundness, sharpness, or undulations. It’s a wonderfully intuitive way to sculpt with your pen, making your lines actively describe the shape and volume. Without this, your forms will always look flat, no matter how much tone you apply.
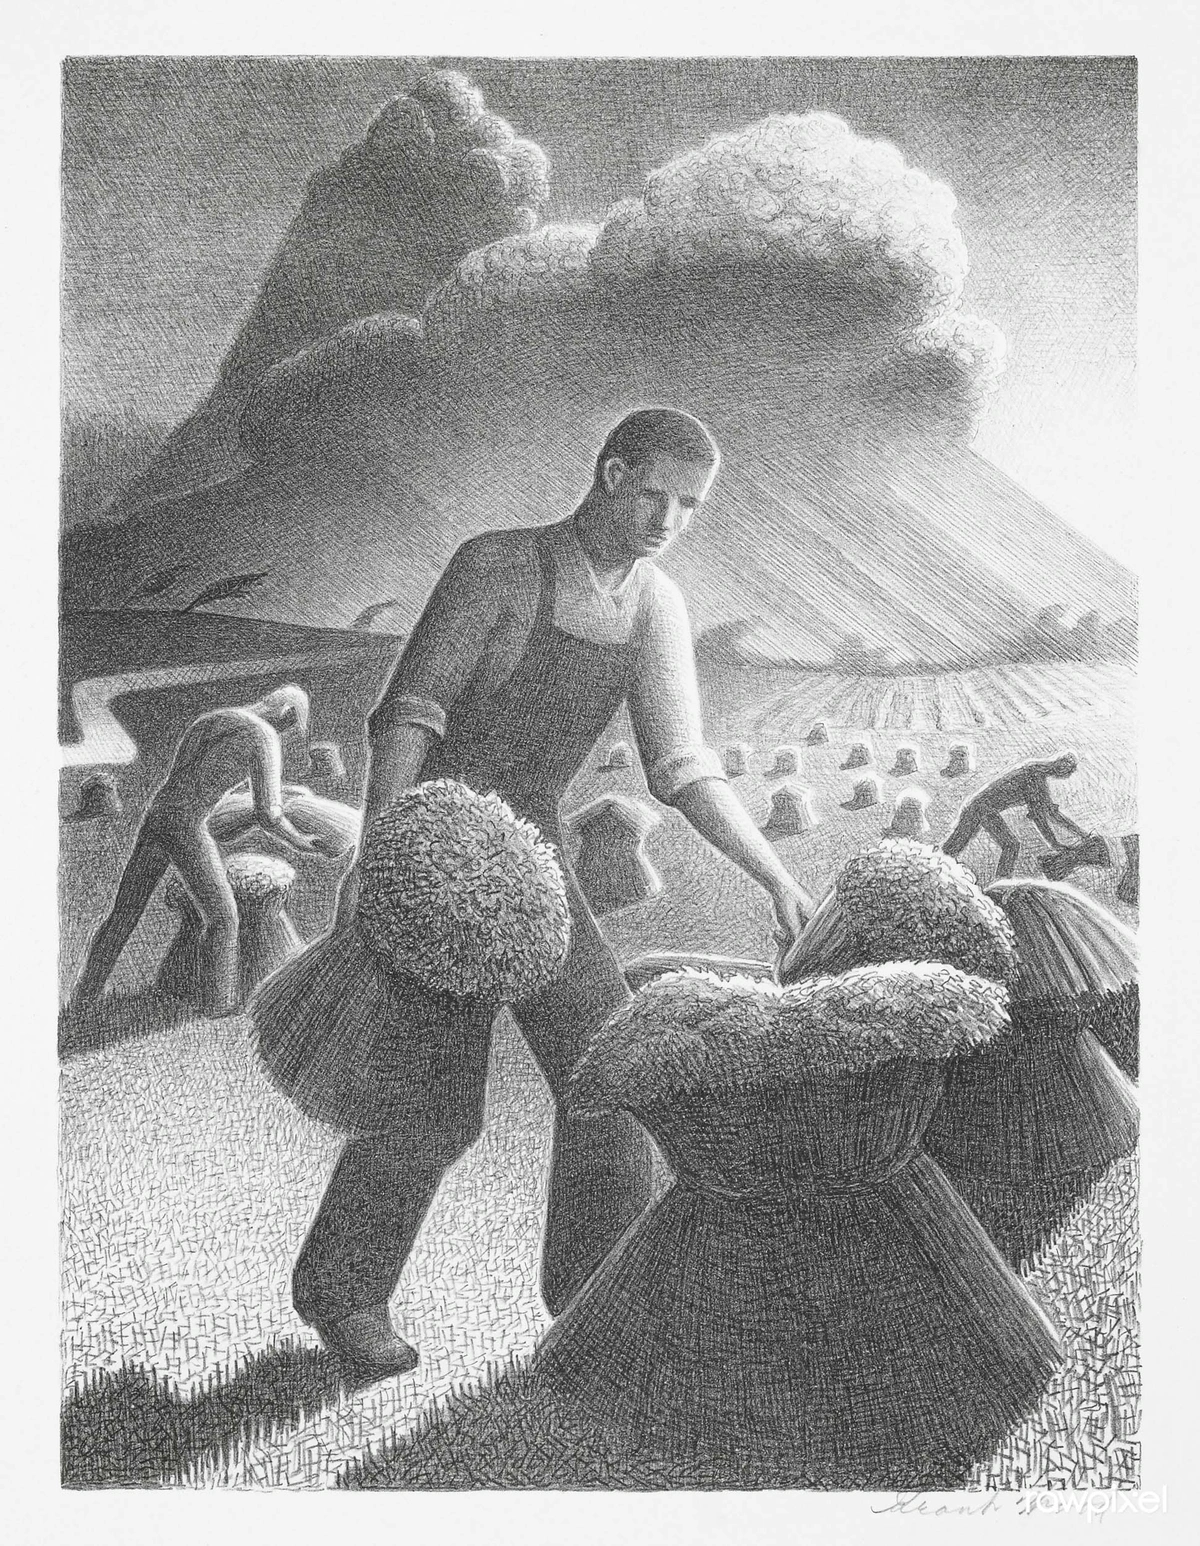
Notice how the strong, dynamic lines in this abstract piece, even if not explicitly curving around a realistic object, guide the viewer's eye and contribute to a powerful sense of form and depth, illustrating the principle of describing volume and movement through line direction. What a great example of how the abstract can teach us about the concrete.
4. Superimposed Hatching: Unleashing the Deepest Shadows
If true cross-hatching layers lines in two directions, superimposed hatching goes further, adding a third, fourth, or even more layers of lines at varying angles. This is how you achieve incredibly dense, rich, and deep tonal values – almost pure black – while still retaining the texture of the lines. It’s often used in areas of deepest shadow, to create extremely rough or complex textures, or to convey an intense, almost overwhelming sense of density. It’s like entering the deepest, most mysterious shadow realms of your drawing, where the light struggles to reach, where forms recede into an inky abyss.
5. Angled and Directional Hatching: The Subtle Language of Lines
More than just crossing, the angle at which you apply your lines can dramatically alter the effect. Acute angles (lines close to parallel, or nearly horizontal/vertical) can create very subtle, smooth transitions, especially useful for soft forms or delicate shading, almost like a whispered tone. Broader angles create more pronounced textures and more rapid transitions in tone, like a shouted declaration. A very shallow angle on a curved surface, for instance, can create a subtle ripple effect, implying sheen or texture. Understanding this allows for precise control over the visual impact of your lines, almost like directing a spotlight on your subject. The speed and pressure with which you draw each line also play a critical role; a faster, lighter stroke creates a different visual texture (airy, fleeting) than a slow, deliberate, heavy one (grounded, dense), much like how a soft pencil mark differs from a bold brush pen stroke.

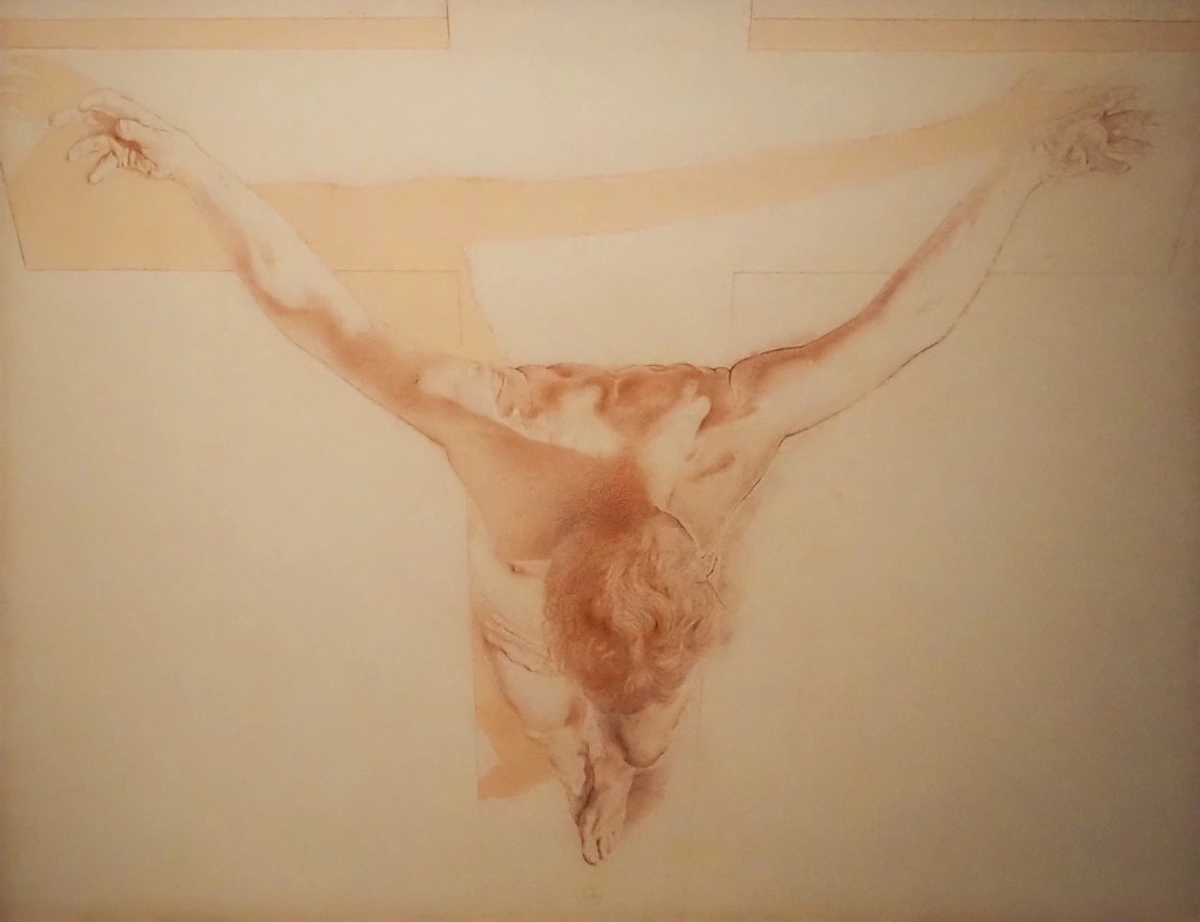
In this image, while not pure cross-hatching, observe how Dalí masterfully uses lines and angles within the drapery and figure to contribute to the dramatic foreshortening and sense of form, a true masterclass in linear dynamics that directly parallels cross-hatching principles for creating depth and volume. He makes the impossible believable, all with the power of line.
6. Beyond the Basics: Scalloped, Wavy, and Broken Hatching
For those ready to truly push the boundaries of texture, to explore how lines can truly mimic the world around us, consider these variations:
- Scalloped Hatching: Instead of straight lines, use slightly curved or 'scalloped' lines that mimic the edge of a shell or scale. This creates a very organic, almost reptilian texture, perfect for natural forms like rough rocks, layered skin, animal hides, or even overlapping roof tiles. While wavy lines suggest smooth undulation, scalloped lines have a more pronounced, repeating edge, like the rim of a shell or the scales of a fish.
- Wavy Hatching: Lines that gently undulate can create a sense of fluid movement, ideal for depicting water, flowing hair, or draped fabric. The rhythm of the waves adds a dynamic energy that straight lines can't achieve, bringing a sense of life and motion to your drawing, making static objects feel alive.
- Broken Hatching: Lines that are deliberately interrupted or dashed create a rough, granular, or ephemeral texture. This is excellent for indicating worn surfaces, misty effects, or areas where detail is dissolving into shadow. It also lends itself well to conveying a sense of anxiety or fragility, depending on the context, or depicting fragmented memories, static electricity, fine dust clouds, shattered glass, or decaying structures. It's the visual equivalent of a whisper fading into the background.
Cousins in Craft: Expanding Your Textural Vocabulary
While not strictly cross-hatching, I often think of stippling (creating tone and texture using countless tiny dots) and scumbling (using tiny, irregular circular scribbles for a soft, cloudy effect) as siblings in the family of texture-building techniques. They offer different visual textures but share that same core principle of building tone through repetition. Stippling creates a granular, almost pixelated effect, excellent for rough surfaces or subtle value changes, while scumbling produces a hazy, diffused softness, perfect for misty effects or abstract textures. Sometimes, I’ll even mix them in with my cross-hatching for a really dynamic effect, adding a layer of granular texture or a misty softness where needed. It’s all about creating a rich tapestry of visual information, a process I delve into when building the-unseen-layers-my-process-of-building-depth-and-narrative-in-abstract-mixed-media.
Observe the meticulous line work in Vija Celmins' waves; while not classic cross-hatching, it demonstrates the incredible power of repeated lines to build texture, tone, and the illusion of movement and depth—principles directly applicable to advanced hatching and a true testament to the versatility of line. The way she sculpts the water with subtle marks is just breathtaking. When combining techniques, the trick is knowing when to allow each method to shine and when to let them blend. For instance, a soft wash of ink could lay down a base tone, with delicate cross-hatching building up form and stippling adding fine texture. It’s an endless playground of possibilities, and honestly, the most fun often begins when you break the rules and see what happens.
The Story Behind the Strokes: A Brief History of Cross-Hatching
I remember countless hours spent staring at old master drawings, utterly captivated. How did they achieve such incredible richness and depth with what looked like mere scribbles? It was baffling. Then I tried it myself. And, oh, I failed, gloriously and often, at first. My early attempts often looked more like a tangled mess than a masterpiece – a veritable black hole of despair, if I'm being honest. But the beauty, I realized, isn't in instant perfection. It's in the layered effort, the patience, and the forgiving nature of the process – very much akin to learning to trust the the-power-of-imperfection-embracing-accidents-and-evolution-in-my-abstract-art.
This technique connects me to a lineage of artists who understood the profound power of a simple stroke, a legacy that traces back centuries. Its origins can be found even in ancient sculpture, where repetitive carving created implied lines and textures, much like the precise forms of the Terracotta Army.
In the Renaissance, artists like Leonardo da Vinci used subtle hatching and cross-hatching to model the delicate contours of faces and drapery in their preparatory sketches and anatomical studies, giving an astonishing sense of life and volume to his figures before paint ever touched canvas. Think of the intricate detail in their studies, where every line served to define form and light with almost scientific precision.
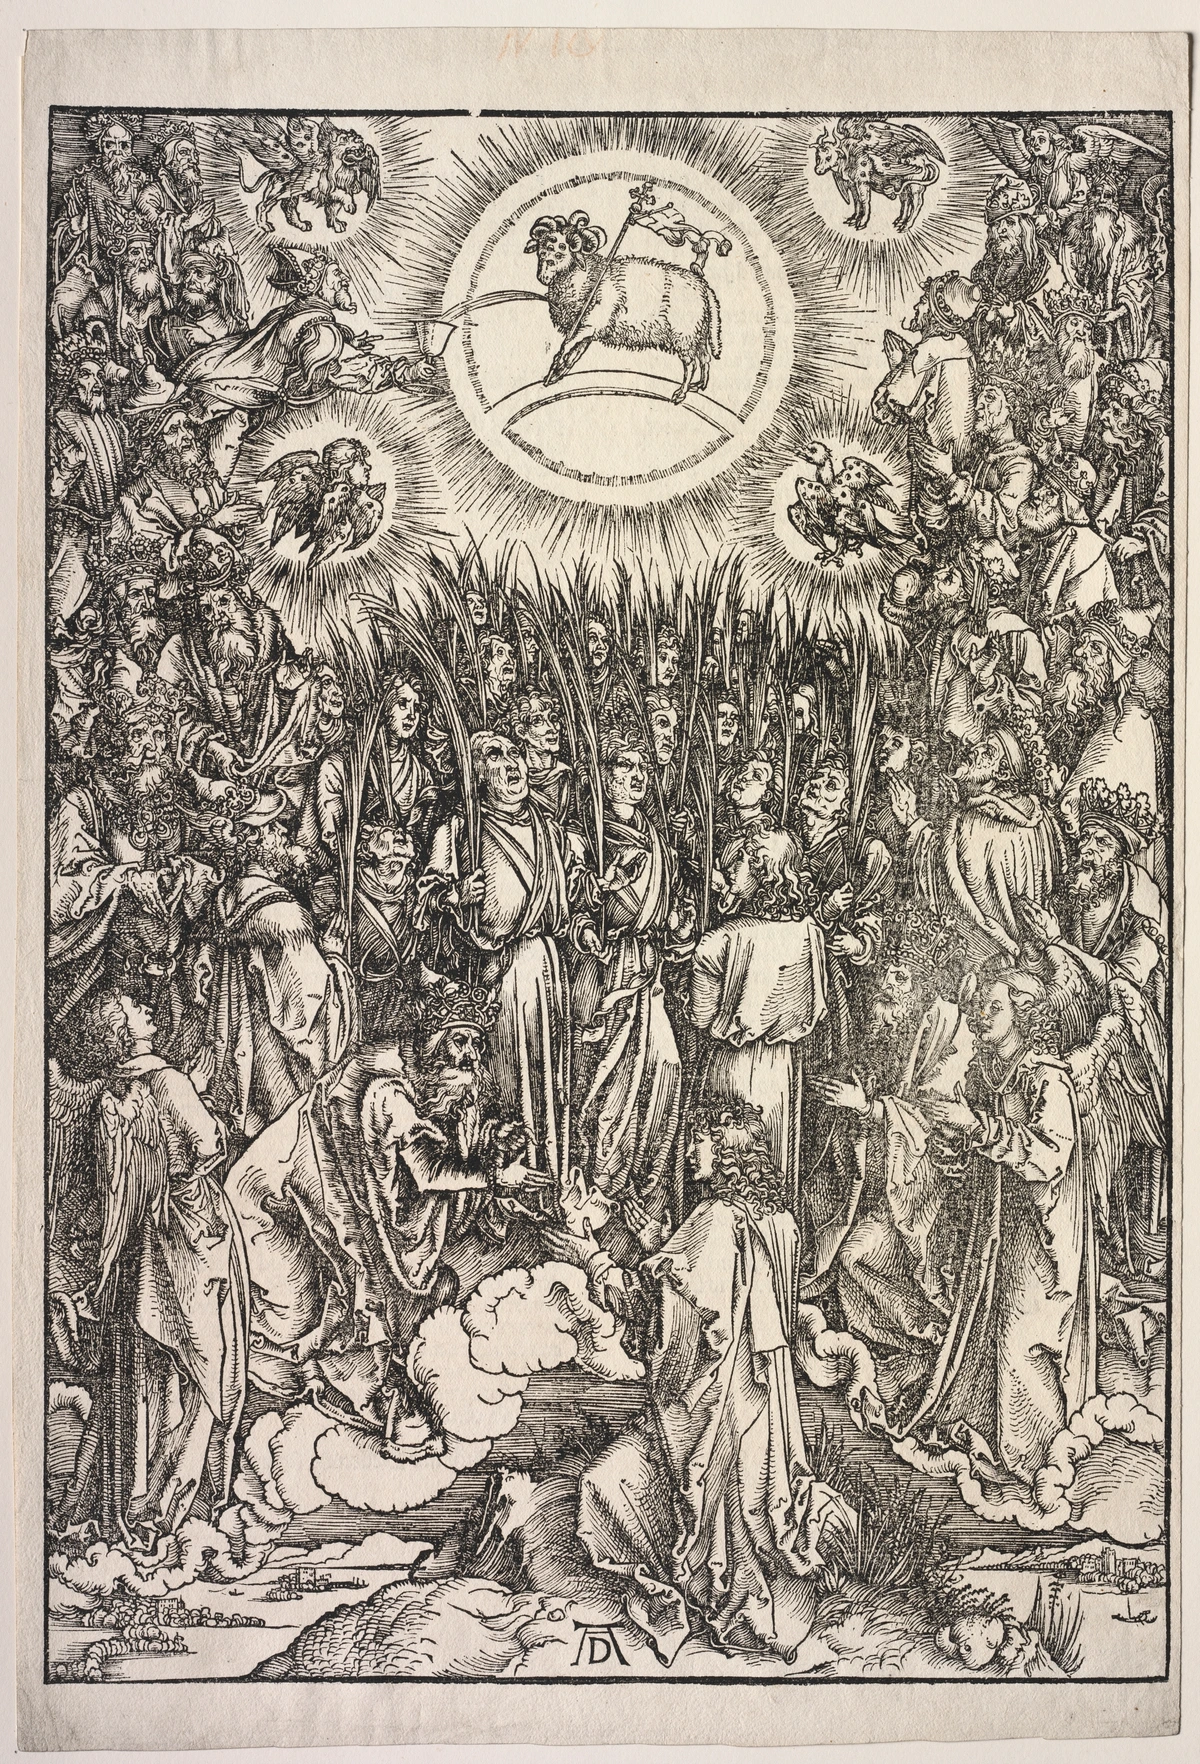
Then came masters like Albrecht Dürer, who in the Northern Renaissance elevated cross-hatching in his woodcuts and line engravings to astonishing levels of detail and drama. His works, intricate worlds built entirely from lines, demonstrated how cross-hatching could create intense contrasts and textures, defining the very spirit of an era. Iconic pieces like "Melencolia I" are breathtaking examples of his mastery, where every shadow and texture is meticulously rendered through a symphony of intersecting lines. Later, artists like Rembrandt would masterfully blend hatching with washes in his etchings during the Baroque period, creating evocative, moody shadows that captured profound human emotion, demonstrating the enduring versatility of the technique. His ability to conjure atmosphere with such simple marks is a constant source of inspiration.
The technique continued its evolution through subsequent centuries, prevalent in Neoclassical and Romantic preparatory drawings, offering artists a quick yet effective way to map out light and shadow. It's a reminder that even the most complex visual ideas often start with the most basic building blocks, much like the vibrant layers I strive for in my own abstract compositions. This historical mastery provides a powerful foundation for contemporary artists, informing the precise linework in technical illustrations, the dramatic shading in architectural renderings (like the Centre Pompidou's intricate structure), and even the stylized textures in graphic novels today. It's truly the-definitive-guide-to-understanding-line-in-abstract-art-from-gestural-marks-to-geometric-forms.

Your Journey Begins: Practical Tips and Tools
My best advice? Just draw. Seriously. Grab the cheapest pen and paper you can find. Don't aim for a gallery masterpiece initially. Aim for understanding. Try drawing a simple sphere and making it look round just using these techniques. Focus on how the lines define the form, how the density shifts with the light. It's a fantastic exercise, almost meditative in its repetition. And remember, the goal isn't always photographic realism; it's about understanding how light falls and how lines can mimic that, allowing you to tell your unique visual story.
Common Pitfalls and How to Overcome Them
We've all been there – a cross-hatching attempt that looks more like a tangled bird's nest than a nuanced shadow. Here are a few common challenges and my go-to solutions:
- Overworking an Area (The Black Hole of Despair): It's easy to keep adding lines, trying to make it 'perfect,' only to end up with a muddy, impenetrable black. Solution: Work in layers, building up tone gradually. Step back frequently to assess the overall value. Once you go too dark, it’s hard to lighten without erasing, which can damage the paper. Remember that control comes from deliberate layering, not endless additions. My early attempts often resembled a murky abyss, so trust me on this one.
- Inconsistent Line Weight: Lines that are too thick in one area and too thin in another can make your drawing look patchy and unprofessional. Solution: Practice maintaining consistent pressure. If using a pen, understand its sweet spot for ink flow. For pencil, try rotating it to keep a sharp edge or use different hardnesses. A consistent line is the bedrock of clean cross-hatching, crucial for a professional finish.
- Difficulty Judging Tone: Achieving smooth transitions from light to dark can be tricky. Solution: Create a value scale first, using only cross-hatching. Practice matching different areas of your reference to these pre-determined values. Remember, the white of the paper is your brightest highlight, and building tone is a gradual, iterative process. It's like mixing colors; you add little by little.
- Lines Don't Follow Form (The Flatness Problem): If your lines are always straight or only at 45 degrees, your object will likely look flat and unconvincing. Solution: Embrace contour hatching. Constantly ask yourself, "If I were to run my finger along this surface, what path would it take?" Let your lines follow that imagined path. This is a crucial step in transforming a flat sketch into something with volumetric presence, literally sculpting with your lines.
- Achieving Clean, Organized Hatching (Avoiding the Tangled Mess): The key to clean cross-hatching isn't perfection, but control. Solution: Focus on keeping lines parallel within each layer, and only change the angle when starting a new layer. Overlapping too many random angles too soon often leads to muddiness. A light touch and deliberate strokes go a long way. Avoid scratching or scribbling; aim for intentional, guided lines that build structure.
- Achieving Deep Blacks without Mud: Sometimes, even with many layers, the black isn't deep enough, or it becomes muddled. Solution: Consider using a softer graphite pencil (e.g., 6B or 8B), a charcoal stick, or a brush pen for the darkest areas, as they can lay down denser tones more effectively. Ensure your previous layers are well-defined before adding the deepest shadows, allowing them to truly pop and providing a solid foundation.
- Depicting Foreshortening Effectively: Making objects recede or project convincingly can be tough. Solution: Combine contour hatching with variations in line density. For parts of an object that are closer to the viewer and thus appear larger due to foreshortening, use denser, more defined cross-hatching. For parts that recede, lighten the pressure, thin out the lines, and perhaps use a more open or broken hatching style. This visual hierarchy emphasizes depth and perspective, making your objects feel truly three-dimensional in space.
- Utilizing Negative Space: Don't forget the space around your subject. Solution: Hatching the negative space around an object can be incredibly effective. By building up tone in the background or surrounding environment, you can make the untouched, unhatched positive form stand out with stark clarity, creating a powerful sense of presence and depth without directly drawing the object's surface. It's a clever trick to make your subject pop!
Tools of the Trade: Beyond the Pen
While we often associate cross-hatching with ink pens, the technique is incredibly versatile across various mediums. Don't limit yourself to one thing; each tool offers a unique voice and personality.
- Pencil & Graphite: My go-to for softer transitions and exploratory work. It allows for easy blending and gentler approaches to building tone, offering a forgiving medium for beginners. Different lead hardnesses, from 9H (for the lightest, sharpest lines) to 9B (for the deepest, richest blacks), give you incredible control and range, allowing for a nuanced exploration of best-sketching-pencils-for-artists.
- Colored Pencils: Even with colored pencils, the principle of building tone through layered lines is clear, as seen in the textured coloring of this mandala. Layering different colors of hatching can create unique chromatic effects and subtle tonal shifts, adding dimension beyond simple value, almost like painting with lines.
- Charcoal: Excellent for bold, expressive lines and achieving deep, rich blacks quickly. The inherent smudginess of charcoal also allows for unique textural effects when combined with hatching, creating a dreamy, atmospheric quality that’s hard to achieve with ink. It's a fantastic medium for exploring understanding-and-using-charcoal-for-drawing.
This abstract piece beautifully showcases the expressive power of charcoal, where lines and washes combine to create dynamic textures and tones, echoing the spirit of layered hatching. Notice how the seemingly random marks build a coherent, emotional landscape. It really shows what's possible beyond just realism.
- Fine-liners & Technical Pens: Perfect for precision, crisp lines, and intricate detail, especially when working on smaller scales or aiming for a very controlled aesthetic. Different nib sizes (e.g., 0.05mm, 0.1mm, 0.3mm, 0.5mm) offer varying line thicknesses, which is crucial for building subtle shifts in tone with accuracy. They are the workhorses for detailed line art.
- Brush Pens: Offer a fluid, variable line quality, allowing for expressive strokes that can range from fine to broad. This adds a calligraphic element to your cross-hatching, bringing a unique energy to your work and allowing for dynamic, gestural marks and sweeping shadows. They can really bring a sense of spontaneous movement.
- Digital Tools: Modern digital art tools, like drawing tablets with pressure-sensitive styluses, allow artists to emulate cross-hatching effects with incredible precision. Specialized brushes can mimic the texture of pen, pencil, or charcoal, enabling dynamic line weight and density control that rivals traditional mediums, with the added benefit of an undo button (a personal favorite).
The Importance of Paper and Ink
Don't underestimate your surface! The tooth (texture) of your paper can dramatically impact your cross-hatching. Imagine the surface of a piece of fruit – some are smooth like an apple's skin, while others have a slight fuzz like a peach. That 'fuzz' is akin to tooth in paper. A smoother paper will yield crisp, clean lines, ideal for fine details and sharp contrasts. In contrast, a paper with more tooth will grab the pigment, resulting in a softer, more textured line quality, which can be fantastic for evoking rough surfaces or adding a subtle grain to your shading.
Similarly, the type of ink matters. India ink offers deep, permanent blacks, while fountain pen inks might have subtle color variations or lighter values, opening up possibilities for nuanced shading. Consider whether you need waterproof ink for layering without bleeding, or water-soluble ink for creating washes. Pigment-based inks offer better lightfastness than dye-based inks, affecting the longevity and vibrancy of your work. When layering different ink types, be mindful of their composition (e.g., water-based vs. alcohol-based) to ensure they interact harmoniously. Experiment with different combinations; you might discover a pairing that truly sings for your style and allows you to create unique effects, almost like a secret recipe.
Cross-Hatching in Contemporary Art: A Living Legacy
Now, you might be thinking cross-hatching is confined to dusty classical realism – somber portraits and meticulously rendered still lifes. But think again! The underlying principles – building texture, creating depth with simple, repeated marks, defining form – are absolutely thriving in contemporary art. Why? Because it offers both a deliberate nod to tradition and a pragmatic, expressive way to achieve unique visual effects that stand apart from purely digital art. Those geometric pieces with intersecting lines that create an illusion of depth or movement, common in abstract and graphic arts? That's the spirit of cross-hatching, just in a different, often more vibrant and experimental, attire.

This intricate abstract pattern, built from intersecting lines and colors, clearly embodies the core principles of cross-hatching in a modern context, creating depth and a sense of dynamic texture. It's a fantastic example of how simple lines, when layered and varied, can create complex visual narratives. Modern illustrators, graphic novelists (think the detailed worlds of Frank Miller or the intricate textures of Moebius), and even abstract painters frequently employ stylized hatching to convey mood, energy, or to build unique visual textures that defy traditional representation. Street artists sometimes use similar layering techniques for shadow and depth in their murals, bringing this ancient technique to urban canvases.
It's about understanding the universal language of lines and how they communicate form, no matter how wild, colorful, or conceptual the conversation gets. It's about seeing beyond the obvious and finding connections, much like tracing the journey of art through my own artist journey.
How do lines in hatching contribute to abstract art?
- Rhythm and Movement: The varying angles and spacing of cross-hatching create a visual rhythm. Acute angles can build a tense, energetic feel, while broader angles or wavy lines induce a calmer, more fluid sense of movement.
- Compositional Structure: Hatching can subtly guide the viewer's eye through an abstract piece, directing focus or creating pathways that lead through the composition. Dense areas anchor the eye, while sparse areas allow it to wander.
- Emotional Expression: Tight, dense, chaotic hatching can evoke tension, anxiety, or intensity. Conversely, looser, more open, or gently undulating hatching might suggest calm, airiness, or introspection. It's a surprisingly powerful way to imbue an artwork with feeling, even without recognizable forms.

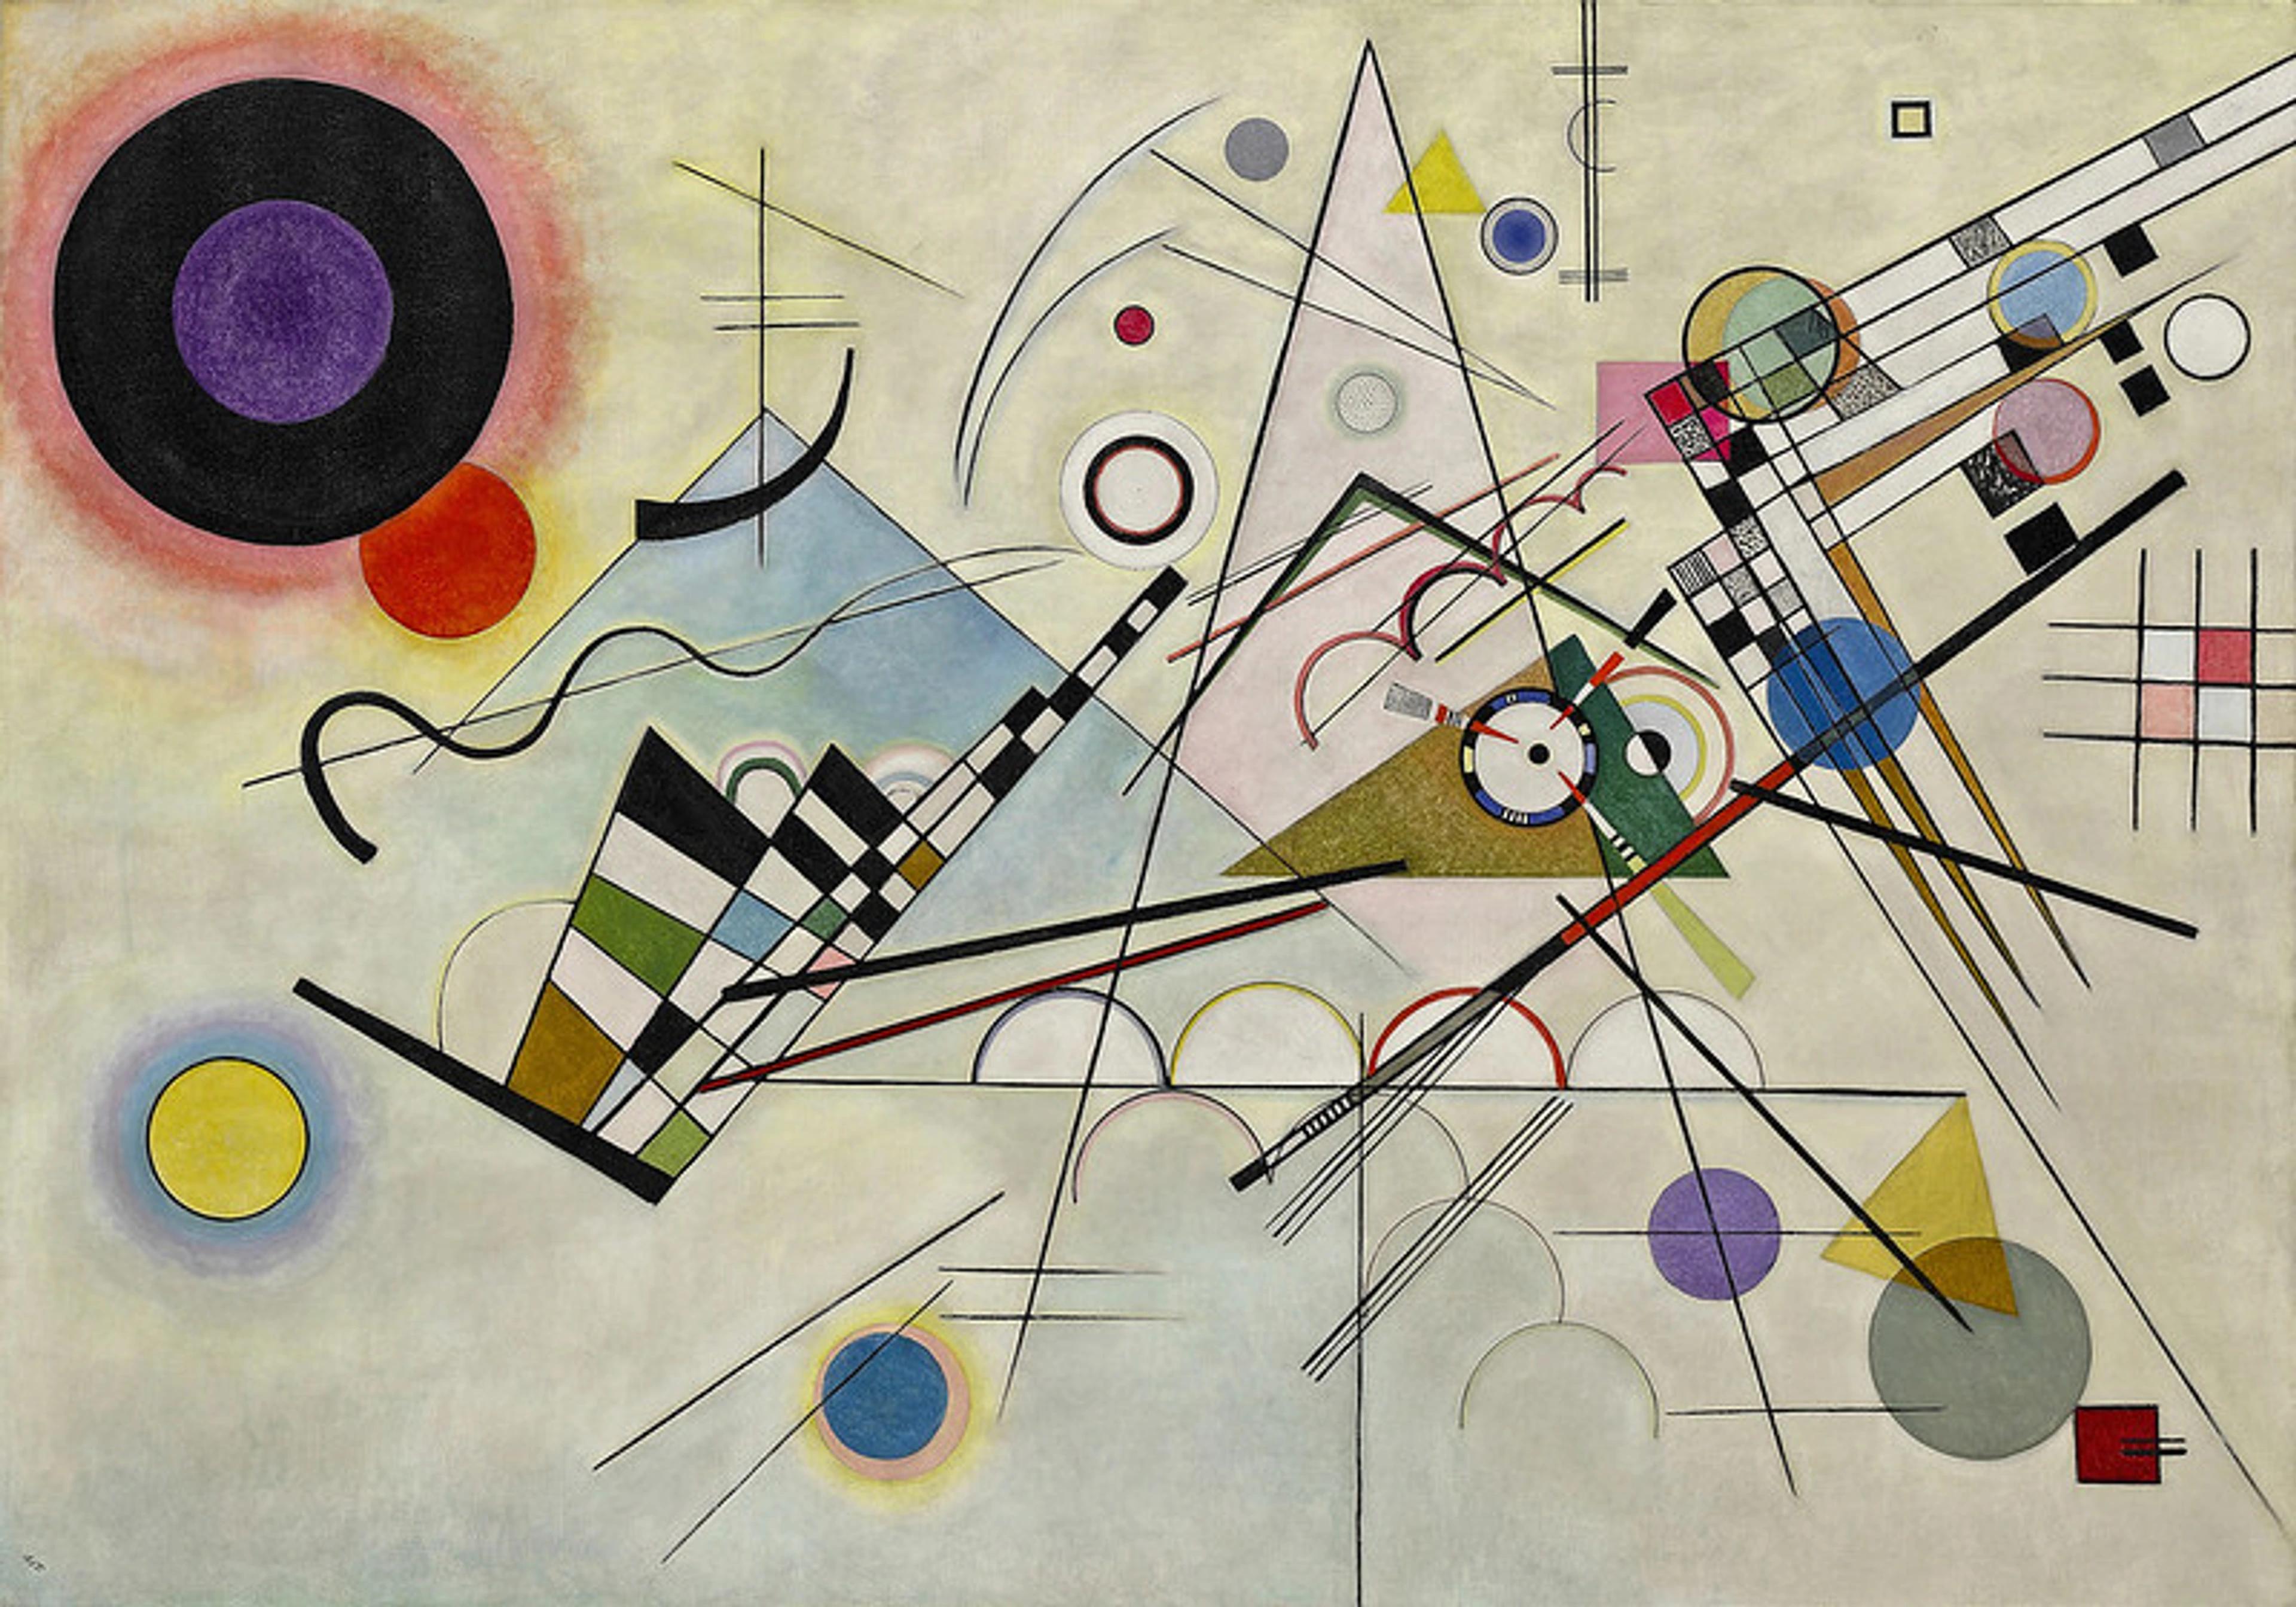
Kandinsky, a pioneer of abstract art, used lines and geometric forms to create dynamic compositions. While not literal cross-hatching, his work demonstrates how the interplay and layering of lines and shapes can build structure, energy, and perceived depth—principles directly reminiscent of sophisticated hatching. It's all about how marks interact. Beyond traditional mediums, digital artists also frequently emulate cross-hatching textures and effects, using brushes and algorithms to achieve similar tonal and textural qualities. While digital tools offer incredible flexibility and an "undo" button (a personal favorite), the unique tactile experience and subtle imperfections of traditional pen and paper often give a depth that's hard to replicate perfectly. The principles are truly timeless, adapting to new technologies and artistic movements, a testament to the enduring power of a simple, repeated mark. It's an exciting connection to see how this centuries-old technique finds new life and expression in contemporary pieces, including often in the expressive forms of ultimate-guide-to-abstract-expressionism.
Frequently Asked Questions About Cross-Hatching
Q: What's the fundamental difference between hatching and cross-hatching?
A: Hatching involves drawing parallel lines in a single direction to create tone. Think of it as laying down a single, transparent layer of shading. Cross-hatching builds upon this by layering a second (or more) set of parallel lines at a different angle over the first, creating darker tones, richer textures, and a stronger illusion of depth. It's literally 'crossing' your hatches, leading to a more complex and impactful visual effect. It's the difference between one instrument playing a melody and an entire orchestra building a symphony.
Q: Can I use any pen or pencil for cross-hatching?
A: Absolutely! While many artists prefer fine-liners or technical pens for their precision and consistent ink flow, a simple ballpoint pen, a brush pen, or even a basic graphite pencil can work wonders. The key is finding a tool you're comfortable with that gives you consistent lines and allows for varied pressure. Experiment to discover what works best for your style and the effect you're trying to achieve; the medium often dictates the expressive quality. Don't let a lack of fancy tools stop you; a cheap pen and paper are all you need to start.
Q: Is cross-hatching only for shading?
A: While it's exceptionally powerful for shading and creating tonal values, its versatility extends much further. It's brilliant for adding diverse textures, conveying the roughness of wood, the softness of fabric, the glint of metal, or the ripples of water. Different hatching patterns and pressures can convey a vast array of tactile qualities and visual effects beyond mere light and shadow, transforming a surface into something tangible. It's like having a whole vocabulary of touch, but expressed visually.
Q: How do I avoid making my cross-hatching look messy and uncontrolled?
A: Patience, practice, and a light touch are your best friends! Start with lighter pressure and build up density gradually in layers. Try to keep your lines relatively consistent in direction and spacing within each layer before adding a new layer at a different angle. It's a methodical process; don't rush. Remember that slight imperfections often add character and a human touch, but consistent layering and deliberate strokes are key to avoiding a tangled look. Think of it as building a house, brick by brick, rather than throwing all the materials at once.
Q: How can cross-hatching help define form and make objects look three-dimensional?
A: By using contour hatching, where your lines explicitly follow the curves and contours of the object. Instead of drawing lines straight across a round surface, you draw them around the surface. This technique creates the visual illusion that the lines are wrapping around the form, dramatically enhancing its perceived volume, making it appear more solid, round, or angular, and ultimately more realistic. It’s like sculpting with lines, truly bringing your two-dimensional drawing into a three-dimensional world.
Q: Does the light source affect my cross-hatching?
A: Absolutely, and profoundly! The direction of your imagined light source dictates where highlights, mid-tones, and shadows fall. You should use denser cross-hatching in areas that receive less light (shadows) and sparser, lighter hatching in areas that are more illuminated. Furthermore, the direction of your hatching lines can sometimes align with the flow of light, adding to the illusion of form and depth and reinforcing the narrative of illumination. It's how you tell the story of light and shadow on your page.
Q: Can I combine cross-hatching with other drawing techniques?
A: Yes, and I highly encourage it! Cross-hatching pairs beautifully with other methods. You can use it alongside stippling for granular textures, scumbling for soft, misty effects, or even traditional blending with pencil or charcoal for smoother transitions. Digital artists often combine hatching with gradients and other effects to create unique styles. The goal is to create rich, dynamic artworks, and mixing techniques is a fantastic way to achieve that expressive range. Don't be afraid to experiment; that's where the real discoveries happen!
Q: Can cross-hatching convey emotions or mood?
A: Definitely! The psychology of lines is fascinating. Tight, dense, angular cross-hatching can evoke feelings of tension, anxiety, or intensity. Looser, more open, or wavy hatching might suggest calm, airiness, or fluidity. Even the direction of your lines can contribute to mood; upward diagonals might feel energetic, while downward diagonals could feel heavy or somber. It's a subtle but powerful aspect of line art, capable of imbuing your work with emotional resonance, turning a simple drawing into a heartfelt statement.
Q: What's a good first exercise for a beginner?
A: I always suggest starting with simple geometric forms: a sphere, a cube, and a cylinder. Try to render them using only basic hatching, then cross-hatching, focusing on making them appear three-dimensional. Observe how the lines define the form and how the density of your marks shifts with the imaginary light source. It's a foundational exercise that rapidly builds understanding and control, and it's surprisingly satisfying. The sphere, especially, is a fantastic challenge for mastering contour hatching.
Q: How do I choose the right hatching angle?
A: There's no single "right" angle! Experimentation is key. Often, artists use a 45-degree angle as a starting point for the first layer, as it provides good coverage without being too dominant. Subsequent layers can be at opposing angles (e.g., -45 degrees) or even different angles (e.g., 90 degrees, 30 degrees). The goal is to create visual interest, build depth, and control the density without creating a muddy effect. Don't be afraid to let your angles interact organically with the form you're depicting and the light source you've established. Sometimes, a seemingly "wrong" angle creates the most interesting texture.
Q: How do I avoid "muddy" cross-hatching?
A: "Muddy" cross-hatching typically results from too many overlapping, random lines or applying too much pressure too soon. To avoid it:
- Work in layers: Build tone gradually, allowing each layer of lines to establish itself before adding another.
- Maintain parallel lines: Within each layer, keep your lines consistent in direction and spacing. This creates structure and clarity.
- Use appropriate angles: Instead of random scribbles, use deliberate, distinct angles for each layer. Varying angles too subtly can also lead to a muddled appearance.
- Control pressure: Lighter pressure allows for more subtle build-up and less muddiness. You can always add more pressure later.
- Step back often: Regularly assess your drawing from a distance to gauge the overall tonal values and prevent overworking. What looks good up close might be muddy from afar. It’s a bit like cooking; you taste as you go, you don’t just dump everything in at once.
Q: Can cross-hatching be used to represent negative space?
A: Absolutely! While we often focus on hatching to define objects themselves (positive space), using hatching to render the area around an object (negative space) can be incredibly effective. By building up tone in the background or surrounding environment, you can make the untouched, unhatched positive form stand out with stark clarity, creating a powerful sense of presence and depth without directly drawing the object's surface. It's a clever trick to make your subject pop!
Q: How can cross-hatching evoke atmospheric perspective?
A: Cross-hatching can subtly suggest atmospheric perspective by manipulating line density and clarity. For objects meant to appear further away, use lighter pressure, sparser lines, and potentially a more broken or ephemeral hatching style. As objects get closer, you would increase line density, use firmer pressure, and apply clearer, more defined marks. This gradual reduction in detail and intensity for distant elements mimics the way air scatters light, creating the illusion of depth and distance on a flat plane. It's a way to make your drawing recede into the horizon.
Q: How does cross-hatching help with foreshortening?
A: Cross-hatching is indispensable for depicting foreshortening. By carefully applying contour hatching that follows the exaggerated curves of a foreshortened object, you can enhance the illusion of parts receding dramatically into space or projecting outwards. Varying the density of your cross-hatching—making areas closer to the viewer denser and darker, and receding areas lighter and sparser—further emphasizes these shifts in perspective, making the three-dimensional illusion much more convincing.
Q: Is there a "mindset" or approach to cross-hatching that helps?
A: Absolutely. I've found that approaching cross-hatching with patience and a meditative mindset is key. It's about developing your "observational muscle" to truly see how light and shadow fall on a form, rather than just guessing. Each stroke is a deliberate act, building upon the last. Embrace the iterative process, the slight imperfections, and trust that the cumulative effect will reveal the depth you're seeking. It’s a journey of quiet accumulation, much like many aspects of life and art.
A Final Thought
So, there you have it. Cross-hatching isn't just a technical skill; it's a profound exercise in observation, patience, and finding immense depth in the simplest of tools. It’s about building a whole world, one line at a time, celebrating the power of repetition and the beauty of constructing something complex from elemental strokes. My journey has taught me to trust the process, to see the beauty in every layered mark, and to find unexpected stories in the interplay of light and shadow. And who knows where that journey will take you? Perhaps it will even inspire you to explore the dynamic forms and textures in my own art for sale in a whole new light. Ready to try it? Grab a pencil and draw a simple sphere, focusing on contour hatching to truly make it pop!
Technique | Primary Effect | Key Characteristic | Visual Effect / Key Aesthetic Outcome | Best For |
|---|---|---|---|---|
| Basic Hatching | Light to medium tone | Parallel lines in one direction | Clean, foundational shading, subtle value changes, foundational | Initial shading, flat surfaces, subtle shadows, establishing first layer of tone |
| True Cross-Hatching | Medium to dark tone, subtle texture | Multiple layers of parallel lines at different angles | Dense, rich shading, strong form definition, woven texture, dynamic | Building depth, defining form, general shading, creating visual weight and solidity |
| Contour Hatching | Defines form, volumetric illusion | Lines follow object's curves | Sculptural, dimensional effect, guiding the eye around the form, organic | Making objects appear round, sculptural effects, emphasizing three-dimensionality, conveying surface flow |
| Superimposed Hatching | Deepest tones, rich texture, intense contrast | Many layers of lines at various angles | Velvety, intense blacks, complex, almost chaotic texture, dramatic | Deepest shadows, complex textures, areas requiring maximum visual density and impact |
| Scalloped Hatching | Organic texture, subtle movement | Curved, scale-like lines | Scaly, layered, natural, fluid organic surfaces, reptilian | Natural forms, skin, rocks, overlapping textures, evoking organic growth or surface irregularity |
| Wavy Hatching | Fluid movement, dynamic energy | Gently undulating lines | Rhythmic, flowing, energetic, soft movement, dynamic | Water, hair, flowing fabric, creating a sense of rhythm and motion |
| Broken Hatching | Rough, granular, or ethereal texture | Deliberately interrupted or dashed lines | Textured, aged, dissolving, anxious, fragile, fragmented, expressive | Worn surfaces, misty effects, dissolving details, conveying anxiety or fragility, fragmented imagery |
| Stippling | Granular texture, varied tone | Dots (closer for darker tone) | Speckled, fine-grained, soft transitions, pixelated look, subtle | Rough surfaces, speckled effects, soft transitions, pointillistic effects, subtle value changes |
| Scumbling | Soft, hazy texture, diffused tone | Tiny, irregular circular scribbles | Diffused, cloudy, misty, atmospheric, textural softness, ephemeral | Misty effects, subtle shifts in light, abstract textures, creating atmospheric depth or softness |