Dry Brush Acrylic Painting: Master Texture & Depth in Abstract Art
Unlock stunning textures with dry brush acrylic painting! My guide covers essential materials, step-by-step techniques, advanced effects, and common pitfalls for creating captivating abstract art.
My Secret for Stunning Texture: Dry Brush Acrylic Painting
There's just something about texture, isn't there? That irresistible feeling of grit, the subtle raised lines, the way light dances over an uneven surface… For years, I chased it in my abstract acrylics, trying every medium imaginable. I remember thick impasto that felt heavy, and glazes that turned out too muddy. Then came the 'aha!' moment: often, the simplest techniques yield the most profound results. For me, that game-changing secret weapon has been the dry brush technique in acrylic painting. It sounds deceptively simple – and it is – yet it can transform a flat canvas into a symphony of depth and visual interest. It's become my go-to for adding that crucial tactile quality that makes a piece truly sing, giving it a sense of history, as if time itself has sculpted the surface. In this guide, I'll walk you through my step-by-step process for achieving these compelling textures, and trust me, it's simpler than you think!
What is Dry Brushing, Anyway? (And Why I Love It)
So, what is dry brushing? At its core, it's pretty much what it sounds like: applying paint with a brush that has very little moisture or paint on it. Instead of smooth, flowing strokes, you get a broken, fragmented application of color that highlights the texture of your surface or the layers beneath. It's not a solid line, but a series of tiny dots and dashes that skip over the surface, revealing glimpses of what's beneath. It's like a whisper of color, not a shout, allowing for a shimmering, vibrating, or ethereal visual effect rather than a flat block. This intentional disruption of color is what truly sets dry brushing apart from more uniform methods. Unlike stippling, which aims for a consistent pattern of dots, or cross-hatching, which builds dense, intersecting lines for tone, dry brushing celebrates the accidental 'skip' of the bristles. It’s that irregular, organic texture that gives it its unique charm.
While I've found it to be my personal secret weapon for contemporary abstract work, the principles behind dry brushing are as old as art itself. It's funny, sometimes the 'newest' discoveries are just old friends rediscovered. Artists across centuries have intuitively used similar concepts. Think of the Renaissance masters like Titian, who wasn't just blending colors but subtly building up luminosity with broken applications in his glazes, allowing light to truly seem to emanate from the canvas, almost as if illuminating from within. Or the Impressionists, like Monet, whose masterful hints of light and shadow—achieved through distinct, unmixed brushstrokes—allowed our eyes to do the mixing from a distance, creating a vibrancy that smooth blends often missed. They weren't exactly 'dry brushing' as we define it today, but they certainly understood the power of subtle layering and fragmented color to create soft transitions, depth, and hints of light. Even later, movements like Pointillism, with their meticulous application of individual dots, took the idea of fragmented color to a scientific extreme, all aiming to create optical vibrancy. This timeless quality is what makes it so compelling, proving that sometimes, older techniques truly are invaluable.
I know what you might be thinking, 'Isn't that just… being stingy with paint?' And in a way, yes! I've certainly had my moments where I thought, "This can't be right, I'm barely using any!" But it's a strategic scarcity of paint, a deliberate restraint. This technique isn't about filling in areas perfectly; it's about suggestion, about creating a ghostly layer that interacts with what's already there. For abstract art, this is truly a treasure. It allows for incredible subtlety, atmospheric effects, and a sense of history in the layers. It’s like discovering an old wall where countless posters have been peeled off, leaving tantalizing fragments of stories behind, or perhaps like the wind-worn patina on ancient stones, revealing layers of time. That's the vibe I often chase.
While dry brushing is a specific technique, mastering fundamental brush control is key to unlocking its full potential. Things like how you hold the brush, the angle of attack, and the pressure you apply are crucial. If you're looking to build that foundation, you might want to check out my guide on basic brushstrokes for acrylic painting.
Gathering Your Allies: Materials for Dry Brushing
To unlock the transformative power of dry brushing, let's gather the right tools. The beauty is, you probably have most of it already! On my artist's workbench, the tools for dry brushing are always within reach. It's a nice feeling when your most impactful tools are also the simplest ones, isn't it?

- Brushes: This is key. You'll want brushes with stiffer bristles. Think old, worn-out brushes you might usually discard – those are often perfect! Hog bristle brushes, in flat or filbert shapes, are my personal favorites. Their magic lies in their coarse, naturally split ends – a phenomenon artists affectionately call 'flagging.' These flagged ends aren't just for show; they dramatically increase the brush's surface area, allowing it to pick up and then unevenly release just a whisper of paint onto your surface. This means they catch onto the tooth (that slight roughness or texture) of your canvas far more effectively, leaving behind that wonderfully broken, granular texture we're chasing. They hold less water and give that lovely 'drag' across the surface. Avoid soft, synthetic brushes for this technique; they tend to apply paint too smoothly. For more on selecting the right tools, you can explore my guide on the best acrylic paint brushes for artists.
- Pro Tip: I actually have a dedicated 'dry brush' tin where I keep my favorite stiff-bristled, slightly frayed brushes. They're not pretty, and some have seen better days, but they get the job done beautifully. This isn't just about extending the life of tools; it's a small act of sustainability, reducing waste and embracing a bit of eco-friendly art in my practice.
- Paint: Acrylics, of course! Any fluid to heavy body acrylic will work. I sometimes even use my slightly dried-out tube paints – another great reason not to discard them too quickly! Now, a little tip: the pigment load in your paints can subtly influence the effect. High-quality artist-grade acrylics often have a higher pigment concentration, which means even a small, dry amount can deliver a vibrant, rich color. They also tend to have a higher quality binder that allows for a more consistent 'drag' and less 'slippery' feel. Student-grade paints, while perfectly usable, might require a bit more careful application to build intensity due to their lower pigment load and different binder compositions. The viscosity of your paint also significantly impacts the outcome: heavier body paints are naturally more forgiving and easier to control, producing bolder, more defined textures by catching more readily on surface peaks. If you're working with fluid acrylics, don't worry! Just let a small amount dry slightly on your palette for a few minutes before loading your brush; this makes them a bit thicker and more concentrated, preventing them from spreading too smoothly or sinking into the canvas like a wash.
- Surface: Texture loves texture. A smooth canvas will give a different effect than one with a slight tooth or a previously applied textured ground. Experiment! I often start with a canvas already rich in texture because dry brushing on top of that is just sublime. Specific mediums like pumice gel, modeling paste, gesso with added sand, or marble dust gel can create incredible foundational textures that dry brushing will brilliantly highlight. The bristles literally dance over the raised areas, catching only the peaks, making them pop with color. This also works wonderfully over areas of impasto painting.

- Palette: Something flat is ideal, so you can really work that excess paint off your brush. I prefer an old ceramic tile or a tear-off palette. It really lets you scrub the brush against it to get it just right.
- Paper Towels/Rag: Absolutely essential for getting your brush 'dry' enough. Seriously, you'll go through a few. It's part of the ritual!
With our allies gathered, let's move on to the actual dance of the bristles and bring these textures to life!
The Dance of the Bristles: How I Dry Brush
Now that we've explored the essence of dry brushing and its rich history, and equipped ourselves with the tools, let's dive into the 'how.' The dry brush technique isn't just about applying paint; it's a mindful dance, a rhythm you learn as you go. Mastering this flow is where the true magic happens. Ready to get our hands (and brushes) a little messy?
- Load Lightly: Dip your brush just slightly into your chosen acrylic paint. And I mean slightly. You don't want a big blob, just a whisper of color on the bristles. Think of it like barely touching the surface of water with a fingertip.
- Work it Off (This is the Magic Step!): This is the most crucial step, the one that makes all the difference. Vigorously wipe and drag your brush back and forth on your palette or a paper towel. Imagine you're trying to get every last bit of toothpaste out of a tube – that's the kind of vigorous wiping you're aiming for, but with paint. You're trying to remove almost all of the paint, leaving just a hint of pigment deep within the bristles. When you drag your brush across the paper towel, it should make a soft, dry whisper, not a wet swish. You'll see a very faint, broken line, not a solid mark. If it's still leaving a solid line, wipe more. When you think it's dry enough, wipe it one more time for good measure. I've found that often, what feels like 'too dry' is actually just right. (Seriously, I've looked like I'm wrestling a small, paint-laden animal at my workbench during this step, and that's usually when the best results happen!).

- Apply with Intent: Now, hold your brush almost parallel to your painting surface. Use light, quick motions: scrubbing, flicking, or dragging. The angle matters, immensely! A flatter angle will catch more of the raised textures, while a slightly more upright angle will give a bit more coverage but still retain that beautiful broken effect. Don't press hard! Seriously, let the bristles do the work, gently skipping over the surface. Imagine your brush is dancing lightly across the canvas, leaving fragmented trails of color. Moreover, consider the direction of your strokes: horizontal movements can create a sense of calm or horizon, vertical strokes can suggest height or movement upwards, and diagonal strokes can introduce dynamism and tension. Tiny shifts in your wrist action and finger grip can create significant differences in the final texture and density of your marks. It's all part of the visual language! The type of surface texture also plays a role: on a very rough surface, even a light drag will yield significant broken texture, whereas on a smoother gessoed board, you might need a slightly more aggressive scrub to create noticeable texture.
- Scrubbing creates dense, textured patches, perfect for evoking rough terrain or the weathered surface of an old stone wall.
- Flicking offers quick bursts of broken color, excellent for scattered highlights, a flurry of leaves, or ethereal wisps.
- Dragging creates longer, broken lines, ideal for mimicking scratches, wind-worn marks, or subtle linear elements like faint wood grain.
- Layer Up (or Down): One of the things I adore about dry brushing is its incredible layering potential. You can build up color gradually, creating incredible depth and translucency. This is where the language of layers truly gets its unique voice through fragmented application. Or, apply it over a darker layer to bring out highlights, almost like magic. Each new, dry-brushed layer adds another whisper, another story to the overall narrative of your painting. You might even find optical color mixing happening, a beautiful phenomenon where your eye perceives two layered colors as a new, blended hue when viewed from a distance, without them ever physically mixing on the canvas. For example, dry-brushed yellow over blue can create a shimmering green effect, a vibrant illusion that adds another dimension. Understanding color theory in art can really amplify these subtle, almost magical effects, allowing you to intentionally craft these visual surprises.
Key Takeaways: Dry Brushing Essentials
Step | Action | Goal |
|---|---|---|
| 1. Load Lightly | Barely touch bristles to paint. | Minimal paint, no blobs. |
| 2. Work it Off | Vigorously wipe brush on palette/towel. | Remove excess paint, leave a faint whisper. |
| 3. Apply with Intent | Hold brush parallel, use light motions. | Fragmented marks, highlight texture, control density. |
| 4. Layer Up | Build color gradually over dry layers. | Create depth, translucency, and optical color mixing. |
Beyond the Basics: Achieving Different Effects & Color Magic
Once you've got the basic motion down, the real fun begins. How do you make dry brushing truly your own? You can manipulate dry brushing to get a whole host of textures and moods. It's not just one effect; it's a spectrum, and for me, it's how my abstract pieces speak their unique visual language.
Whispers of Color (Atmospheric Haze)
For a very soft, atmospheric haze, I use an almost completely dry brush with very little pressure. This is fantastic for adding a subtle glow, a distant, hazy quality, or creating a sense of veiled mystery in my abstract landscapes or dreamscapes. Think of sunlight filtering through morning mist, or a faint, forgotten memory. It’s perfect for creating soft backgrounds that allow other elements to float forward, almost like distant mountains. On larger canvases, these whispers can unify broad areas, creating a cohesive, ethereal atmosphere.
Rough, Gritty Texture (Powerful Tactility)
To achieve a powerful, tactile feel – something like the raw, weathered surface of concrete, or maybe the intricate cracks in dried earth, or even ancient bark – I reach for a stiffer brush. I use a bit more paint, but still dry-brushed, and apply it with a slightly more aggressive scrubbing motion. This really catches onto any existing texture on your canvas, allowing the dry brush to hit only the peaks, making them pop and glow. It’s where this technique truly excels, defining shapes and adding a sculptural quality without needing sharp outlines. For big, bold textures on a grand scale, I'll even use a large, stiff house painting brush, working across the canvas with broad, vigorous movements.
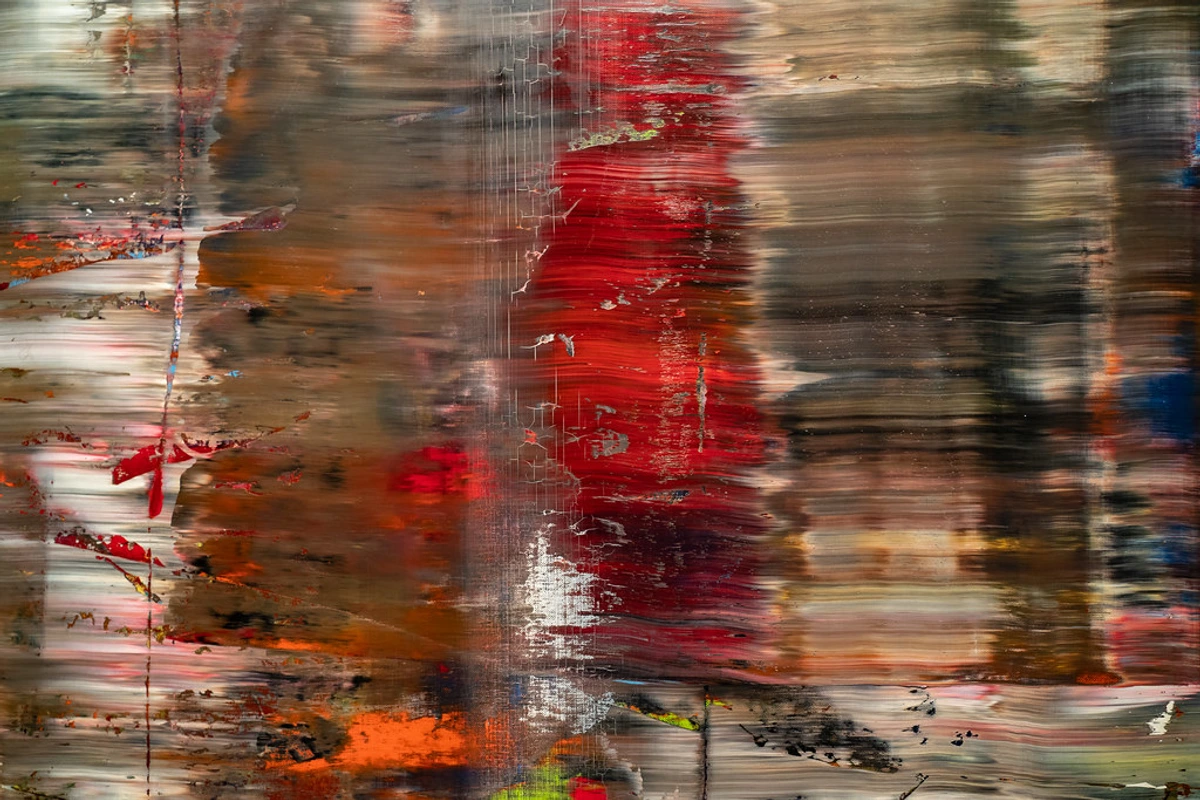
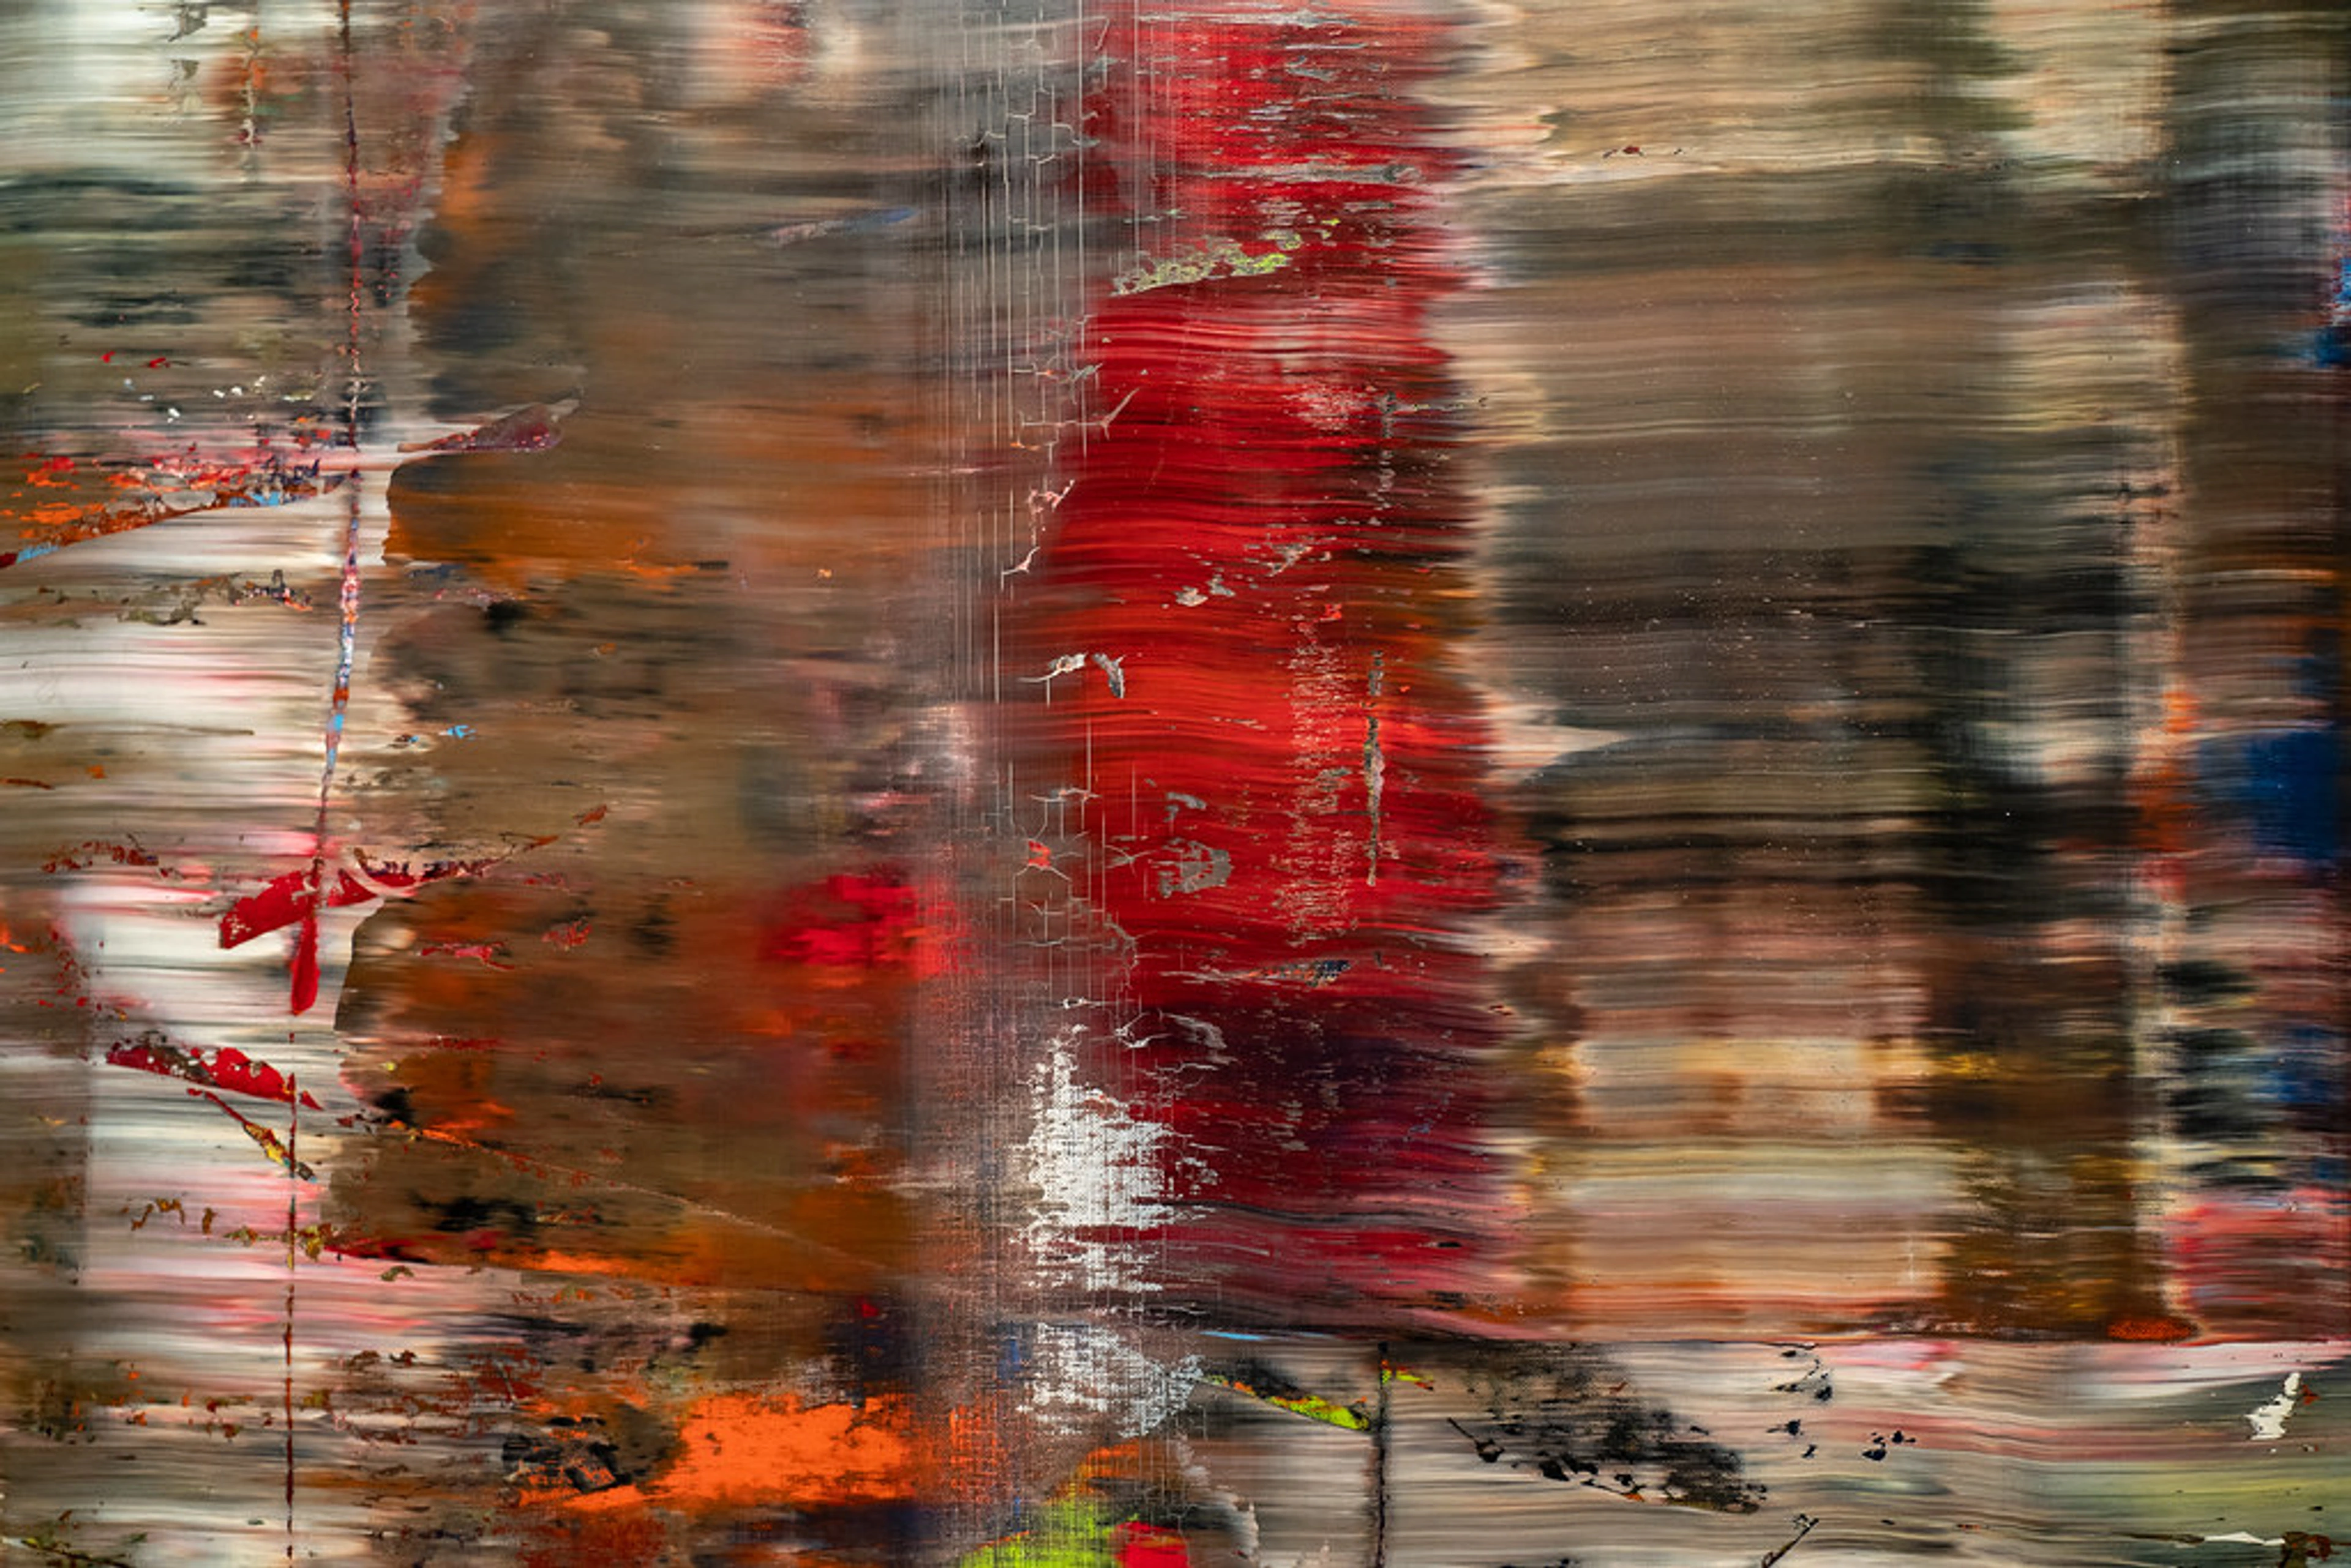
This piece by Gerhard Richter, while known for his unique scraping techniques, offers a powerful example of the broken, layered color and revealed texture that dry brushing can also achieve. It's a fantastic illustration of how varied application creates dynamic, resonant surfaces.
Fine Lines and Scratches (Intricate Detail)
When I want delicate, broken lines that mimic scratches, fine threads, or emerging cracks, I turn my brush on its side, use the very tip of a stiff, flat brush, or even a well-worn script liner, rigger, or fan brush with minimal paint. These specific brushes are fantastic because their long, slender (liners, riggers) or fanned-out (fan) bristles are perfect for holding just a tiny amount of pigment, allowing for a controlled, broken release. For these delicate marks, I find a slightly thicker, paste-like consistency – either heavy body acrylic used directly or fluid acrylic that has dried on the palette for a good few minutes – works best, ensuring crisp skips rather than a watery spread. They're ideal for creating those intricate, sparse marks without heavy application. I often use them for unexpected visual 'noise' or subtle calligraphic elements, giving a piece that wonderfully busy, fragmented texture that keeps the eye moving and engaged. This is particularly effective on a smooth, dark underpainting, where those fine, broken lines truly stand out.
Highlighting Form (Dimensional Pop)
If you have a textured surface (think impasto or gesso modeling paste), dry brushing a lighter color over the raised areas will make them pop, creating a strong sense of dimension. The bristles catch only the peaks, making them glow. This is a brilliant way to define shapes and add sculptural quality. For instance, in my own abstract work, I often use a very dry brush with a light ochre or muted white over a dark, textured base to mimic the look of weathered concrete or decaying plaster, giving the piece an urban, layered history.
The Magic of Color Interaction (Subtle Gradients & Optical Blending)
Dry brushing can also play tricks with color perception. When you layer a light, broken color over a darker, solid one, your eye optically mixes the hues, creating a new, vibrant shimmer that isn't present in either pigment alone. It's fantastic for creating subtle shifts in saturation or adding a sense of luminosity without using metallics. By subtly varying pressure and paint load, you can even achieve gentle, broken gradients, allowing colors to transition softly despite the fragmented application. I love seeing how a thin veil of dry-brushed color can unify elements that initially felt disconnected, like a common thread woven through different fabrics. It's a wonderful way to harmonize a composition that might otherwise feel jarring, especially across large areas of a painting.
But don't just take my word for it; the true joy of dry brushing lies in experimentation. Try combining these effects, pushing the boundaries, and seeing what unique 'voice' emerges from your own canvas!
My Personal Touch: Dry Brushing in Abstract Art
In my abstract art process, dry brushing isn't just a technique; it's practically woven into the very personality of my work. It's the quiet magic, the whisper, behind many of my favorite pieces. I cherish that moment when a fresh layer, after a light dry brush of muted gray, suddenly transforms into what feels like a faded, forgotten fresco – it truly breathes a narrative into the canvas. It allows me to build incredible depth without any heaviness, adding layers without ever making the painting feel 'muddy' or overworked. For me, it’s akin to draping transparent gauze over a vibrant scene, letting the underlying colors to shimmer through with a beautiful, subtle luminescence. Take 'Echoes of Time,' for instance: I used a very dry brush with diluted white paint, almost like a ghostly veil, to softly skim over a heavily textured, dark blue and gray ground. The dry-brushed white caught only the highest peaks, creating the impression of ancient, forgotten writing or a weather-beaten, peeling fresco, while allowing the dark undertones to recede. Or in 'City of Whispers' (a piece you can find in my gallery), I layered dry-brushed pale yellows and soft blues over a textured base of deep greens, aiming for the diffused light of a city at dawn, where structures begin to emerge from the morning mist. Sometimes, I even dry brush over a wet glaze or a thin layer of modeling paste, letting the bristles catch on the emerging texture, creating an unexpected, beautiful dance between smooth and rough, wet and dry. I once had a 'happy accident' where I was trying to cover an area with a solid color, grabbed the wrong (too-dry) brush, and ended up with a shimmering, ethereal layer that was far more interesting than my original plan! This technique has become an indispensable part of my creative journey from concept to canvas, offering a unique way to connect disparate elements and infuse each piece with its own compelling story. I really hope you feel inspired to experiment and uncover your own unique dry brush narratives.
It truly is a testament to the power of deliberate restraint in art. A whisper of paint, applied with intention, can speak volumes, telling a story that a solid, opaque block of color simply cannot. If you're curious to see how these techniques translate into finished pieces, feel free to explore my art for sale here. And if you ever find yourself near 's-Hertogenbosch, you're always welcome to visit my museum to see how these techniques manifest in larger works. You might just spot some dry brush magic in action!
Common Dry Brush Pitfalls (And How I Overcame Them)
Look, I've made all the mistakes, so you don't have to! My early attempts at dry brushing often looked more like a streaky mess than subtle texture. I distinctly remember one attempt where I thought I was being clever, trying to dry brush a vibrant orange over a dark blue, only for it to turn into a muddy brown stripe because my brush wasn't nearly dry enough. It's all part of the learning curve, and I'm happy to share my hard-won lessons, hopefully saving you a bit of frustration. I've definitely had moments where my 'dry' brush was more like a dripping hosepipe, creating a lovely puddle where texture should have been.
- Too much paint: This is, hands down, the most common one. Your 'dry' brush suddenly isn't so dry, and you get a solid streak. It's like trying to paint with a wet noodle – not the look we're going for! Solution? Wipe more. Then wipe again. You really can't over-wipe in the prep stage. If you think it's dry enough, wipe it one more time. Trust me on this.
- Too much pressure: Trying to force the paint on. This negates the 'broken' effect we're chasing. Lightness is key. Let the brush dance, not stomp. Imagine brushing dust off a delicate surface – that's the feather-light touch you want.
- Wrong brush: Using a soft brush that just glides. Soft brushes are lovely for smooth washes, but for dry brushing, stiff bristles are your friends here. They're the ones that will skip and grab the surface texture effectively.
- Too fluid paint: Using very fluid acrylics can make it harder to achieve a truly 'dry' brush effect, as they are designed to flow easily. Heavy body or even slightly dried-out paints are often more forgiving and give you more control over that broken texture. As a workaround, you can let fluid acrylics dry on your palette for a few minutes before loading your brush, making them tackier and more suitable. I usually wait until they're almost like a thick paste.
- Impatient layering: Trying to add too much too fast. Dry brushing builds up beautifully, but it takes patience. You really need to let previous layers dry completely. Skipping this step is a fast track to 'mud' instead of magic! For acrylics, this can mean waiting anywhere from a few minutes to half an hour, though it heavily depends on how thickly you've applied the paint, the local humidity, and ambient temperature. I always suggest a simple touch test: if the paint is no longer tacky to your fingertips and doesn't feel cool, it's usually ready. If you're painting over a particularly thick layer or in humid conditions, give it extra time – patience really is a virtue here.
- Ignoring the surface: Expecting the same effect on a super smooth canvas as on a textured one. The surface plays a huge role in how the dry brush effect manifests. Understand and leverage the texture beneath your brush; it's your silent partner in this technique.
- Neglecting brush cleaning: Dried acrylic paint, especially in stiff bristles, can be a real pain to remove. Pro Tip: As soon as you finish a dry brushing session (or even between different colors if you're quick), give your stiff brushes a good clean with soap and water, working the bristles to get all the pigment out. A dedicated brush cleaner can also help keep them supple and ready for your next textural adventure.
These insights, honestly, are just part of my creative journey from concept to canvas, the learning, the evolving. Don't be afraid to experiment, make 'mistakes,' and find what works for your hand. The beauty of art is that there's no single 'right' way.

Frequently Asked Questions About Dry Brush Acrylic Painting
- Q: Can I use water to make my brush 'dry' for dry brushing?
- A: In short, no, not really in the way you might think. While you can dab a brush with water and then wipe it almost dry, the 'dry' in dry brushing primarily refers to having very little paint on the brush, rather than just minimal water. My aim is always minimal paint load to create that beautiful, broken textural effect. Adding water to acrylics makes them more transparent and fluid, which really isn't what we're going for here. It tends to make your paint too thin and streaky, completely hindering that delicate, broken texture.
- Q: What kind of surface is best for dry brushing?
- A: Any surface can work, but a textured surface (like canvas with a visible weave, gesso with some tooth, paper with a slight roughness, or even a layer of modeling paste) will yield the most dramatic dry brush effects, as the bristles catch on the raised areas. Smooth surfaces will still show a broken application, but it will be subtler and more about the optical broken color rather than tactile texture.
- Q: Can I use dry brushing with other paint types?
- A: Absolutely! Dry brushing is a classic technique across many mediums. In oils, the slower drying time gives you more blending opportunities and a different kind of 'skip' due to the medium's inherent slipperiness. With watercolors, the effect is quite different, focusing more on granulation and transparent broken color due to the medium's nature. It also works beautifully with pastels. The principles remain the same: minimal paint, a suitable brush, and a light touch.
- Q: How does dry brushing interact with other mediums or varnishes?
- A: Oh, dry brushing interacts beautifully with other mediums! Layering it over a dried impasto surface or modeling paste is pure magic for highlighting those textures. You can also dry brush a lighter color over a glazed area for a soft, shimmering effect. As for varnishes, I typically lean towards a matte or satin spray varnish. Gloss varnishes can sometimes flatten the visual impact of subtle textures because their smooth, reflective surface tends to fill in the microscopic crevices created by the dry brush, reflecting light too uniformly and thereby minimizing the perceived depth. A matte or satin finish, however, preserves that visual depth. A word of caution with spray varnishes on very textured surfaces: sometimes they can pool in crevices or lead to uneven coverage if applied too heavily or too close. Always apply in thin, even coats from a distance! And speaking of caution, absolutely avoid brushing varnishes directly onto uncured dry brush layers, especially on absorbent surfaces, as that delicate, fragmented paint can easily smudge or lift. Just make sure everything is completely dry and fully cured – I usually recommend waiting at least 72 hours for acrylics before varnishing, just to be safe.
- Q: Can I use dry brushing with other acrylic mediums like gels or pastes?
- A: Absolutely, and in my opinion, this is where the fun really begins! Beyond modeling paste and pumice gel (which I adore for foundational textures), you can try dry brushing over granular gels for an even rougher look, or over transparent heavy gels to add subtle, shimmering fragments without obscuring the layers beneath. Fluid acrylic inks, when allowed to partially dry on the palette, can also be dry-brushed for incredibly vibrant, broken lines. Each medium offers a slightly different surface and absorbency, so don't hesitate to experiment and see how the dry brush technique dances with each one!
- Q: My dry brush looks too streaky, not textured. What am I doing wrong?
- A: You likely still have too much paint on your brush or are pressing too hard. Go back to your palette/paper towel and wipe off even more paint. Seriously, be ruthless! Then, use an even lighter touch, letting the bristles skim the surface. Practice on a scrap piece until you get that lovely broken, textured look. It takes a little feel, but you'll get it – it's more about muscle memory than brute force.
- Q: How does dry brushing differ from scumbling?
- A: They're quite similar and share many principles, but in my practice, I find scumbling often involves a slightly softer brush and a circular motion, aiming for a hazy, diffused layer of color. Dry brushing, for me, is typically done with a stiffer brush and is more about creating sharper, fragmented textures or broken lines. It's about that deliberate drag that catches on the surface's tooth, leaving those distinct, broken trails. So, while they are closely related, I lean towards scumbling for a soft, atmospheric haze, and dry brushing for sharp, broken highlights on textured surfaces or creating a 'weathered' look.
- Q: What if I'm dry brushing on very absorbent paper or a mixed media surface?
- A: On highly absorbent surfaces, the dry brush effect can appear softer or less defined as the paint sinks in more. To counteract this, you might need a slightly thicker paint consistency or apply a thin layer of gesso first. For mixed media, dry brushing is fantastic for highlighting textures like collage elements or embedded sand, but ensure all underlying layers are completely dry and stable to prevent smudging or lifting.
Conclusion: Embrace the Whisper
So there you have it: the dry brush technique, simple yet profoundly effective. It's a powerful reminder that sometimes the most impactful tools in our artistic arsenal are not the most complex or expensive, but the ones we learn to wield with intention and a bit of playful abandon. It allows us to imbue our work with a sense of history, depth, and authentic character. It truly transforms a flat surface into a layered masterpiece.
I hope this encourages you to grab those old, stiff brushes and give it a try. Don't be afraid to experiment; you might just uncover a new favorite way to add depth, character, and that undeniable textural 'oomph' to your own acrylic masterpieces. Happy painting, and remember: sometimes a whisper is more powerful than a shout! (That's a pretty good life lesson too, don't you think?).


