
Embracing Texture: My Personal Journey into Layered Abstract Painting
Discover a personal journey into layered abstract painting, exploring texture as a deep conversation with the canvas. Learn about techniques like impasto, mixed media, and scraping to add depth, meaning, and a tactile experience to art, transforming flat surfaces into living, breathing pieces.
Embracing Texture: My Personal Journey into Layered Abstract Painting
You know, sometimes I look at a perfectly smooth, flat painting and I think, "Hmm, nice." But then I see a piece that just begs to be touched, where the paint almost jumps off the canvas, and that's when my heart does a little flutter. It’s like discovering a secret language that speaks not just to your eyes, but to your fingertips, to something primal inside you. For me, exploring texture in abstract painting isn't just a technique; it's a deep, personal conversation with the canvas, a way to add layers of meaning and depth that a flat surface just can't quite capture. It wasn't always smooth sailing (pun very much intended, and often lived!), but discovering the magic of texture transformed my art, allowing me to express so much more. I remember one early piece, a landscape I was so proud of, until a curious cat (or perhaps my own clumsy elbow) swiped across a wet, thick cloud. Instead of despair, I realized the accidental ridge it left added an unexpected, visceral dynamism. That's when I truly started to lean into the 'happy accidents'.
I've always been drawn to the tactile. As a kid, I was the one always picking up interesting rocks, running my hands over tree bark, or just fiddling with the frayed edges of my jeans. It’s a sensory thing, isn't it? That urge to truly feel something. And art, for me, is no different. It's not just about what you see; it's about the experience, the subtle invitation to lean in closer, to imagine the artist's hand moving over the surface. If you've ever wondered how to really make an abstract painting sing, to give it that irresistible, almost gravitational pull, then come along. We're diving into my favorite ways to inject pure, unadulterated depth and dimension.
Why Texture? A Sensory Love Affair Through Time
Why bother with lumps and bumps when you could just glide a brush smoothly across the canvas? Oh, my friend, because texture is the whispered secret, the untold story in a painting. It adds a whole new dimension, transforming a flat image into a landscape your eyes can wander through, a history your imagination can trace. It's the difference between hearing a song on the radio and feeling the bass drum thudding in your chest at a live concert, a deep rumble that resonates through your bones – much like that time I saw a hardcore punk band in a tiny club and thought my ribs were going to vibrate right out of my chest. It was glorious, and it was felt.
For me, texture is about authenticity. It reveals the process, the struggle, the joy, the accidental magic. It's less about perfection and more about presence. It creates shadows and highlights that dance with the light, changing throughout the day, making the painting a living, breathing thing. It's also about inviting the viewer in, almost daring them to resist the urge to reach out and touch (please don't, unless invited, of course!). It makes the abstract tangible, relatable, and deeply engaging. This sensory exploration is a huge part of what makes abstract art compelling.
I remember one quiet afternoon, working on a piece that felt... stagnant. Flat. I’d been trying to convey a feeling of ancient, weathered stone, but it just wasn't landing. Then, almost on a whim, I picked up some modeling paste and started sculpting directly onto the canvas. The immediate transformation was profound. The surface began to breathe, casting its own micro-shadows, and suddenly, the painting had a history, a sense of timelessness I couldn't achieve with just color. It wasn't just my art anymore; it felt like it was telling its own story, evoking a deep, almost archaeological connection to something primal. That was when I truly understood the power of texture to add more than just visual depth; it added soul. In my 'Echoes of Time' series, for instance, I heavily leaned on modeling paste and pumice gel to create the crumbling, time-worn facades that evoked both decay and enduring memory, a feeling I could never have captured with just flat washes of paint.
Artists throughout history, from the bold impasto of Van Gogh, whose thick, swirling brushstrokes pulsed with raw emotion and palpable energy, literally building up feeling on the canvas, to the richly layered surfaces of Rembrandt, who built up luminous layers that seemed to breathe life into his subjects, his textures narrating the passage of time and depth of character. Even in the 20th century, movements like Abstract Expressionism with its vigorous, material-rich applications, and European Art Informel which celebrated the raw physicality of paint, embraced texture not just as an aesthetic choice but as a profound means of expression. It's an enduring language, a human touch, a fingerprint of the artist's journey that transcends time. This enduring connection, this silent conversation between artist, canvas, and viewer, is why I've deeply pondered the role of texture in abstract art: a sensory exploration.
My Go-To Techniques: More Than Just Paint
Ready to get your hands gloriously dirty? Over the years, I've dabbled in so many methods, some successful, some... well, let's just say they ended up as a very textured base layer for something else. But a few techniques have really stuck with me, becoming core parts of my artistic vocabulary.
Impasto & Heavy Body: The Classic Power Move
When I want to make a bold statement, to really build up a surface that you can almost taste, I turn to impasto. This is where paint isn't just paint; it's sculptural. Think thick, luscious dollops, applied with a palette knife or even directly from the tube. It’s wonderfully liberating. You’re not just painting on the canvas; you're building on it. Be warned, patience is a virtue with impasto – those thick layers take their sweet time to dry! (More on that in the troubleshooting section, of course, because I've learned that lesson the hard way more than once, often by sticking a curious finger into what I thought was a dry peak, only to leave a perfect, squishy fingerprint – a 'happy accident' for future archaeologists, perhaps?).
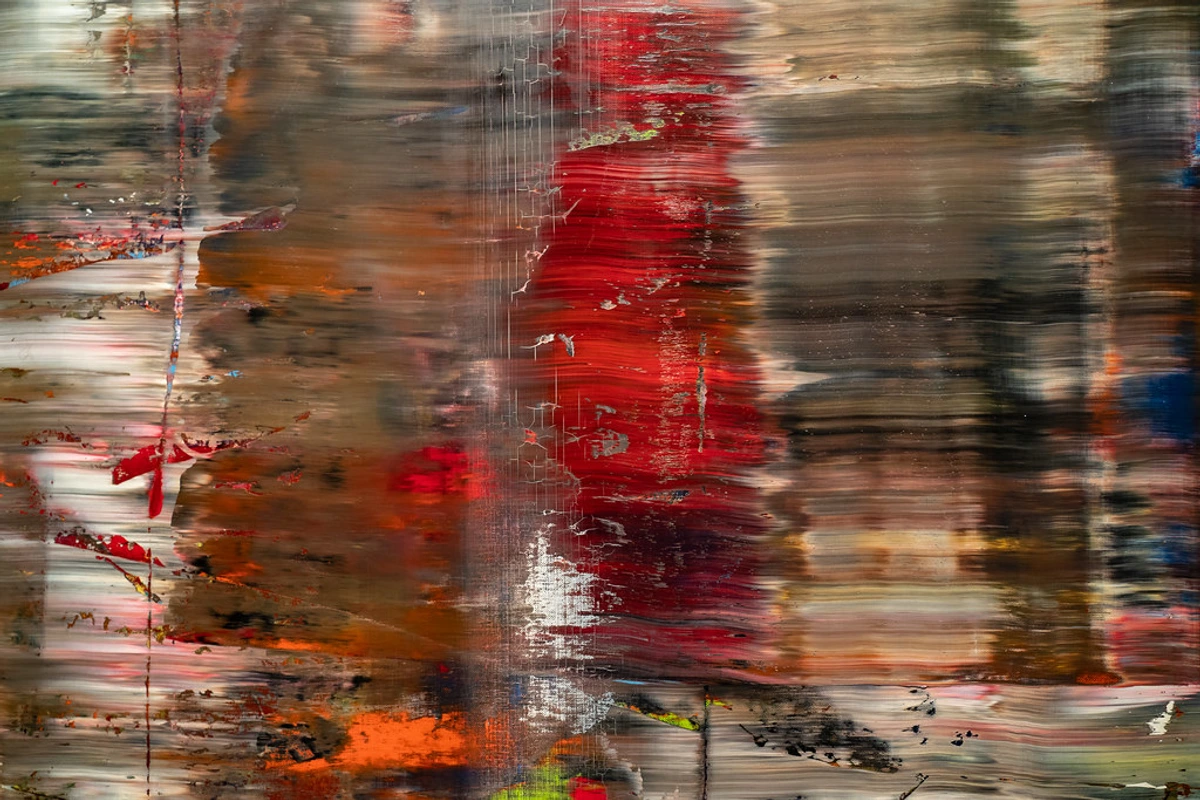
Artists like Gerhard Richter masterfully use impasto, often with large squeegees, to create a sense of deep, layered abstraction where colors push and pull, and the surface itself tells a story of creation and erasure. Richter's unique approach, using a large squeegee to drag paint across the canvas, allows for both a deliberate application and an element of chance, creating those signature horizontal streaks and an almost geological stratification of color and texture. It's less about individual brushstrokes and more about the fluid, evolving landscape of the paint itself, which always captivates me.
My favorite tools for impasto are often surprisingly simple. A sturdy palette knife, of course, but also:
- Old credit cards
- Kitchen spatulas (my partner has occasionally wondered where her favourite pancake flipper went... oops!)
- Combs
- Even my fingers (gloved, ideally, if you value your skin cells and don't want paint under your fingernails for a week).
In my 'Urban Strata' series, I used heavy impasto with both a palette knife and old credit cards to build up jagged, architectural forms, aiming to evoke the chaotic yet structured feel of cityscapes. The thick layers allowed me to achieve a raw, almost Brutalist aesthetic that truly defined the series. The trick is to apply the paint with confidence, letting the peaks and valleys form naturally. It’s less about control and more about letting the material guide you. And if you're curious about what impasto truly is, I've got a whole other piece on what is impasto painting that delves deeper into its history and application. It’s an incredibly satisfying technique.
Mixed Media & Found Objects: The Unexpected Guests
This is where things get really fun, and sometimes, wonderfully messy. Why limit yourself to just paint? The world is full of texture! I’ve experimented with everything from sand and coffee grounds (yes, really!) to torn paper, fabric scraps, and even bits of cardboard. My most memorable "happy accident" involved a rogue piece of bubble wrap I accidentally pressed into wet paint – the resulting grid pattern was unexpectedly captivating! It happened during a session where I was trying to express a sense of order breaking down into chaos, and the geometric regularity of the bubble wrap, suddenly imprinted into the fluid paint, offered a beautiful counterpoint, hinting at underlying structure. The goal is to integrate these elements seamlessly (or sometimes, jarringly, for effect) into the painting's narrative.
Anselm Kiefer is a master of this, incorporating organic materials like straw, ash, or lead into his monumental works. His ability to evoke such profound historical and emotional narratives through the sheer physicality of his materials always leaves me awestruck. In my 'Forest Floor' series, I embedded actual dried leaves, twigs, and sand, then painted over them with earthy tones, allowing the natural forms to emerge and add a sense of organic decay and renewal.
My process often involves applying a base layer of heavy gel medium or texture paste. While both are thick, clear acrylic binders, heavy gel medium often retains more transparency and is excellent for building subtle layers, whereas texture paste is typically more opaque and designed for creating robust, sculptural forms. Think of gel medium as a slightly softer, more translucent glue for lighter textures, and texture paste as a denser, more opaque spackle for heavy-duty relief. I then press materials into it while wet. Once dry, I paint over them, allowing the underlying textures to peek through or create new, surprising surfaces. It’s like inviting unexpected guests to a party – you never quite know what magic will unfold. If you're intrigued by this adventurous side of art, you might enjoy my journey beyond the canvas: my journey into abstract mixed media. It's a true playground for experimentation, and a fantastic way to add unique depth. A word of caution: when using found objects, consider their archival quality. Organic materials like fresh leaves, certain food items (like pasta or coffee grounds directly embedded), or non-stable plastics (which can degrade, yellow, or off-gas over time) might degrade, attract mold, or cause damage. I once had a whole section of a mixed media piece start to sprout actual, fuzzy grey mold because I'd embedded some not-quite-dry moss – a truly 'living' artwork, but not in the way I'd intended! Opt for stable, non-acidic materials where possible, and when in doubt, test a small sample first. And for adhesion, sometimes roughing up a smooth surface slightly with sandpaper before applying the binder can make all the difference, ensuring your elements stick securely. I once had a whole constellation of carefully placed tiny pebbles decide to stage a mass exodus mid-varnish – never again!
Exploring Other Texture Mediums
Beyond found objects, the art supply world offers a treasure trove of dedicated texture mediums. Oh, the rabbit hole of art supplies one can fall into – it's both thrilling and slightly terrifying for the wallet! I often work with:
- Modeling paste for robust, sculptable surfaces that dry hard and can even be carved or sanded once dry – my go-to for rocky, mountainous landscapes on canvas, or bold, sculptural focal points like those in my 'Terra Incognita' series, where I wanted to evoke a sense of ancient, unyielding earth.
- Pumice gel for a gritty, sand-like finish that's great for subtle, earthy tones and adding a natural, textural depth – perfect for evoking windswept dunes or ancient, crumbling walls, as seen in my 'Desert Winds' collection.
- For subtle sparkle, I've dabbled with glass beads, which add a reflective, almost jewel-like quality – I love using them to mimic shimmering water or distant galaxies, as I did in my cosmic-themed works.
- And for incredible fine grit, silica sand mixed into gel medium can create a wonderfully understated texture, perfect for a delicate, almost velvety feel, making you want to reach out and stroke the canvas (but please don't!).
The possibilities are truly endless, and each medium brings its own unique character to the canvas.
Scratching, Scraping, & Layering: The Archeological Dig
Sometimes, adding texture isn't about building up; it's about revealing what's underneath. This is where layering, and subsequently, scratching and scraping, come into play. I'll often apply multiple layers of paint, sometimes contrasting colors, sometimes similar tones, allowing each to dry. Then, using a palette knife, a sanding block, or even the blunt end of a brush, I’ll selectively scratch or scrape away parts of the top layer, revealing glimpses of the colors and textures below. For more intricate lines or deeper gouges, dental tools, wire brushes, or even nails can be surprisingly effective. A quick safety tip: if you're sanding or creating fine dust, consider wearing a dust mask to protect your lungs.
Christopher Wool is renowned for his technique of using rollers, stencils, and solvents to apply and then often remove or distort paint layers. This scraping and removal creates a raw, industrial aesthetic, revealing the underlying process and adding a gritty, urban texture to his work. His unflinching embrace of deconstruction has always resonated with me. In my 'Urban Palimpsest' series, I intentionally layered bright, graffiti-like colors, then scraped back sections to reveal hints of stark, monochromatic underpaintings, creating a sense of history and weathered urban decay.
It's like an archaeological dig on the canvas, uncovering forgotten histories, or like peeling back layers of an old storybook. The feeling of the tool revealing a hidden color, a forgotten gesture, is incredibly satisfying. This technique adds an incredible sense of time and depth, hinting at previous decisions and hidden stories. It creates a dynamic surface that feels weathered, lived-in, and full of character. It's a bit like life, isn't it? The layers we build, and the occasional scrapes that reveal something beautiful and resilient underneath. If you love the idea of building stories through paint, you'll find a lot to love in the language of layers: building depth in abstract acrylics.
The Foundation: Preparing Your Canvas and Workspace for Texture
Before you even think about applying that glorious gunk, remember your support! The foundation of your textured masterpiece is crucial. While paper or stretched canvas might suffice for lighter applications, if you're going for heavy impasto or embedding substantial mixed media, a sturdy wood panel or heavy-duty stretched canvas (with extra bracing) is often a better choice. They resist warping and sagging under the weight of the materials. Think of it like building a house – you wouldn't build a skyscraper on a flimsy foundation, would you? Ensuring your support can handle the 'architectural' demands of your textured vision will save you heartbreak (and cracks!) down the line. Sometimes, I'll even add an extra layer or two of gesso just to create a stronger, more absorbent tooth for the texture mediums to grip onto, though this isn't always necessary.
Preparation: Setting the Stage for Tactile Art
Before diving headfirst into thick mediums and found objects, a quick word on preparation. Always protect your work surface with drop cloths or old newspapers – trust me, cleanup is much easier that way! My studio often smells faintly of impatience and half-dried paint. And if you're working on multiple pieces, a dedicated drying rack can be a lifesaver for those thick, slow-drying layers. A quick note on safety: always check the label for safety instructions, especially with new mediums or found objects. Good ventilation isn't just for fumes; it's for your peace of mind and long-term health, too.

Mindset: Embracing the Journey
And for anyone wrestling with the fear of "ruining" a piece: remember, art is a journey, not a destination. Every 'mistake' is a lesson, every unexpected outcome a potential breakthrough. Embrace the experimentation, the mess, the happy accidents. Your canvas is a playground, not a sacred shrine. I've 'ruined' more pieces than I've completed, and each one taught me something invaluable. If you're an absolute beginner and feeling a bit overwhelmed, start small. Grab some basic acrylic paint and a palette knife, or even an old credit card, and just play. Experiment with applying paint thickly on cardboard or a small canvas. You don't need fancy materials to begin your textural adventure.

The Dance of Color and Texture
It's easy to focus purely on the tactile feel of texture, but don't forget how it interacts with color! A rough, absorbent texture can make colors appear deeper, more muted, or even alter their perceived hue as light catches the peaks and valleys differently throughout the day. Conversely, a smooth, glossy surface might enhance a color's vibrancy and sheen. For example, a vibrant cadmium red might appear almost velvety and absorb light on a heavily textured surface, feeling grounded and earthy, while on a smooth surface it would pop with a bright, glossy intensity, reflecting light directly. Experiment with applying thin washes over textured areas to see how the color sinks into crevices, creating subtle variations, or applying opaque colors on top of raised areas to make them pop.
Integrating Texture with Color Theory
Beyond aesthetics, texture can profoundly influence the emotional resonance of a piece. Sharp, jagged textures might evoke tension or dynamism, while soft, undulating forms can convey calm or fluidity. A gritty, raw surface might speak of struggle or authenticity, and smooth, polished areas could represent stillness or refinement. Consciously playing with these qualities allows you to weave an even richer narrative into your abstract work. Moreover, texture isn't just about what you feel; it actively shapes the composition. A highly textured area can act as a focal point, drawing the eye and grounding the composition, while subtle textures can create movement or guide the viewer's gaze across the canvas, adding a silent, almost sculptural dimension to your visual storytelling. When considering mixing color with mediums, be aware that some mediums, especially opaque ones, can slightly dull or alter the vibrancy of colors. To maintain luminosity, consider layering thin, transparent washes over textured areas, or using highly pigmented heavy body paints. This delicate dance of light, shadow, and hue over a varied landscape is what truly makes a textured piece come alive, shifting and revealing new secrets with every glance. It's also worth noting how your light source – whether it's soft, natural daylight or harsh, directional artificial light – can dramatically alter the perception of your texture, making it a truly dynamic element of your art.
Lighting Textured Art: Unveiling Hidden Depths
Just as important as creating texture is how you light it. The play of light and shadow is what truly makes texture sing. Directional light (like a spotlight from the side or above) will emphasize every peak and valley, casting dramatic shadows that deepen the texture and reveal its intricate details. This is often ideal for showcasing strong impasto or sculptural elements. Diffused light, on the other hand, will soften the shadows, creating a more subtle, harmonious feel. Experiment with different light sources in your studio or display space. A painting might look one way under soft, natural daylight and transform entirely under a focused, warm LED. Understanding this interplay allows you to guide the viewer's eye and evoke specific moods, transforming your artwork into a living, breathing experience that shifts with its environment.
The Unseen Benefits: Beyond the Canvas
Beyond the purely aesthetic, working with texture brings a profound sense of satisfaction. It grounds me. In a world that often feels digitally flat and overwhelmingly smooth, the physical act of manipulating materials, feeling the grit and the drag, is a reminder of the real, tangible world.
Creating textured art has subtly but surely changed how I perceive the world around me. I find myself constantly noticing the subtle imperfections and variations in surfaces – the flaking paint on an old door, the rough bark of a tree, the uneven patina of an ancient wall. Even the humble concrete sidewalk now reveals a universe of tiny, aggregate textures to me, which I used to just walk over without a second thought. It’s like a new pair of glasses, revealing the hidden tactile beauty in everyday objects. Texture in art is also a beautiful metaphor for life itself. We're all wonderfully textured beings, full of bumps, bruises, smooth patches, and rough edges. A painting that embraces its own texture feels more authentic, more human. It tells a story not just through its colors and composition, but through the very fabric of its existence. It invites you to pause, to look closer, to connect on a deeper level. It's why I believe so strongly that what makes abstract art compelling often lies in these tactile details.
Troubleshooting Common Texture Challenges
Even experienced artists encounter little bumps (pun intended!) on their textured journey. Here are a few tips for when things don't go exactly as planned:
- Drying Times: Thick layers of texture paste or impasto can take days or even weeks to fully dry, especially in humid conditions. Patience is key! Don't rush to apply the next layer or finish the piece, or you risk cracking or bubbling. I've learned this the hard way more times than I care to admit – usually involving me poking a seemingly dry layer, only to find it's still squishy underneath, followed by a sigh that could power a small fan. My studio often smells faintly of impatience and half-dried paint.
- Achieving Consistency: Sometimes you want a smooth paste, other times a gritty one. Experiment with adding small amounts of water (for acrylics) or gel medium to your paints/pastes to achieve the desired flow and workability. For oil-based mediums, specific oil painting mediums (like impasto medium or cold wax medium) would be used. For very fine textures, you might even consider adding a bit of marble dust or sand directly to your medium.
- Adhesion Issues: Oh, the heartbreak of a perfectly applied element deciding to flake off! If materials aren't sticking, ensure your canvas/support is properly prepared. A good layer of gesso provides a stable, absorbent surface. For very smooth or non-porous materials, lightly sanding the surface can create a 'tooth' for better grip. And always use an appropriate, strong binder like heavy gel medium or professional-grade texture paste. Sometimes, simply using more medium or pressing the object in more firmly does the trick. Don't be shy with the glue! I once had a whole constellation of carefully placed tiny pebbles decide to stage a mass exodus mid-varnish – never again!
- "Over-Texturing": Yes, it's a thing! Sometimes, in the excitement of building up, you might lose the composition or overwhelm the piece. If you feel you've gone too far, don't despair. You can often scrape back excess material while it's still wet, or once dry, you can sand down raised areas. Sometimes, a thin wash of contrasting color over an "over-textured" area can help unify it. Embrace the process, and remember, it's all part of the journey.
- Preventing Mold or Mildew: When incorporating organic or porous materials, especially in humid environments, mold can be a concern. Ensure all materials are completely dry before embedding them. You can also mix a small amount of an anti-fungal agent (available at art supply stores) into your mediums, or apply a clear sealant to the material before adding it to the artwork. I once had a whole section of a mixed media piece start to sprout actual, fuzzy grey mold because I'd embedded some not-quite-dry moss – a truly 'living' artwork, but not in the way I'd intended!

FAQ: Your Textural Tangles Untangled
Ready to get your hands dirty, but still have a few nagging questions? Let's tackle some common textural tangles together – because everyone starts somewhere, and sometimes, even experienced artists need a little reassurance!
Question | My Answer |
|---|---|
| Will texture make my painting crack? | Not if you do it right! Using flexible mediums like heavy gel medium or texture paste specifically designed for art prevents cracking because they expand and contract subtly with temperature changes, unlike rigid paint layers. Ensure each layer dries thoroughly, and avoid mixing incompatible materials or applying excessively thick layers of traditional paint without a proper medium. |
| How do I know when a textured layer is completely dry? | Patience, my friend, patience! The best way is the 'touch test' – if it feels cool to the touch or even slightly tacky, it's not dry. It should feel completely hard and inert. For very thick layers, visual inspection for changes in opacity (some mediums become more transparent when dry) and a light tap for a solid sound are good indicators. When in doubt, wait longer. Rushing this step is a common culprit for future cracking! |
| Can I combine different texture mediums in one piece? | Absolutely, and I encourage it! Mixing mediums can create incredibly rich and complex surfaces. However, always check for compatibility, especially if mixing water-based acrylic mediums with oil-based ones. Generally, stick to acrylic-based mediums if working with acrylic paints, and oil-based for oils. A small test patch on scrap material is always a good idea to ensure they play nicely together. |
| What tools do I absolutely need? | A good palette knife is a must-have. Beyond that, experiment! Old credit cards, kitchen spatulas, combs, even sponges can create interesting textures. Don't be afraid to repurpose household items. |
| How do I clean textured art? | Gently. Dust with a soft, dry brush or a lint-free cloth. Avoid water or harsh chemicals. For heavily textured pieces, compressed air (from a distance) can help dislodge dust in crevices. |
| Does textured art cost more? | Generally, yes, both in materials and time. Heavy bodied paints and texture mediums are more expensive than fluid acrylics, and the layering/drying process takes longer. But the added depth and uniqueness are, in my humble opinion, priceless. |
| Can I add texture to any abstract painting? | Absolutely! While it's easier to plan for texture from the start, you can always go back into an existing piece and add texture mediums or impasto layers to give it new life. Just make sure the existing paint layers are fully dry. |
| How do I varnish/seal textured art? | Varnishing textured art requires a careful hand. Use a spray varnish (matte, satin, or gloss, depending on desired finish) applied in multiple thin coats, allowing each to dry thoroughly. This ensures coverage without filling in crevices, unlike brush-on varnishes which can pool and obscure delicate texture. For very delicate pieces, a conservator's advice might be best. It's about protecting the art without losing its soul. |
| How should I frame textured art? | Textured art often needs special framing. A 'float frame' (where the canvas appears to float within the frame) is often ideal, as it provides depth and allows the edges of the canvas and its texture to be seen. Standard frames might compress or hide the texture, so look for deeper frames or consult a professional framer who understands dimensional art. |
| What kind of paint is best for texture? | Heavy body acrylics are generally preferred for texture. Their thick consistency allows for easy impasto and holds form well. They also dry quickly and are flexible when dry, reducing cracking. While oils can also be used for texture, their longer drying times require more patience. |
| How do I properly store textured art? | Store textured art in a way that protects its surface from pressure and dust. Avoid stacking pieces directly on top of each other. Use spacers or bubble wrap (bubble-side out) if packing. Keep in a climate-controlled environment to prevent extreme temperature or humidity fluctuations, which can affect the integrity of layered materials. |
Final Strokes: Embracing the Imperfect
For me, creating textured abstract paintings is a constant dance between control and surrender, between planning and happy accidents. It's about embracing the beauty of the imperfect, the story told by every ridge and valley. It's a reminder that true depth isn't always smooth and polished; sometimes, it's beautifully rugged and rich with experience.
If you’re an artist, I encourage you to get your hands (literally!) dirty and explore the world of texture. It might just unlock a whole new dimension in your work. And if you’re a collector, I hope this gives you a deeper appreciation for the tactile beauty of art, and perhaps inspires you to seek out pieces that invite you to lean in and explore. I'd love to hear about your own textural adventures – what materials have you experimented with? What's your favorite texture to create or encounter? You can always see some of my own textured pieces, and perhaps even find one for your collection, on my art for sale page. Or, if you're ever in 's-Hertogenbosch, you can experience my artistic journey up close at my museum.
So, go on, embrace the beautiful bumps and glorious grit. Your canvas (and your life) will thank you for it. It’s a textured life, after all, and our art should reflect that, don't you think?


