Getting Started with Charcoal: My Personal, Extended Beginner's Guide
Unlock charcoal's expressive power! My extended guide covers types (vine, compressed, willow, blocks, powder), essential supplies (toned paper, kneaded erasers, blending tools, sharpening tools), mastering techniques (shading, subtractive drawing, blending, hatching), managing the glorious mess, avoiding beginner mistakes, troubleshooting, and finding your unique artistic voice.
Getting Started with Charcoal: My Personal, Extended Guide to the Basics
Your personal, dusty journey starts here.
Ah, charcoal. Just the word conjures up images of dusty studios, dramatic shadows, and maybe a bit of a mess. And honestly? It's all true! But beyond the potential for smudges (which, trust me, are part of the fun), charcoal is one of the most expressive and fundamental drawing mediums out there. It's raw, it's immediate, and it can create incredible depth and mood. Unlike some mediums that require extensive setup or drying time, charcoal lets you make a mark instantly. That speed and immediacy are part of its unique appeal. There's a unique sensory experience to it – the dry, slightly acrid smell of the burnt wood, the soft shhh it makes as it glides across textured paper, the way the fine dust coats your fingertips. It feels ancient, primal, a direct connection to the earliest marks humanity ever made. Drawing with charcoal feels like tapping into that deep, shared history, a simple, fundamental act that connects you across millennia. Unlike graphite, which leaves a shiny mark, charcoal offers a rich, matte black that can achieve unparalleled depth. It's also incredibly forgiving; you can lift it off the paper with ease, making it perfect for building up layers and then drawing with light. If you're curious about diving into charcoal drawing, this guide is for you. We'll cover the absolute basics to get you started on your own dusty, beautiful journey.
Did you know that charcoal is one of the oldest art mediums known to humanity? We're talking cave paintings, folks! There's something truly primal about taking burnt wood and making marks on a surface. It connects you to a tradition stretching back tens of thousands of years. I remember the first time I really tried charcoal. I'd messed around with those cheap little sticks in school art class, but it wasn't until I picked up some decent vine charcoal and a big sheet of textured paper that something clicked. It felt... ancient. Like I was connecting to that deep history. It was also incredibly frustrating at first – getting the right pressure, controlling the dust, not smearing everything into oblivion. I distinctly remember one early attempt where I tried to blend a large area with my finger, only to create a giant, muddy thumbprint that ruined the whole thing. Lesson learned, the hard way! But stick with it, and you'll discover a world of possibilities.
What Exactly Is Charcoal?
So, what is this magical, messy stuff? At its core, drawing charcoal is just burnt organic material, usually wood like grapevines or willow, heated in an airtight kiln until it's carbonized. Willow and grapevine are traditionally favored because they burn cleanly and produce a fine, consistent carbon structure, resulting in a smooth, easily erasable charcoal stick. The type of wood and how it's processed determines the kind of charcoal you get. Understanding the different types is key to knowing what marks you can make. Compressed charcoal, for instance, uses a binder (often gum arabic) mixed with the charcoal powder and pressed into sticks or pencils, which makes it harder and produces darker marks than pure vine charcoal.
| Type | Description | Properties | Best For | | :---------------- | :-------------------------------------------------------------------------- | :----------------------------------------------- | :----------------k------------------------------ | | Vine Charcoal | Made from burning grapevines or willow sticks in an airtight kiln. | Very soft, light, easily erasable mark. | Sketching, blocking in, preliminary drawings. | | Compressed Charcoal | Charcoal powder mixed with a binder and pressed into sticks or pencils. | Harder, produces darker, richer blacks, less erasable. Comes in various grades (e.g., 2B, 4B, 6B, 8B). Remember, for charcoal, higher numbers mean softer and darker marks, capable of achieving much deeper blacks than graphite. | Detail, deep shadows, intense darks. | | Charcoal Pencils | Compressed charcoal encased in wood. | Offers most control, comes in different hardnesses (like compressed sticks). | Details, sharp lines, cleaner work. | | Charcoal Powder | Pure, fine charcoal pigment. | Incredibly fine, messy, creates smooth washes. | Large areas, smooth tones (more advanced). | | Charcoal Blocks | Larger, chunkier sticks of compressed charcoal. | Cover large areas quickly, bold marks. | Large-scale work, broad strokes. |
In essence, you'll typically start with the softer vine charcoal for initial sketches and broad strokes, then move to the harder compressed charcoal or pencils for building up those deep, dramatic darks and finer details. I usually start with vine charcoal for the initial sketch and blocking, laying down those first tentative lines and values. Then, I move to compressed charcoal sticks or pencils for building up darker tones and details, adding that necessary drama. I remember the first time I used a compressed charcoal stick after only using vine – the sheer intensity of the black felt like a revelation! It's a good way to learn how each type behaves and how they interact on the paper.
It's also worth noting the difference between charcoal and carbon pencils. While both produce a matte black mark, carbon pencils are made with carbon black pigment and clay or gum binder. They tend to be denser, less dusty, and harder to erase than charcoal. Charcoal offers a wider range of values and is generally more blendable and liftable, making it more versatile for many drawing techniques, especially for beginners focused on value studies.
Choosing Your First Supplies
Ready to get your hands dirty? You don't need a massive amount of stuff to start, which is one of the great things about charcoal. Don't feel pressured to buy everything at once; start simple. Here's what I recommend for your initial foray, based on what I actually use in my own dusty corner:
Charcoal
Begin with a small selection. A few sticks of vine charcoal (maybe medium and thick) and a couple of compressed charcoal sticks (soft and medium) or a basic charcoal pencil set will be plenty. This gives you a feel for the range without overwhelming you. Remember that compressed charcoal and pencils come in different grades (like 2B, 4B, 6B, 8B, etc.), similar to graphite, with higher numbers indicating softer, darker charcoal – capable of achieving much deeper blacks than graphite.
Charcoal Grades Quick Tip: Unlike graphite where higher numbers (like 9H) mean harder and lighter, for charcoal, the 'B' grades work like graphite 'B' grades: Higher 'B' number = Softer & Darker. An 8B charcoal will give you a much deeper black than a 2B.
Brands like Nitram, Faber-Castell Pitt, or Generals are reliable choices. A beginner set that includes a few sticks of vine, compressed, and maybe a pencil or two is often a cost-effective way to get started. There's a distinct feeling to holding a raw charcoal stick, feeling its texture and weight, versus the familiar, controlled feel of a pencil. Both have their place! Oh, and don't forget a white charcoal or white pastel pencil if you plan on working on toned paper – it's essential for adding highlights.
Paper
Charcoal works best on paper with some 'tooth' or texture to grab the pigment. Think of the paper surface like tiny hills and valleys; the charcoal particles get caught in the valleys, allowing you to build up layers. Smooth paper (often called 'hot press') just won't hold it – the charcoal will just slide off or smudge into a muddy mess. Paper with texture (often called 'cold press' or specifically labeled for charcoal/pastel) is generally preferred. Look for paper specifically labeled for charcoal or pastel, or even drawing or sketch paper with a noticeable texture. Any paper labeled 'drawing' or 'sketch' with texture is fine to start. For beginners, starting with a paper pad is often more convenient and cost-effective than buying individual sheets.
- Paper Types: Papers specifically labeled for charcoal or pastel (like Canson Mi-Teintes or Strathmore Charcoal) are fantastic because they have a pronounced texture designed for dry media. The level of tooth matters too – a finer tooth gives smoother blends and more subtle textures, while a coarser tooth leaves more white paper showing through, creating a grainier, more expressive effect. Imagine the difference between fine sandpaper and coarse sandpaper – that's a bit like the difference in tooth! You'll want to experiment to see which you prefer for different effects. Beyond standard textured papers, you might encounter papers with specific surface textures like laid paper (showing a pattern of parallel lines from the manufacturing process) or vellum surface (a slightly rough, toothy finish). These can add unique visual textures to your charcoal marks. Quality can vary between brands, impacting how well the paper holds pigment and withstands erasing, so don't be afraid to try a few different types. (Fun fact: 'Hot press' paper gets its smooth surface from being pressed between hot rollers during manufacturing, while 'cold press' is pressed between cold rollers, leaving more texture.)
- Paper Weight: Paper weight (like 80lb or 100lb) affects how much blending and erasing the paper can handle without falling apart. For beginners, something around 80-100lb is usually sturdy enough.
- Toned Paper: Toned paper (gray, brown, or even black) can be really fun to work on, as it provides a middle value to work from. This allows you to add both darks (with black charcoal) and lights (with white charcoal or white pastel). It completely changes how you approach a drawing! Different paper colors can even suggest a mood or subject – a warm brown for portraits, a cool blue for landscapes. Working on black paper is a particularly interesting challenge, as you build up all your values using white charcoal or pastel, essentially drawing with light from the start. I remember trying toned paper for the first time and feeling like I was drawing with light, rather than just removing shadow.
Drawing Surface
You'll need something firm to support your paper, especially if you're working vertically on an easel or applying pressure. A simple drawing board or even a piece of sturdy cardboard or foam core works perfectly. Use clips or tape to secure your paper firmly to the board to keep it from shifting while you work. This prevents accidental creases or tears.
Erasers
This is where charcoal gets interesting! Erasers aren't just for fixing mistakes; they're tools for drawing with light. You need specific erasers:
- Kneaded Eraser: This is your best friend. Seriously. It's a putty-like eraser that you can mold into different shapes – a point for fine highlights, a flat edge for lifting larger areas. It doesn't rub away charcoal but lifts it off the paper, making it perfect for creating highlights and softening areas without damaging the paper surface. It gets dirty, but you just knead it clean. I've lost count of how many times a kneaded eraser has rescued a drawing or allowed me to pull out a brilliant highlight I didn't plan. It feels strangely satisfying to knead it clean, like resetting a little clay helper.
- Plastic/Vinyl Eraser: A standard block eraser is useful for more aggressive erasing or cleaning up edges, but use it gently on textured paper, as it can damage the paper's tooth if you're too rough.
- Eraser Pencil: These are like regular pencils but with an eraser tip. Fantastic for getting really sharp, fine highlights or cleaning up tiny areas with precision.
- Electric Eraser: For even sharper, more precise highlights, especially in small areas, an electric eraser can be a powerful tool. It uses a small, vibrating eraser tip to quickly lift pigment. It's not essential for beginners but can be fun to experiment with later.
Blending Tools
Your fingers are the most natural tool, but they can also transfer oils from your skin and create smudges you don't want, or just make everything look muddy. I learned this the hard way when a seemingly innocent smudge turned into a greasy stain that wouldn't lift! (Pro tip: Wash your hands before you start drawing to minimize transferring skin oils.) Other options include:
Tool | Primary Effect / Best For | Notes |
|---|---|---|
| Fingers | Quick, broad blending. | Can transfer oils, lead to muddy results, less precise. |
| Tortillons / Stumps | Blending small areas, smooth transitions, getting into tight spots. | Can be sharpened on sandpaper. |
| Chamois Cloth | Very smooth blending over large areas. | Excellent for skies, smooth backgrounds. Can be washed gently. |
| Paper Towels | Broad blending, removing excess dust. | Simple, effective. |
| Cotton Swabs | Blending very small, precise areas, tight corners. | Good for fine details. |
| Cotton Balls | Very soft, broad blending over large areas, subtle transitions. | Creates a different feel than firmer tools. |
| Soft Brushes | Gentle blending, sweeping away loose dust, subtly lifting pigment for soft highlights. | Feels like painting with air when lifting. Use a dedicated art brush or clean makeup brush. |
Blending with a tortillon on textured paper has a unique, slightly scratchy sound as the paper fibers grab the pigment. You can clean tortillons by gently rubbing them on a sandpaper block.
Sharpening Tools
While charcoal pencils come pre-sharpened (sort of), you'll quickly find you need to sharpen them and your compressed sticks to get different marks. These tools are essential:
- Craft Knife or Utility Knife: This is often the preferred tool for sharpening charcoal pencils. It allows you to expose more of the charcoal core and create a long, fine point perfect for detail work. Always sharpen away from yourself over a trash can! It takes a little practice to get the hang of it, but it gives you much more control than a standard pencil sharpener. (Note: Standard pencil sharpeners are generally not recommended for charcoal pencils as the core is brittle and prone to breaking inside the sharpener.)
- Sandpaper Block: This is indispensable for creating a sharp point on compressed charcoal sticks or refining the point on charcoal pencils. You simply rub the end of the charcoal stick or pencil on the sandpaper at an angle. It's also great for creating charcoal powder by rubbing the stick vigorously. Keep a small one handy!
Fixative
Charcoal is dusty and easily smudged. A spray fixative (either workable or final) is essential to prevent your drawing from smearing once it's finished (or even during the process if you use workable fixative). Workable fixative allows you to draw over it once dry, building up layers or making corrections. For example, you might use workable fixative after blocking in the main values with vine charcoal before adding sharp details with compressed charcoal. Final fixative is meant to be the last step, sealing the drawing completely. Use this in a well-ventilated area! Seriously, open windows or go outside. Your lungs will thank you. I once sprayed fixative in a small, closed room and felt like I'd inhaled a cloud of chemicals – definitely not recommended! The smell of fixative, that distinct chemical scent, is one of those studio smells that just is art-making to me. (And please, resist the urge to use hairspray as a fixative! While it might seem like a quick hack, it's acidic, will yellow your paper over time, and can remain sticky, attracting dust. Stick to proper art fixatives for archival quality. I once used hairspray on a quick sketch and came back a week later to find it had attracted every piece of lint and dust bunny in the room – a fuzzy, yellow disaster!)
When applying fixative, hold the can about 10-12 inches away from your drawing and use a sweeping motion across the surface, rather than spraying in one spot. Apply several light coats, letting each dry, rather than one heavy coat, which can cause the charcoal to run or the paper to buckle. Properly fixed charcoal drawings, made with quality materials, can be quite archival, meaning they will last a long time without significant degradation or yellowing.
Managing the Mess (Because There Will Be Dust)
Let's be real: charcoal is messy. Embrace it, but also manage it. It's part of the charm, but also the challenge! It's like glitter, but grey and less festive. I once finished a particularly large, detailed drawing and looked around to find a fine layer of grey dust covering everything in my workspace – my desk, my chair, even my cat looked vaguely charcoal-dusted. Sigh. Here are a few tips I've learned, often the hard way:
- Protect Your Workspace: Lay down old newspapers or a drop cloth. Charcoal dust gets everywhere. Seriously, everywhere. I once left a drawing out overnight and woke up to a fine layer of grey on my desk. My cat probably walked through it. Sigh. Wear old clothes or an apron you don't mind getting stained. Charcoal dust is notoriously difficult to wash out completely!
- Work Vertically (If Possible): Drawing on an easel or slanted surface lets excess dust fall away from your drawing, reducing smudging. It's a simple trick that makes a big difference.
- Remove Loose Dust Gently: To remove loose dust, gently blow on the paper (directing the dust away from you!) or use a soft, dry brush. Do NOT wipe with your hand! That's an instant smudge-fest, trust me, I've done it more times than I care to admit. It's a reflex I still fight. Using a soft brush is much more controlled and less likely to smear.
- Protect Your Drawing: When working on different areas, place a clean sheet of paper under your hand to avoid smudging areas you've already worked on. This is crucial for preserving highlights and clean areas. If you're working on a table, placing a barrier sheet (like glassine or tracing paper) under your drawing can also help protect the table surface from dust fallout. You can also use a mahl stick or bridge to rest your hand on, keeping it off the paper entirely, which is especially helpful for larger pieces.
- Fixative Safety: Again, use fixative in a well-ventilated area. The fumes aren't good for you. A cheap dust mask isn't a bad idea either, especially if you're working with powder or spraying a lot. Your lungs will thank you.
- Basic Dust Safety: Wash your hands frequently when working with charcoal to avoid transferring dust to other surfaces (or your face!). Try not to inhale the dust – work in a well-ventilated space and avoid tapping or blowing excessively on your drawing without directing the dust away.
- Cleaning Up: For surfaces, sweep or vacuum up the bulk of the dust first. Then, a slightly damp cloth (not wet!) can pick up the remaining fine particles. There are also specialized art cleanup sponges available that are great for lifting dust from surfaces without spreading it. For cleaning charcoal from your hands, soap and water work, but sometimes a little baby oil or hand sanitizer first can help lift the pigment before washing.
- Storing Supplies: Store your charcoal sticks and pencils carefully, ideally in a box or case, to prevent them from breaking easily. Compressed charcoal is particularly brittle.
- Storing Finished Work: Once your drawing is finished and fixed, protect it from smudging and dust by placing a sheet of glassine paper (a smooth, translucent paper) over the surface before storing it in a portfolio or flat file. This prevents the charcoal from rubbing against other surfaces.

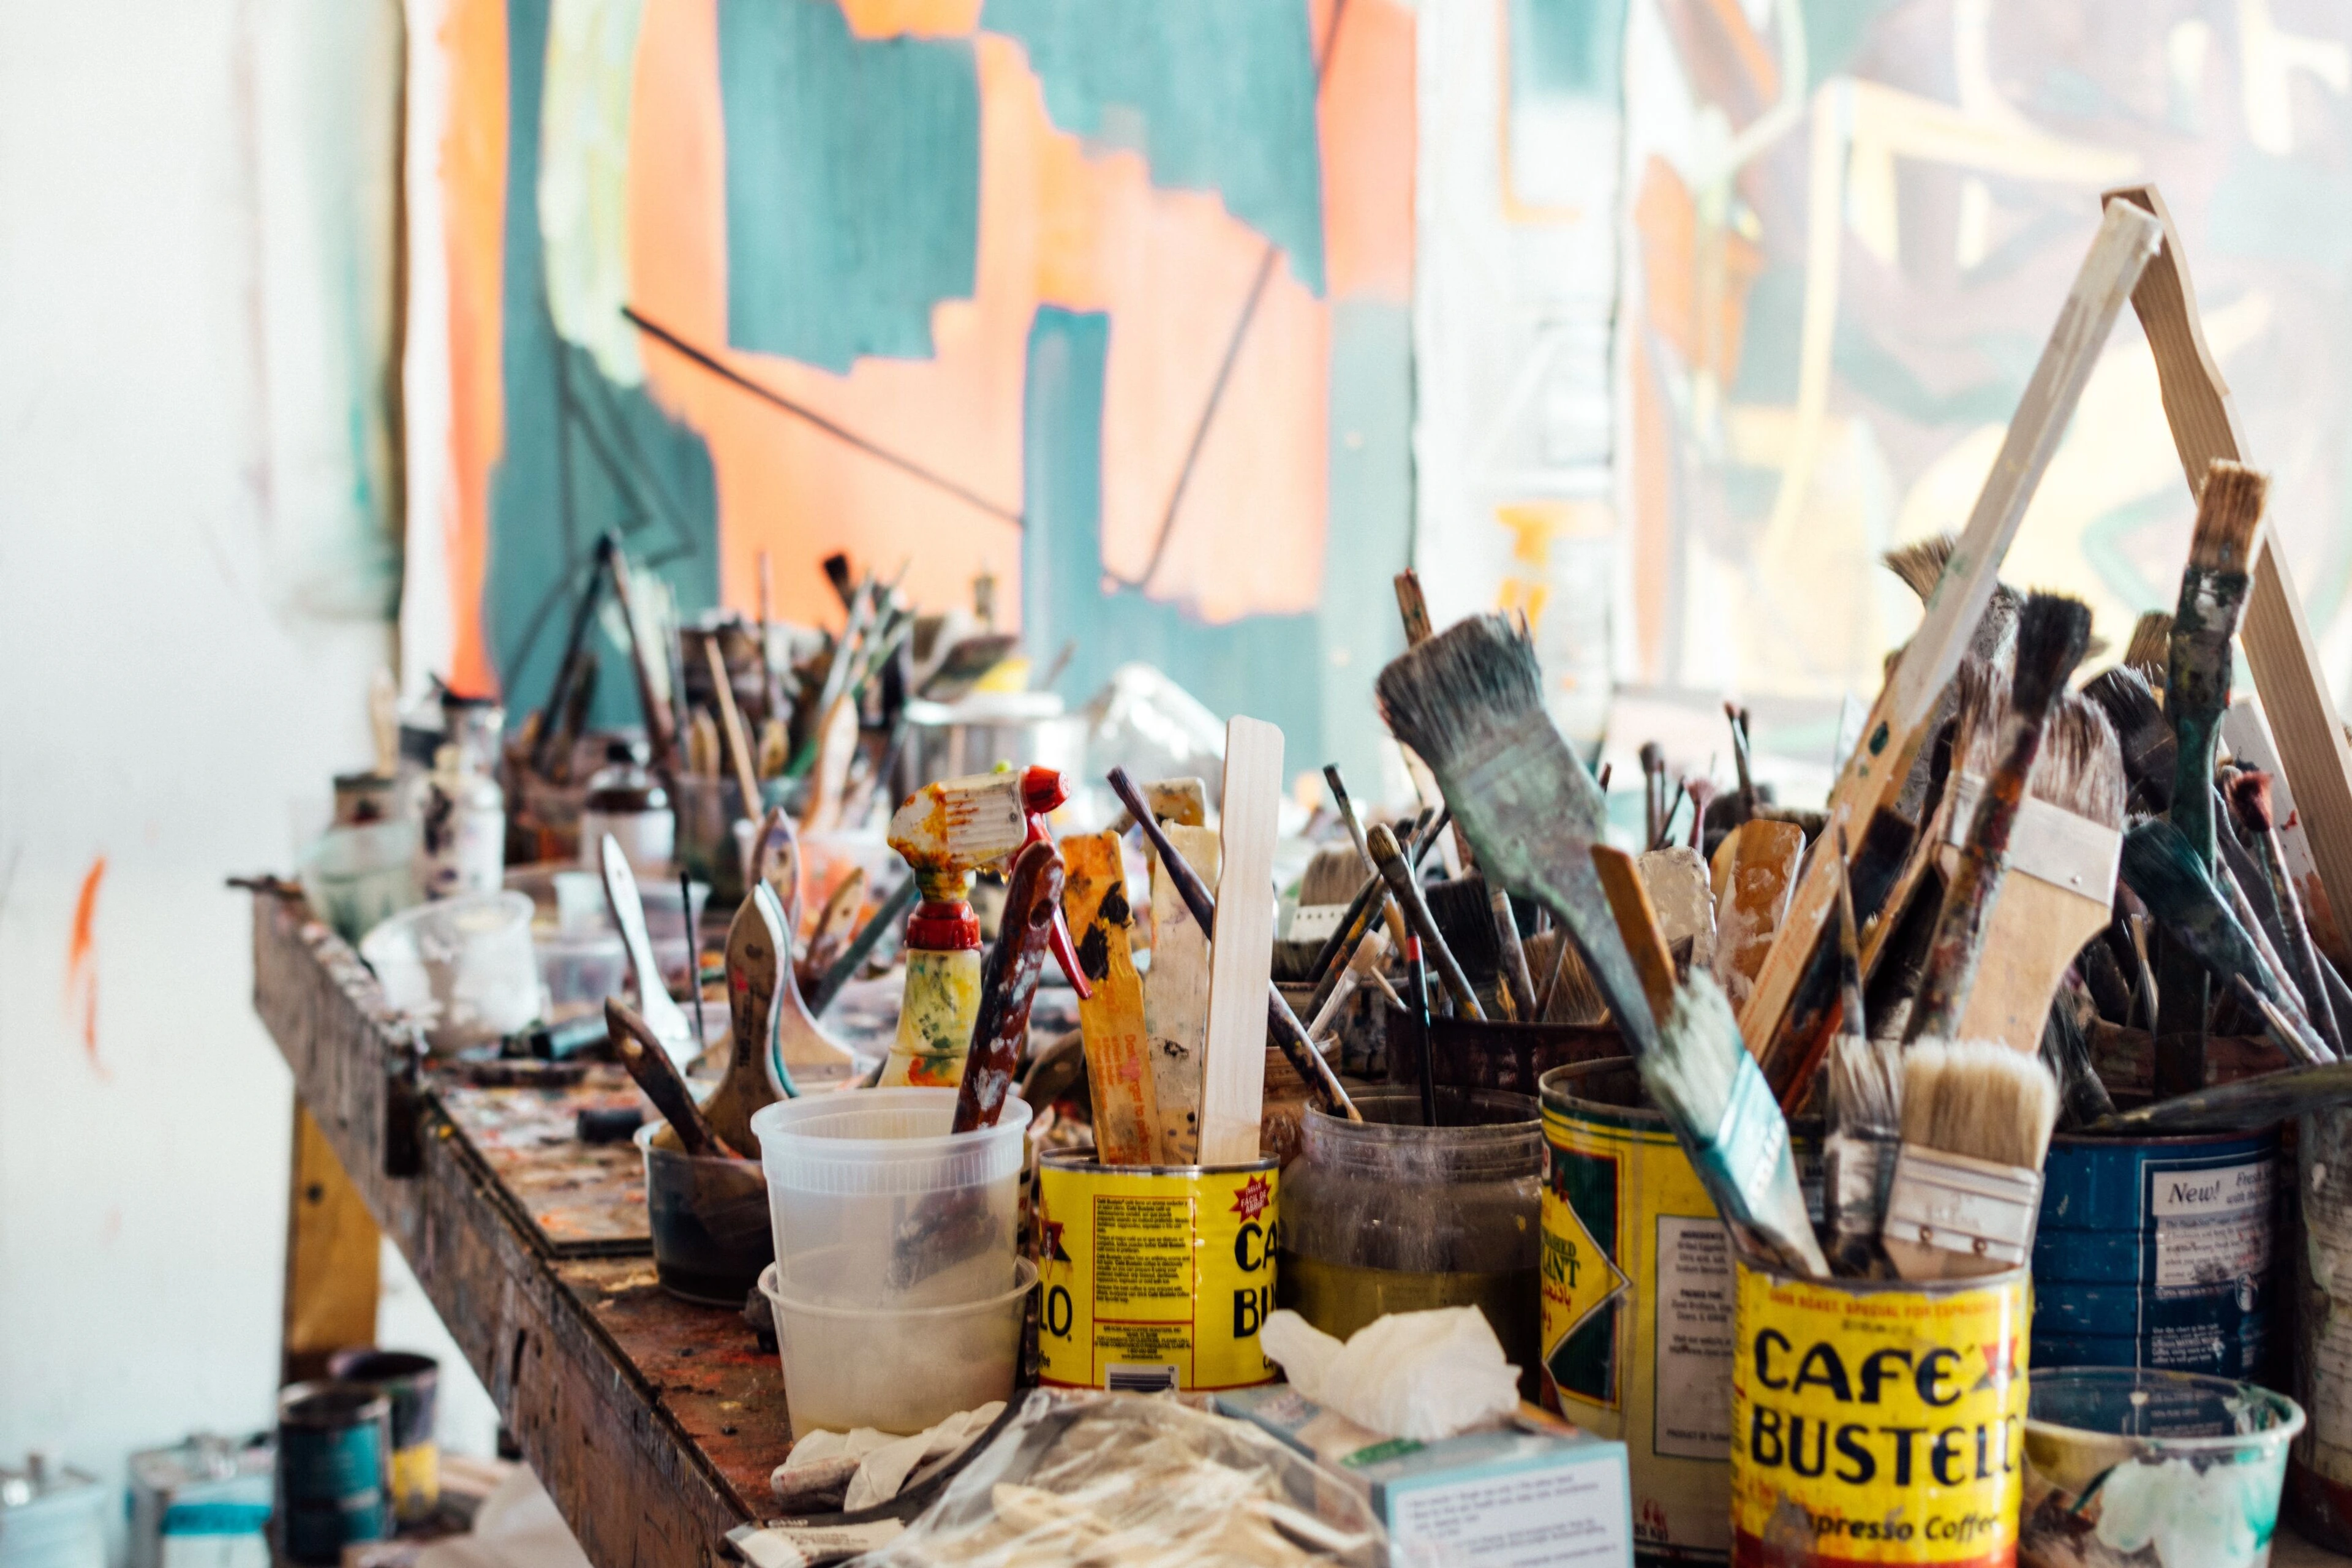
Ah, the glorious mess! My own little corner often looks something like this – a battlefield of creativity, where charcoal dust mingles with paint smudges and good intentions. It's a space where ideas take shape, sometimes cleanly, sometimes... not so much. This image captures that perfectly.
Basic Charcoal Techniques to Try
Okay, you've got your dusty arsenal ready. Now let's explore how these tools come together to make marks and build form! The beauty of charcoal is its versatility. Working from a reference image or a simple object with clear lighting can be a great way to practice these techniques as you learn to see in terms of light and shadow. Speaking of light, pay attention to your lighting setup when you draw – strong, directional light will make highlights and shadows much clearer and easier to translate into charcoal values. Consistent lighting while you work is crucial; trying to draw subtle value shifts under fluctuating light is incredibly frustrating and makes it hard to judge your tones accurately. When working from a reference, try simplifying the subject into basic shapes and identifying the main areas of light and shadow first – don't get bogged down in tiny details too early.
Holding the Charcoal
Don't just hold it like a pencil for everything. For broad strokes and shading large areas, try holding the stick on its side and using the flat edge. This covers a lot of ground quickly and gives a different texture. For lines and details, hold it closer to the tip, like a pencil. Experiment with different grips to see the variety of marks you can make. It feels awkward at first, like trying to write with your non-dominant hand, but trust me, it unlocks so many possibilities.
Making Marks
Start simple. Draw lines with different pressure – from the faintest whisper of vine charcoal using the side, to the deepest black of compressed using the tip. Draw circles, squares. Fill areas with tone using the side of the charcoal. See how the texture of the paper affects the mark – the toothier the paper, the more granular the mark will be, leaving little flecks of white paper showing through. This is part of charcoal's charm. The sound it makes as it scratches against the paper's tooth is part of the process, too.
Shading
Charcoal is fantastic for building up tone. Start with light layers using vine charcoal or the side of a compressed stick. Gradually add more layers to build up darker values. Don't try to get the darkest black right away; build it up slowly, layer by layer. You can also vary pressure within a single stroke or layer to create subtle tonal shifts, adding nuance to your shading. Think of it like sculpting with shadow. You can also layer vine and compressed charcoal – start with vine for the overall tone, then use compressed to deepen the shadows and add definition. Beyond blending, consider hatching (parallel lines) or cross-hatching (intersecting lines) to build tone and texture. These techniques leave the individual marks visible, interacting beautifully with the paper's tooth, and can be chosen over blending when you want to show the direction of form or maintain a more graphic quality. I remember trying to get a smooth gradient once and just kept adding more and more charcoal, ending up with a flat, lifeless blob. Learning to build up tone gradually was a game-changer.
Charcoal powder can also be applied and blended over large areas using brushes or soft cloths for very smooth, subtle washes of tone, though this is often a more advanced technique. You can even mix charcoal powder with a little water to create a charcoal wash, which behaves somewhat like watercolor, allowing for fluid, transparent layers – definitely something to explore once you're comfortable with the dry medium.
Blending
This is how you create smooth transitions and soft edges. Use your finger, a tortillon, a chamois cloth, a cotton ball, or even a soft brush or cotton swab to gently rub the charcoal into the paper's tooth. Each tool gives a slightly different effect – fingers are quick but can be muddy (due to transferring skin oils), tortillons offer precision, chamois is great for large, soft areas, cotton balls for broad, subtle blends, and brushes/swabs are good for small details. Be mindful that over-blending can make your drawing look muddy or flat, losing the lovely texture. Sometimes leaving some of the raw marks is more expressive! It's a balance you'll learn with practice. I once spent ages blending a background to perfection, only to realize it looked completely flat compared to the textured subject. Lesson learned: embrace the tooth!
Lifting and Erasing (Subtractive Drawing)
This is like drawing with light! Subtractive drawing is a key technique in charcoal, where you cover an area with charcoal and then remove pigment to create lighter tones, highlights, and shapes. Use your kneaded eraser to dab or press onto areas to lift charcoal and create lighter tones or highlights. Mold the eraser into a point for fine details or use the edge for sharper, more defined lifts. Use the plastic/vinyl eraser for sharper highlights or corrections, but remember it can be harsher on the paper. An eraser pencil is perfect for drawing thin, bright lines or cleaning up tiny areas with precision. You can also use a soft brush to gently lift pigment for subtle highlights or transitions, almost like dusting light onto the paper. Don't be afraid to lift back to the paper or near-white; it's a key part of the process. You can even use stencils or shields to protect areas while erasing for crisp lines. I remember the first time I intentionally drew with my kneaded eraser, pulling bright highlights out of a shaded area – it felt like magic, like I was sculpting light itself. Remember to keep your kneaded eraser clean by kneading it frequently; a dirty eraser will just smear the charcoal instead of lifting it effectively.
Charcoal is very forgiving because you can lift so much of it off. Don't be afraid to make mistakes and correct them. It's part of the process! Just keep making marks and seeing what happens.
Simple Exercises to Get You Started
Ready to get your hands dirty with purpose? Try these. They might seem simple, but they build fundamental skills. These exercises are a great way to practice the techniques we just discussed. They also help you understand how charcoal interacts with paper and how to control value – the range of light and dark tones. What will you discover about light and shadow?
- Value Scale: Draw a series of boxes (5-7 is a good number to start). In the first, leave it white (the paper). In the last, make it the darkest black you can achieve with your charcoal. Fill the boxes in between with gradually increasing tones, aiming for distinct steps in value. This helps you understand the full range of values your charcoal can produce and how pressure affects tone. It's less exciting than drawing a masterpiece, but crucial. Trying to get smooth transitions across the boxes can be surprisingly tricky, a good lesson in control! (Try spending 15-30 minutes on this exercise initially.)
- Basic Shapes / Value Studies: Draw a sphere, a cube, a cone. Practice shading them to make them look three-dimensional, paying attention to where the light hits and where the shadows fall. For these studies, try to use a single, consistent light source (like a lamp) to make identifying the light and shadow areas easier. Focus on identifying the terminator (the line separating light from shadow), the core shadow (the darkest part of the shadow on the form), reflected light (light bouncing back onto the form from the surface it's resting on), and cast shadows (the shadow the object casts onto the surface). Use blending to soften transitions and your kneaded eraser for highlights. This is where you really start to see form emerge from the dust. These are often called "value studies" and are fundamental to learning how to translate three-dimensional objects into two-dimensional representations using light and shadow. You can learn more about The Dramatic Dance: How Artists Use Light and Shadow. (Aim for 20-40 minutes per shape study initially.)
- Simple Objects: Find an apple, a mug, a crumpled piece of cloth. Draw it using charcoal, focusing on capturing the form through light and shadow. Don't worry about perfection, just observe and draw what you see. It's about seeing the world in terms of light and dark, which charcoal is perfect for. Still life with strong, directional lighting is particularly well-suited for charcoal practice.
- Eraser as a Tool Exercise (Subtractive): Completely shade a small area of paper with a medium tone using the side of a charcoal stick. Now, using only your kneaded eraser molded into different shapes (a point, a wedge), draw into the shaded area, lifting charcoal to create lines, shapes, and highlights. See how much detail and form you can create just by removing pigment.
- Gesture Drawing: Grab your vine charcoal and do quick, timed sketches (30 seconds, 1 minute) of figures or objects, focusing on capturing the energy and movement rather than detail. Charcoal's immediacy is perfect for this. If you're interested in figure drawing, you might also find our guide on How to Draw Hands: An Artist's Guide to Conquering the Challenge helpful, as hands are a classic drawing challenge.
These exercises are great for building fundamental skills, not just in charcoal but in drawing in general. Understanding Art Composition: A Viewer's Guide to Seeing More Than Just Paint is also a key skill that charcoal excels at teaching. Simple portraits focusing on the structure of the face or landscapes with dramatic skies are also excellent subjects for charcoal beginners.
Common Beginner Mistakes (I Made Them All!)
Trust me, I've stumbled through every single one of these. Don't worry, everyone learning charcoal makes these mistakes. Knowing them can help you avoid some frustration, but remember they're just part of the learning curve! It's like trying to learn to ride a bike without falling – you'll probably scrape your knees (or smudge your drawing) a few times.
- Over-blending: Trying to make everything perfectly smooth can kill the life and texture in a charcoal drawing. Let some of the tooth show! Embrace the grain. Sometimes that raw, dusty texture is exactly what makes charcoal drawings so compelling.
- Going Too Dark Too Soon / Using Too Much Pressure: It's easier to add more charcoal than to remove it, especially with compressed charcoal. Build up your darks gradually, layer by layer. Applying too much pressure too early makes it very difficult to lift the charcoal back to lighter values without damaging the paper. I definitely ruined a few drawings by pressing too hard too fast! Patience is key here.
- Not Using the Eraser as a Tool: Thinking of the eraser only for mistakes means you miss out on drawing highlights and lifting tones. Your kneaded eraser is a sculpting tool for light! I definitely spent too long just using it to fix wobbly lines before realizing its true power.
- Wiping Away Dust with Your Hand: Instant smudge-fest. Use a brush or gentle blowing (away from you!). Seriously, just don't do it. I still catch myself sometimes! It's a hard habit to break.
- Not Fixing: You finish a drawing, you're proud, you lean it against a wall... and half of it slides off. Fixative is your friend. Learn to use it. And use it properly in a well-ventilated area!
- Using the Wrong Paper: Trying to use charcoal on smooth printer paper is just asking for trouble. You need that tooth! It's like trying to climb a smooth wall vs. a textured one – the charcoal needs something to grip. Using paper with insufficient tooth is a recipe for frustration and muddy results.
- Not Protecting Finished Work: Leaving your beautiful, fixed drawing exposed means it can still get smudged or attract dust over time. Use glassine paper for storage! It's a simple step that makes a huge difference in preserving your work.
- Not Sharpening Properly: Trying to use a dull charcoal pencil or breaking tips because you're using the wrong sharpener is incredibly frustrating. Invest in a craft knife or sandpaper block and learn the right way to get a good point. A sharp point gives you so much more control for details.
- Not Experimenting Enough: Being too precious or afraid to make a mess can hold you back. Charcoal is forgiving! Try different techniques, different pressures, different tools. See what happens. Embrace the dust and the process. The unexpected marks are often the most interesting.
Embrace the mistakes as part of the learning process. Charcoal is forgiving; you can often lift and rework areas. Just keep making marks and seeing what happens. They're easily overcome with a little patience and practice.
Troubleshooting Common Charcoal Issues
Even with the right supplies and techniques, you might run into some common issues. Here's what I've encountered and how I usually tackle them:
- Muddy Blends: This often happens from over-blending or using fingers too much (transferring oils). Try using blending tools like tortillons or chamois cloth. If an area is already muddy, you might need to lift as much charcoal as possible with a kneaded eraser and rebuild the tone layer by layer, using lighter pressure and less blending.
- Difficulty Getting Deep Blacks: Ensure you're using a soft grade of compressed charcoal (like 6B or 8B). Build up the darks in layers, applying more pressure gradually. Sometimes layering a soft compressed charcoal over a base layer of vine charcoal can help achieve deeper blacks. Also, check your paper – some papers just won't hold super dark tones.
- Highlights Aren't Bright Enough: You might not be lifting enough pigment, or the paper's tooth is holding onto the charcoal too much. Use a clean, pointed kneaded eraser or an eraser pencil for sharper lifts. Make sure you're working on paper with enough tooth to allow for lifting. Sometimes, you need to lift back to the bare paper for the brightest highlights. Also, ensure your kneaded eraser is clean – a dirty eraser just smears the charcoal around.
- Paper Getting Damaged/Fuzzy: This is usually from erasing too aggressively, especially with a plastic/vinyl eraser on textured paper. Use your kneaded eraser for most lifting, as it's much gentler. If you need a sharper lift, use a plastic eraser sparingly and with light pressure. Working on a sturdier paper weight (80lb+) can also help.
- Drawing Smudging While You Work: Use a sheet of paper under your hand! This is the simplest and most effective solution. A mahl stick or bridge is also excellent for keeping your hand off the surface entirely.
- Charcoal Not Adhering Well in Spots: This can happen if there's oil transferred from your hands (wash them!) or if you accidentally sprayed a tiny bit of fixative on that spot early on. Try lifting the area with a kneaded eraser and rebuilding the tone. If it persists, that spot on the paper might be compromised, and you may need to work around it or try a different sheet.
Learning to troubleshoot is part of the artistic journey. Don't get discouraged; see each issue as a puzzle to solve! Every 'mistake' is a learning opportunity.
Why I Love Charcoal (And Maybe You Will Too)
There's something incredibly tactile and immediate about charcoal. You're literally working with burnt earth. It feels ancient and modern all at once. It forces you to think about value and form in a way that color doesn't always. Stripping away color allows you to focus purely on the interplay of light and shadow, the fundamental building blocks of visual art. Even in my own work, which is often vibrant and abstract (see my art for sale), the fundamental understanding of light and shadow I gained from charcoal drawing is absolutely crucial. For instance, learning to build up subtle gradients with charcoal directly translates to how I layer translucent colors in my abstract paintings to create depth and form, even without explicit lines. It's the skeleton beneath the colorful skin. I remember working on a large charcoal portrait once, spending hours building up the subtle shifts in shadow on a cheekbone, and feeling that deep connection to the form emerging from the paper. It was a slow, meditative process, completely different from the speed of painting, but just as rewarding. The feeling of pulling a bright highlight out of a dark area with a kneaded eraser is pure magic.
It's messy, yes, but it's a good kind of messy – the kind that feels like real work is happening in my studio (peek into my artist timeline), a tangible connection to the creative process. It's also a fantastic medium for capturing emotion and energy. Think of the dramatic sketches of the old masters or the powerful, expressive drawings of artists like William Kentridge: My Personal Journey Through Charcoal, Erasure, and Memory (whose work with charcoal and erasure, creating dynamic, evolving narratives, is particularly inspiring), Käthe Kollwitz (renowned for her deeply emotional, powerful figures rendered with raw, expressive lines and rich darks that capture the human condition), or even the hyper-realistic charcoal drawings of Robert Longo (achieving incredible detail and intensity through masterful control of value and contrast, pushing the medium to its limits). Charcoal has a unique ability to convey mood and movement with just a few strokes. There are many Masters of the Line: Famous Drawers Today & Why Drawing Endures working in all sorts of styles, proving the medium's enduring power.
If you're looking to explore different Types of Artwork Explained: An Artist's Engaging Guide to Forms, Mediums & More or just want to try a new medium, give charcoal a shot. It might surprise you how much you connect with it. It's a journey of discovery, much like developing your own Developing Your Unique Artistic Style: A Personal Journey of Discovery and Evolution.
Frequently Asked Questions About Charcoal Drawing
Here are some common questions beginners often ask about charcoal drawing:
Is charcoal drawing difficult for beginners?
Like any new medium, it takes practice! The dust and smudging can be tricky at first, but the ability to easily lift charcoal with a kneaded eraser makes it quite forgiving for corrections. Start simple and focus on understanding value.
What's the difference between vine and compressed charcoal?
Vine charcoal is softer, lighter, and easier to erase, made from burnt vines or willow. Compressed charcoal is charcoal powder mixed with a binder, making it harder, darker, and less easily erased. It comes in different grades of hardness/darkness (like 2B, 4B, 6B, 8B), similar to graphite pencils but generally much darker. Remember, for charcoal, higher 'B' numbers mean softer and darker.
What's the difference between charcoal and carbon pencils?
Charcoal pencils are made from charcoal powder and a binder, offering blendability and liftability. Carbon pencils use carbon black pigment and a binder, resulting in a denser, less dusty, and harder-to-erase mark. Charcoal is generally preferred for techniques relying heavily on blending and lifting.
Do I need special paper for charcoal?
Yes, paper with 'tooth' or texture is best. It helps the charcoal particles adhere to the surface. Smooth paper won't hold the charcoal well, leading to smudging and difficulty building layers. Look for paper specifically labeled for charcoal or pastel, or drawing paper with a noticeable texture. Papers like laid paper or vellum surface also offer unique textures for charcoal.
How do I stop my charcoal drawing from smudging?
Use a fixative spray. Workable fixative allows you to continue drawing over it, while final fixative seals the drawing when you're done. Handle the drawing carefully even after fixing, and consider using glassine paper for storage.
Can I mix charcoal with other drawing materials?
Absolutely! Charcoal can be combined with graphite, pastels (especially white pastel on toned paper!), or even ink for mixed-media effects. Just be mindful of the order you apply them; charcoal often goes on top of graphite or light ink washes, but ink or paint can go over fixed charcoal. Applying wet media directly over unfixed charcoal will likely result in a muddy mess.
Can I use charcoal on surfaces other than paper?
Yes, charcoal can be used on other textured surfaces like wood or canvas, often after applying a suitable ground (like gesso) to give it tooth. Experimenting with different surfaces can lead to interesting results.
Can I use white charcoal or white pastel with black charcoal?
Yes, absolutely! White charcoal or pastel is fantastic for adding highlights and working on toned paper or black paper. It allows you to build up light values just as you build up dark values with black charcoal, creating a full range of tone on a mid-value surface.
How do I sharpen charcoal pencils and sticks?
For charcoal pencils, a craft knife or utility knife is often best for creating a long, sharp point. Always sharpen away from yourself over a trash can. Standard pencil sharpeners are generally not recommended as they can break the brittle core. For compressed sticks, you can rub them on a sandpaper block to create a point or a bevelled edge.
Are charcoal drawings archival?
Yes, charcoal drawings can be archival, meaning they can last a long time without significant degradation, provided you use quality, acid-free paper and charcoal, and protect the finished drawing with a proper art fixative and store it carefully (e.g., with glassine paper in a portfolio).
How do I clean charcoal dust off my hands and clothes?
For hands, soap and water usually work, but sometimes a little baby oil or hand sanitizer can help lift stubborn pigment before washing. For clothes, try shaking off as much dust as possible outdoors first. Avoid rubbing the dry dust in. You may need to pre-treat stains before washing, but charcoal can be tricky to remove completely from fabric.
How should I frame or display a finished charcoal drawing?
To protect a finished charcoal drawing from smudging and dust, it's best to frame it under glass or acrylic. Ensure there is a mat or spacer between the drawing's surface and the glass to prevent the charcoal from touching the glass. Store unframed drawings with a sheet of glassine paper over the surface in a portfolio or flat file. You can find more tips in our guide on The Ultimate Guide to Framing Your Artwork: Tips & Techniques.
How should I store charcoal sticks and pencils?
Store them carefully in a box or case to prevent them from breaking. Compressed charcoal is particularly brittle and prone to snapping if not protected.
Ready to Get Dusty?
Charcoal drawing is a rewarding practice. It teaches you to see in terms of light and shadow, to embrace imperfection, and to find beauty in the raw mark. It forces you to simplify and focus on the fundamental interplay of light and dark, which is a crucial skill for any artist, regardless of medium. Don't be intimidated by the mess; embrace it! Grab some supplies, find a quiet corner (or a well-ventilated one for fixing!), and just start making marks. The more you practice, the more comfortable you'll become with the medium's unique properties. You might just fall in love with the process. There's a unique satisfaction in seeing a form emerge from the dust, built purely from light and shadow, a feeling that's hard to replicate with other mediums.
And hey, if you create something you love, maybe you'll even want to explore putting it up for Art for Sale yourself one day. Or perhaps you'll be inspired to explore other mediums or even visit a Modern Art Galleries: Your Ultimate Guide to Visiting & Understanding to see how contemporary artists use line and tone. The journey of art is full of unexpected turns. Maybe you'll even find yourself visiting my own little corner of the art world at the Zen Museum in 's-Hertogenbosch someday. The path of an artist is a wild one, full of exploration and discovery, as my own My Artist Timeline can attest.
Further Exploration
If you want to dive deeper into related topics, check out these resources:
Stepping into the world of charcoal is like opening a door to a fundamental way of seeing and creating. It strips away the complexity of color and forces you to confront form, light, and shadow in their purest state. I hope this guide gives you the confidence to pick up a stick and get started. Your hands will get dirty, your paper will get smudged, but you'll be connecting with an ancient practice and discovering a powerful new way to express yourself. Where will your dusty journey take you?


