How to Create a Salon-Style Art Hang: Your Comprehensive Guide to Curated Chaos
Transform your walls with a personal touch! Learn how to create a stunning salon-style art hang in your home with this comprehensive, step-by-step guide from an artist's perspective, covering curation, planning, tools, hanging techniques, lighting, common mistakes, and telling your unique story.
How to Create a Salon-Style Art Hang: Your Personal, Comprehensive Guide to Curated Chaos
Ah, the blank wall. It stares back at you, full of potential, maybe a little intimidating. Is your art collection gathering dust instead of admiration? You've collected some art over time – pieces you love, maybe a few prints, perhaps even something from a local artist you met at an opening. But how do you get them from leaning against the wall (or worse, still in their tubes!) to creating that effortlessly cool, layered look you see in galleries or stylish homes? You want a salon-style hang, and trust me, it's less daunting than it looks. It's less about perfection and more about personality and telling your unique story. It's about turning a flat surface into a vibrant, breathing entity, a visual symphony of your life and taste.
I remember the first time I attempted a proper gallery wall. It involved a lot of measuring, a lot of second-guessing, and maybe one or two misplaced nail holes that I still occasionally spot and sigh at. Like the one behind that small landscape print – a tiny monument to my initial over-eagerness. But the result? A wall that felt alive, that told a story, that wasn't just a backdrop but a destination. That's the magic of a salon hang – it's a conversation starter, a visual diary, and a bold statement all in one. It's a curated chaos that feels just right.
So, let's dive in. Forget the fear of commitment (it's just paint and plaster, after all!). We're going to turn that blank canvas into a masterpiece of your own making.
What Exactly is a Salon Hang?
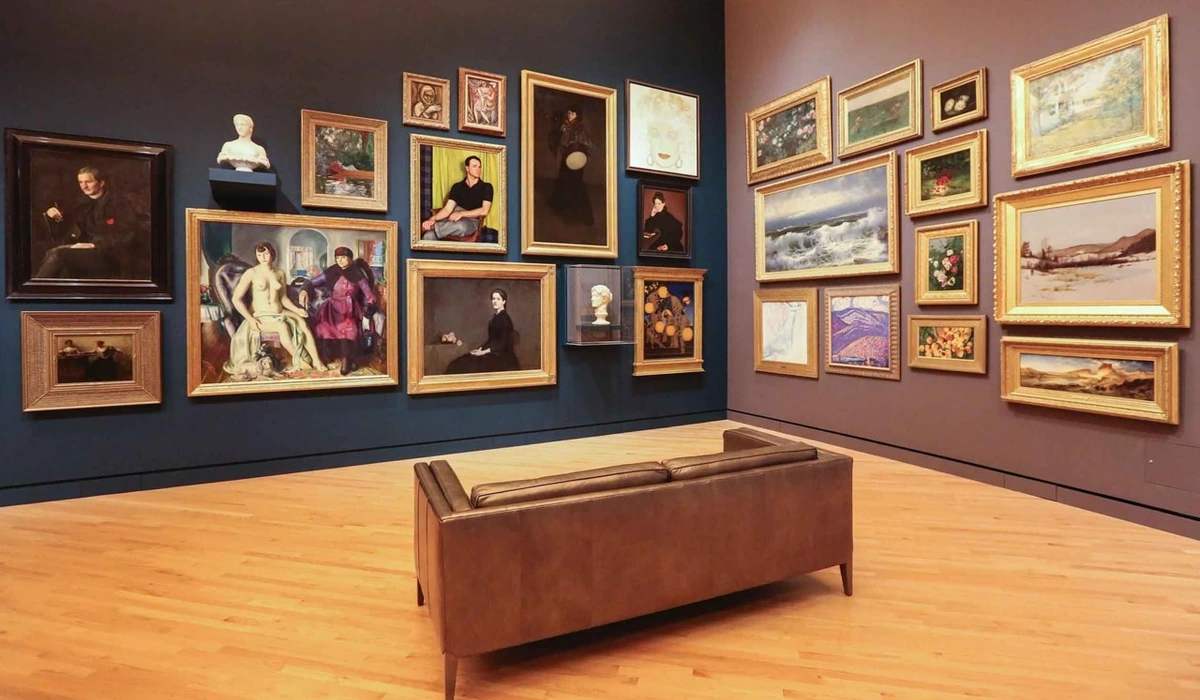
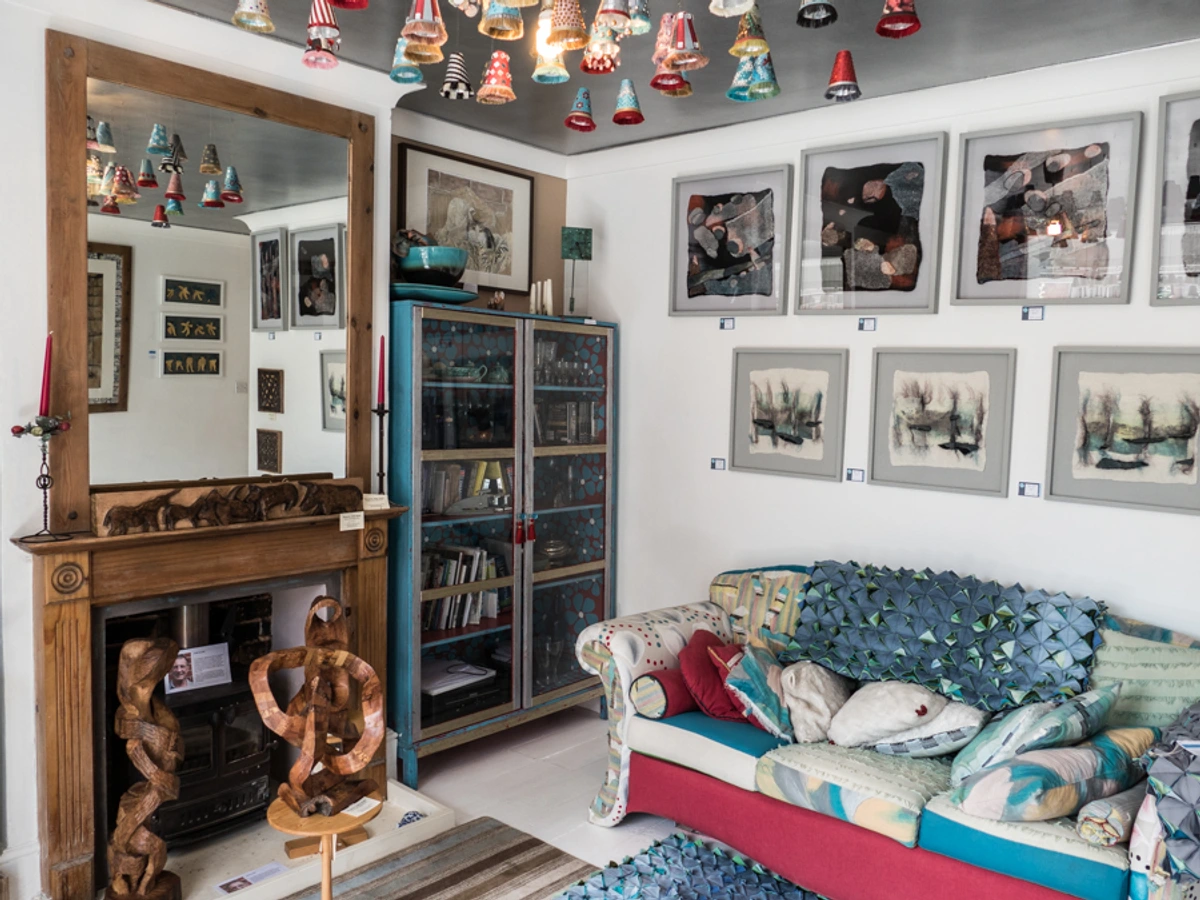
Think back to the salons of 17th and 18th century Paris. Art was displayed floor-to-ceiling, crammed together in a glorious, sometimes overwhelming, visual feast. It wasn't about minimalist spacing; it was about showcasing as much as possible, creating a dense, layered effect. This historical approach often featured academic paintings, grand historical scenes, and numerous portraits, reflecting the tastes and hierarchies of the time. The sheer volume and proximity of works influenced how art was viewed and critiqued, encouraging viewers to take in the overall impression while also inviting closer inspection of individual pieces. Imagine the buzz, the competition, the sheer volume of art vying for attention! That's the essence of the salon hang – art displayed close together, often mixing sizes, styles, and mediums, creating a rich, curated look that feels both abundant and intentional. In contemporary homes, the terms "salon hang" and "gallery wall" are often used interchangeably to describe this dense, layered display style, though "salon hang" often evokes a slightly more historical or maximalist feel.
It's the opposite of the single, perfectly centered piece. It's about building a visual narrative, letting different pieces play off each other. In a world often leaning towards minimalist interiors, a salon hang is a bold embrace of maximalism, adding warmth, character, and a sense of history to a space. It turns a simple wall into a dynamic installation that constantly invites closer inspection. It's a way to challenge traditional notions of "proper" art display and make your own rules.
Historically, the term comes from the official art exhibitions of the Académie des Beaux-Arts in Paris, held initially in the Salon Carré of the Louvre. These annual (later biennial) events were the central showcase for French artists, and space was limited, leading to the famous floor-to-ceiling arrangements. Imagine the sheer volume and variety! As a little historical side note, this dense hanging style also led to the famous Salon des Refusés in 1863, where works rejected by the official Salon were shown. It was a rebellious counterpoint that highlighted how the 'rules' of display can evolve and be challenged, adding another layer to the history of how we view and present art. While our home versions are usually on a smaller scale, the principle remains: maximum art, minimum white space, maximum impact.
Today, you see the spirit of the salon hang in many places beyond traditional galleries. Boutique hotels often use dense art arrangements in lobbies and corridors to create a sense of curated luxury and personality. Restaurants might feature salon walls to add visual texture and conversation points. And in museums, while not always floor-to-ceiling, you'll find examples of dense hangs, particularly in historical collections or special exhibitions designed to evoke a specific period or theme. Think of the way some museums display prints or drawings in a more intimate, clustered fashion. It's a versatile display method that adapts to different contexts while retaining its core principle of abundant, layered art.
Why Go Salon Style?
Tired of blank walls? Beyond just looking cool, a salon hang offers some real benefits:
- Maximize Space: Got a lot of art but limited wall space? This lets you display more pieces than traditional spacing. It's like a visual storage solution! It's particularly effective for showcasing a growing collection over time, as integrating new pieces into a dense arrangement is often easier than into a sparse one.
- Tell a Story: Grouping art allows you to create themes, connect different periods of your life, or simply showcase pieces that evoke a similar feeling. It's a personal exhibition, a visual timeline of your taste and experiences. What story do you want to tell with your collection? Maybe it's a wall dedicated to your travels, featuring art picked up in different cities. Or perhaps it's a chronological display of your collecting journey, showing how your taste has evolved. It could even be a wall celebrating a specific theme, like art about nature or art about jazz. The possibilities are endless, and the narrative is entirely yours to craft. Consider grouping pieces by personal milestones – art acquired during a significant trip, a piece that marked a new job, or a gift from someone special. These personal markers add deep layers to your story.
- Create Impact: A dense wall of art is instantly eye-catching and creates a focal point in a room. It adds depth and texture, turning a flat surface into a dynamic installation.
- Mix and Match: It's the perfect excuse to hang that tiny sketch next to a large print, or a painting alongside a photograph. Rules are meant to be bent, or at least interpreted creatively. As an artist, I love seeing how unexpected pairings can create new dialogues. Try placing a bold abstract next to a delicate botanical print, or see how a painting with thick impasto plays off a smooth photograph. I once hung a tiny, serious etching I bought years ago next to a bright, silly abstract print I made last week, and they somehow just worked, creating a surprising visual conversation. It's also a fantastic way to incorporate pieces that might not stand alone well but work beautifully as part of a larger composition. Don't be afraid to mix mediums too – a framed print, a canvas, a small textile piece, or even a small sculpture on a floating shelf can live happily side-by-side, adding unexpected texture and dimension.
- Cost-Effectiveness: Filling a large wall with just a few massive, expensive pieces can be prohibitive. A salon hang allows you to incorporate smaller, more affordable pieces like art prints, postcards, or even meaningful children's art alongside more significant investments, making it a budget-friendly way to create a high-impact display.
It's a fantastic way to bring your art at home to life.
Step 1: Gather Your Treasures (and Prepare for Curation)
First things first: collect all the art you might want to include. This is not the time to be shy. Pull out everything – framed pieces, canvases, prints, even things you might not have considered wall-worthy before. Lay them out in a space where you have room to maneuver, like the floor. This is your personal treasure trove, your potential exhibition. (Fair warning: this is where my floor usually disappears under a pile of potential, and I start questioning everything. It's a necessary chaos before the curated calm. You might even find pieces you completely forgot you owned, sparking a little moment of rediscovery!)
Consider the variety. A great salon hang often mixes types of artwork – paintings, drawings, photographs, prints (maybe even some affordable art prints you found online!), textiles, or even small sculptural objects. Don't be afraid to include different frame styles or even unframed canvases or prints mounted on board if they work together; they add different depths and textures to the mix. Think about textures, colors, subjects, and sizes. How do they speak to each other? Does the smooth surface of a photograph contrast nicely with the thick texture of an impasto painting? Does the matte finish of a drawing complement a glossy print?
Also, take a moment to assess the condition of each piece. Does anything need a quick clean? Is a frame loose? Does a print need flattening? Addressing these small issues before you hang will save you headaches later. For more valuable pieces, consider professional painting restoration or framing. You can find more tips in Art Care 101.
Curating Your Collection: The Art of Selection
Okay, you've gathered your potential wall-mates. Now comes the crucial step: deciding who makes the final cut. While the goal is density, it's crucial to acknowledge that you might gather more than you can or should hang. This is where the curation comes in. Look at your pile of treasures and start making choices based on:
- The Wall: Does the size and shape of the piece work with the wall space you have? Will it fit into the overall puzzle?
- The Vibe/Theme: Does this piece fit the theme or feeling you want for this particular wall? Does it clash in a bad way? Sometimes a piece that doesn't work in this specific grouping might be perfect for another spot. I remember having a vibrant, abstract piece that I loved, but every time I put it in the potential layout for my living room wall, it just screamed over everything else. It found its perfect home on a smaller wall in my studio instead. It's okay to let a piece tell you where it belongs.
- Visual Dialogue: How does this piece look next to the others you're considering? Do they enhance each other, create an interesting contrast, or does one overpower the rest? Think about the conversation happening between the artworks. Consider the composition basics that artists use. Explicitly consider the direction figures or objects in the art are facing – do they lead the eye into the wall or off it? Do they face each other?
- Emotional Connection: Do you still love this piece? Does it evoke a positive memory or feeling? A salon wall is deeply personal, so prioritize pieces that resonate with you.
- Historical Significance (to you): Does this piece mark a specific time in your life, a trip, a gift from someone special? These personal markers add layers to your story.
- Subject Matter & Narrative: Beyond just aesthetics, think about the stories the pieces tell, individually and together. Can you group pieces that share a common subject (like art about nature) or evoke a similar narrative or emotion (like art about loss or art about love)? This adds another layer of depth to your curated wall.
Don't feel pressured to use everything. The curation process is key to creating a cohesive, intentional look, even within the abundance of a salon hang. It's about selecting the best pieces to tell this wall's story. As an optional initial step, consider creating a mood board or digital collage of the art pieces you're considering. This can help you visualize the overall color palette, style mix, and potential themes before you even get to the floor layout or templates.
Strategies for Curation:
Need a starting point for your curated chaos? Here are a few frameworks you can use:
- Color Palette Focus: Choose 2-3 dominant colors from your art collection or room decor and select pieces that feature these colors prominently. This creates a visually harmonious, albeit dense, arrangement. I often use this when I want a wall to feel calming or cohesive, pulling out subtle blues and greens.
- Subject Matter Theme: Group pieces around a specific theme, like landscapes, portraits, abstract shapes, or even a personal interest like art about jazz or art for plant parents. This adds a clear narrative layer. This is great for telling a specific story, like my wall dedicated to pieces collected during travels.
- Anchor Piece First: Select your largest or most impactful piece as the central anchor. Then, build the rest of the arrangement outwards from this piece, using it as a visual starting point. This is my go-to for a large, empty wall – that one big piece immediately breaks the ice.
- Mix of Styles/Mediums: Intentionally select a diverse range of styles (abstract, figurative, photography, illustration) and mediums (painting, print, textile, sculpture) to create a dynamic and visually interesting wall. The contrast between pieces becomes part of the art. I love the energy this creates; it feels like a mini-museum of my diverse interests.
- Chronological or Personal Journey: Arrange pieces in the order you acquired them or based on significant life events they represent. This turns the wall into a visual timeline of your collecting history. This approach makes the wall feel incredibly personal, like flipping through a visual diary.
- Shape and Line Focus: Group pieces based on dominant shapes (circles, squares, triangles) or lines (horizontal, vertical, diagonal) within the artwork or frames to create visual harmony or dynamic contrast. Sometimes I'll notice a recurring circular motif or strong diagonal lines across several pieces and use that as a starting point.
- Scale Play: Intentionally group pieces of vastly different scales together to create visual tension and interest, rather than just distributing sizes evenly. Placing a tiny, detailed piece right next to a large, bold abstract can be surprisingly effective and draws the viewer in for closer inspection.
Remember, these are just starting points. Feel free to mix and match strategies or let your intuition guide you. The most important thing is that the final collection feels authentic to you. As a helpful reference, take a photo of your entire collection laid out on the floor once you've made your initial selections. This visual record can be invaluable during the planning and hanging stages.
Step 2: Choose Your Wall (and Your Vibe, and Your Light)
Which wall is calling out for this transformation? A large, prominent wall in a living room or hallway is classic. But don't discount smaller spaces – a salon hang can make a cozy reading nook or even a bathroom feel incredibly special. (Just be mindful of humidity if you're hanging art for bathroom!).
Think about the overall vibe you want. Are you going for a cohesive color palette? A mix of abstract and figurative? A chronological display of your collection? Having a loose theme can help guide your arrangement. Also, consider the scale of the wall relative to the room. A floor-to-ceiling hang on a small wall can feel oppressive, while the same density on a large wall feels grand. Match the scale of the hang to the scale of the space. Consider the height of your ceilings; a floor-to-ceiling hang can dramatically emphasize verticality in a room with high ceilings.
Consider the function of the room too. In a dining room, you might want energetic pieces that spark conversation. In a bedroom, calming, introspective art might be more appropriate. The art should enhance the purpose of the space. Also, consider the scale of the room's furniture (sofa, console table, fireplace) when planning the hang. Ensure the art wall complements the overall proportions of the space and the furniture it relates to. Think about the sightlines from other rooms or entryways – what's the first impression your salon wall will make upon entering the space?
Finally, think about the color of the wall itself. Is it a neutral backdrop, or a bold color that will interact with the art? The wall color is part of the overall composition. Consider the undertones of the paint color – a seemingly neutral gray might have blue or green undertones that subtly interact with the colors in your art. And crucially, evaluate the natural and artificial light that hits the wall throughout the day. How does the light change? Will direct sunlight fade delicate pieces? (You can find tips on protecting art from sunlight here). How will the art look in the evening under lamps? This can influence where you place certain pieces or if you need to plan for supplemental lighting later. I once hung a piece with subtle metallic accents on a wall that looked great during the day, but at night, the overhead light created a harsh glare that completely killed the effect. Learning how light interacts with your art is a game-changer. Test the lighting at different times of day by holding a few key pieces up to the wall before you commit to your layout.
Lighting Your Salon Wall:
Proper lighting is essential for making your salon wall truly shine. It can highlight textures, bring out colors, and add drama. Here are some options:
- Track Lighting: Versatile and adjustable, track lighting allows you to direct light precisely onto individual pieces. It's a popular choice in galleries for a reason. Consider the direction of the light source relative to the art to minimize glare and maximize texture visibility; side lighting often works best for textured pieces.
- Picture Lights: Small, dedicated lights mounted directly onto or above individual frames. These create a classic, intimate feel and draw attention to specific artworks.
- Spotlights/Floodlights: Ceiling-mounted lights that can illuminate larger sections of the wall or specific anchor pieces.
- Ambient Lighting: Ensure the room's general lighting is sufficient, but avoid placing art where it will receive harsh, direct light that causes glare or fading.
When choosing light bulbs, pay attention to the Color Rendering Index (CRI). A high CRI (90+) means the light will accurately represent the true colors of your artwork. Aim for CRI 90+ bulbs whenever possible. Also, consider the color temperature (measured in Kelvin). Warm light (lower Kelvin, e.g., 2700K-3000K) can enhance reds and yellows, creating a cozy atmosphere, while cool light (higher Kelvin, e.g., 4000K-5000K) can make blues and greens pop, creating a brighter, more neutral feel. Choose lighting that complements your collection and the room's overall mood.
Step 3: Understand Your Wall & Gather Your Tools
Okay, you've got your art and your wall. Time for the practical stuff. Having everything ready before you start planning the layout on the wall itself is key to avoiding frustration.
Dealing with Different Wall Types & Choosing Hardware:
Understanding your wall material is vital for choosing the right hanging hardware. Using the wrong type can lead to your art (or worse, your wall!) being damaged. Always consider the weight of each piece when selecting hardware. A small nail might hold a lightweight print, but a heavy framed painting needs something much more substantial. It's always better to overestimate the weight and use more robust hardware than necessary. Always test your anchors with a firm tug downwards before hanging your art, especially for heavier pieces. If possible, test with a weight slightly heavier than the artwork itself for extra confidence.
Wall Type | Characteristics & Considerations | Recommended Hanging Hardware |
|---|---|---|
| Drywall | Common in modern homes. Relatively soft, easily damaged. | Light items (under 5-10 lbs / 2-4.5 kg): Small nails (use sparingly). Medium items (10-25 lbs / 4.5-11 kg): Plastic or metal drywall anchors. Heavy items (25+ lbs / 11+ kg): Locate studs with a stud finder and use screws or heavy-duty picture hooks directly into the stud. Toggle bolts or Molly bolts are also excellent for heavier items where studs aren't available, distributing weight over a larger area. Molly bolts are particularly useful for hollow walls. |
| Plaster | Older homes. Can be brittle, especially if damaged or crumbly. | Use a drill with a masonry bit. Light to medium items: Plastic wall anchors. Heavier items: Toggle bolts or specialized plaster hooks that distribute weight over a larger area. Avoid hammering directly into old plaster if possible. |
| Brick/Concrete | Very hard and durable. Requires specialized tools. | You'll need a hammer drill and masonry bits. For very hard concrete or old brick, a rotary hammer might be necessary. Use appropriate wall anchors designed for brick or concrete (e.g., expansion anchors, sleeve anchors). Ensure the anchor is long enough to get past any surface plaster or texture. |
| Wood Paneling | Can vary in thickness and material (plywood, MDF, solid wood). | Light to medium items: Nails or screws directly into the wood. Be mindful of potential splintering when drilling; placing painter's tape over the drill spot can help. Heavy items: Locate studs behind the paneling and use screws or hooks into the studs for maximum security. Use appropriate screw length for panel thickness. |
Before drilling or hammering, especially for deeper anchors, be mindful of what might be behind the wall – plumbing, electrical wires, or ductwork. If you're unsure, consulting a professional or using a non-invasive method is wise. If you're hanging very valuable pieces, consulting a professional art installer is highly recommended.
If you're renting or just hate making holes, check out how to hang art without nails for alternative methods.
Specialized Hanging Systems:
For very heavy or valuable pieces, or for walls where traditional methods are difficult, consider specialized systems:
- Cleat Systems (French Cleats): These consist of two interlocking pieces, one attached to the wall and one to the artwork. They provide extremely secure support and distribute weight evenly. They are particularly useful for large, heavy canvases or panels and can help hang pieces flush against the wall, even on slightly uneven surfaces. I've used these for some of my larger abstract paintings, and the peace of mind is worth the extra effort.
- Picture Rail Systems: These involve installing a rail near the ceiling from which art is hung using adjustable wires or cords. This is a fantastic option if you plan to change your display frequently or want to avoid making multiple holes in the wall. It also adds a classic, gallery-like aesthetic.
- Security Hooks: For valuable pieces, consider using specialized security hooks that lock the artwork onto the wall, preventing easy lifting or accidental removal. These often require a special tool to detach the art.
Your Tool Checklist:
Here's what you'll likely need:
- Your art (obviously!)
- Measuring tape
- Pencil (use a light graphite pencil that's easy to erase!)
- Level (a small one is fine, or even a phone app). A laser level can be particularly helpful for aligning multiple pieces over a large area, especially on challenging walls like staircases.
- Hammer and nails OR drill and screws/wall anchors (depending on your wall type and the weight of your art)
- Picture Hanging Hooks: These are often more secure than just nails, especially for heavier pieces. They distribute weight better.
- Painter's Tape: Essential if you're using the template method, but also useful for temporary marking with the floor method. Also great for catching dust!
- Stud Finder: Crucial for locating wall studs if you're hanging heavier pieces on drywall. Hanging directly into a stud provides the most secure anchor.
- Paper (newspaper, butcher paper, wrapping paper) and scissors for templates.
- Gloves: Useful for protecting your hands, especially when handling older frames or potentially dusty pieces.
- Small Brush: A soft brush (like a clean paintbrush) is great for dusting off pencil marks or small debris after drilling.
- A friend (optional, but highly recommended for holding things and moral support!)
I once thought I could eyeball a level line for a row of three small prints. Spoiler alert: I couldn't. The slight tilt drove me crazy until I finally took them down and used a level. Learn from my mistakes – use the tools!

Step 4: Plan Your Layout (The Fun, Slightly Stressful Part!)
This is where the magic happens, and where you can avoid those extra nail holes. There are a few ways to approach this. The goal is to visualize the arrangement before committing to holes. It's like composing a visual symphony – each piece is a note, and the spacing and arrangement create the melody and rhythm.
Method | Description | Pros | Cons |
|---|---|---|---|
| Floor Layout | Arrange art on the floor in front of the wall or a similar-sized space. | Quick visualization, easy to rearrange large pieces. | Transferring to the wall requires careful measurement. |
| Paper Templates | Trace art onto paper, cut out templates, tape to the wall. | Precise placement visualization, easy to adjust before drilling. | Can be time-consuming for many pieces. |
| Digital Planning | Use photo editing software or apps to mock up the arrangement digitally. | Highly precise, easy to experiment with many layouts without physical effort. | Requires taking photos of all art, learning software/app. |
Method 1: The Floor Layout
This is often my preferred method for getting a feel for the composition quickly. Use the floor space in front of your chosen wall (or a similar-sized area) as your canvas. You can even use painter's tape on the floor to mark the boundaries of the wall space you're working with. Start placing your largest pieces first, usually somewhere off-center to create visual interest. Then, build outwards, arranging smaller pieces around them. Play with the spacing – remember, Salon Style means things are closer than a traditional hang, but you still want a little breathing room, maybe 2-4 inches (5-10 cm) between frames. Think of the space between the art as negative space, just as important as the art itself in creating the overall composition and visual rhythm. Pay attention to the shapes of these negative spaces – are they interesting shapes, or just awkward gaps? Step back frequently! Look at it from different angles. Sometimes, what looks perfect up close is off from across the room. I've spent hours on the floor, shuffling things around, convinced I've found the perfect arrangement, only to stand up and realize it's completely lopsided. It's part of the process!
- Tip: Take photos of arrangements you like! It's easy to forget what worked best. Documenting your layout and taking key measurements (like distance from the floor, distance between anchor pieces) before you start hanging is a lifesaver for future reference or if you ever need to recreate the hang. You might even take a photo of the blank wall before you start, just to appreciate the transformation later!
Method 2: Paper Templates
Trace each piece of art onto paper (newspaper, butcher paper, etc.). Cut out the templates. Label each one with the name of the artwork and mark exactly where the hanger is on the back. For pieces with wire, pull the wire taut as if it were on a hook and mark that point on the template. For sawtooth hangers, mark the center of the sawtooth. Tape these paper templates onto your wall using Painter's Tape. This lets you visualize the layout directly on the wall and rearrange easily before making any holes. Once you're happy, you'll know exactly where to put the nail or screw for each piece by marking through the template.
Method 3: Digital Planning
For the tech-savvy or those with many pieces, take photos of all your artwork. Use photo editing software (like Photoshop or even free online tools) or dedicated gallery wall planning apps to create a digital mock-up of your wall and arrangement. You can easily resize and move pieces around until you find the perfect layout. Once finalized, you can use measurements from the digital plan to mark your wall.
Layout Considerations:
- Starting Point: You can start with your Anchor Piece(s) (the largest or most important ones), placing them slightly off-center or centered over a piece of furniture like a sofa or console table. Alternatively, you can start from the center of the intended arrangement area and work outwards, or even start from the bottom row and build up. Experiment to see what feels most natural for your collection and space.
- Anchor Piece: Start with a central piece or a few larger pieces to anchor the composition. Everything else radiates from this point.
- Balance: Aim for visual balance, but not necessarily perfect symmetry. Distribute larger and smaller pieces, as well as different colors or styles, across the wall. Avoid clustering all the heavy pieces in one corner.
- Flow: Think about how your eye will move across the arrangement. Create lines or clusters that guide the viewer's gaze through the collection. Consider the composition basics that artists use.
- Edges: Decide if you want a defined rectangular shape for your hang or a more organic, freeform edge that spreads out across the wall.
- Eye Level & Viewing Distance: While a salon hang often goes floor-to-ceiling, consider placing the center of the overall arrangement roughly at eye level (around 57-60 inches or 145-152 cm from the floor) if possible, or centered on a piece of furniture like a sofa or console table. This provides a comfortable starting point for viewing. Also, think about the primary viewing distance – a dense hang is best appreciated relatively close up, so consider this when choosing a wall in a very large room.
- Scale: Ensure the overall scale and density of the hang feels right for the room. A massive, dense hang in a tiny room can feel oppressive, while a sparse hang on a huge wall gets lost. Also, consider the scale of individual pieces relative to each other within the composition – a tiny piece might get lost next to a giant one unless strategically placed or grouped.
- Negative Space: Pay attention to the shapes and spaces between the pieces. These 'negative spaces' are just as important as the art itself and contribute to the overall visual rhythm and composition of the wall. Think of it like the pauses in music – they give the notes (the art) room to breathe and resonate. This is a concept artists use all the time, like negative space in abstract art.
- Wall Color: Remember that the wall color is part of the composition. Consider how the colors in your art interact with the wall color and how this affects the overall feel. Choosing art based on room color is a related skill. Also, think about the color temperature of the paint itself.
- Framing Harmony (Optional): While mixing frame styles is encouraged, if your collection is very diverse, sometimes introducing a unifying element like a consistent mat color or a dominant frame material/color (e.g., all black frames, or a mix but with a few key gold frames repeated) can help tie the eclectic mix together visually. Pairing a sleek metal frame with an ornate vintage one can create a dynamic contrast. It's not a rule, just an option for creating a sense of intentionality.
- Considering the Backgrounds & Textures: Don't just think about the frames and the wall color. Look closely at the art itself. Does a piece with a busy background clash with the piece next to it? Does a dark, moody piece get lost against a dark wall? Consider how the internal composition, colors, and texture of each artwork interact with its neighbors and the wall itself. It's another layer of visual dialogue to consider.
- Planning for Future Additions: If you anticipate your collection growing, consider leaving small strategic gaps or planning for expansion zones within your initial layout. This makes integrating new pieces easier down the line without having to completely re-hang everything.
Step 5: Start Hanging! (Deep Breaths Required)
This is the moment of truth. Deep breaths! (Seriously, take a deep breath. It's just art, not brain surgery... unless you're hanging something really heavy). You've planned, you've gathered your tools, you've got your layout. Now, transfer that plan to the wall.
- If you used the Paper Template method: Simply hammer or drill through the marked spot on the paper template for each piece. Remove the paper and insert your hook or anchor. Easy peasy.
- If you used the Floor Layout or Digital method: This requires a bit more careful measurement. Start with your Anchor Piece(s). Measure their position relative to the floor or a piece of furniture (like the top of a sofa), mark the wall lightly with a pencil, and hang them. Then, work outwards, piece by piece, measuring the distance between frames as you go (remember that 2-4 inch / 5-10 cm spacing!). Use your level to ensure each piece is straight before you fully commit. And remember that light pencil mark? It's your friend – easy to erase if you need to shift things slightly.
- Pro Tip for Wire Hangers: For pieces with wire hangers, measure the distance from the top of the frame to where the wire is taut when pulled up. This is the point on the wire that will rest on the hook. Think of it like finding the peak of a triangle formed by the wire and the back of the frame. Mark this distance down from where the top of the frame should be on the wall. That's where your hook needs to go.
- Pro Tip for Sawtooth Hangers: For pieces with sawtooth hangers, the hanging point is the center of the sawtooth. Measure from the top of the frame down to this point. That's where your nail or screw should go.
- Pro Tip for Dust: Place a small piece of Painter's Tape folded into a pouch just below where you plan to drill or hammer. It will catch most of the dust and debris, making cleanup much easier. Trust me, your vacuum will thank you.
Testing Your Anchors:
Before hanging your precious art, especially heavier pieces, it's a good idea to test the strength of your installed hook or anchor. Give it a firm tug downwards. Does it feel secure? Does it wiggle? If there's any doubt, remove it and try a different spot or a stronger type of anchor. Better safe than sorry! I once thought a standard drywall anchor would be fine for a medium-sized framed print, only to see it start pulling away from the wall a few days later. Lesson learned: always overestimate the weight and use the right hardware! If possible, test the anchor with a weight slightly heavier than the artwork itself for extra confidence, especially for valuable pieces.
Dealing with pieces of different depths (e.g., a thin framed print next to a deep canvas) can be tricky. You might need to use standoffs or spacers behind the thinner pieces to bring them forward and create a more uniform depth across the hang. Or, you can embrace the variation in depth as another layer of visual interest, adding a desirable three-dimensional quality to the wall composition.
Don't be afraid to step back frequently and assess. Does it look right? Does it feel balanced? It's okay to make small adjustments. Sometimes, once things are on the wall, you see a better spot for something. That's part of the process! I've definitely moved pieces after they were hung, leaving behind a tiny, fillable reminder of my initial misjudgment. It's all part of the story of the wall.
Safety First: If you're using a ladder, make sure it's stable. If hanging very heavy pieces, consider getting help or using specialized heavy-duty hanging systems like cleat systems.

Step 6: Refine and Accessorize (The Finishing Touches)
Once everything is on the wall, take a good look. Are there any gaps that feel awkward? Could a small piece fit there? Sometimes adding one or two extra small items can really complete the look. This could be a tiny framed photo, a decorative plate, a small mirror, or even a textile piece. Don't be afraid to incorporate objects other than traditional framed art. A small sculpture on a floating shelf within the hang, or a decorative mask, can add unexpected texture and dimension. Consider the placement and scale of these objects carefully so they complement the art rather than distracting from it. Ensure the style of these non-art objects complements the art and the overall aesthetic.
Types of Non-Art Objects to Incorporate:
- Vintage Mirrors: Can add light and break up the visual weight of framed art.
- Decorative Plates or Trays: Offer a different shape and texture.
- Small Sculptural Objects: Busts, figurines, or abstract forms on floating shelves add three-dimensionality.
- Framed Textiles: Small tapestries, embroidered pieces, or even interesting fabric swatches add softness and texture.
- Small Plants: A tiny potted plant on a floating shelf can bring a touch of life (just be mindful of watering!).
- Architectural Salvage: Interesting corbels, small decorative moldings, or unique hooks can add character.
Consider lighting. Proper lighting can make a huge difference in how your art looks. Track Lighting mounted on the ceiling or individual Picture Lights attached to frames can highlight key pieces and add drama, bringing the collection to life, especially in the evening. Also, think about the lighting temperature – warm light (lower Kelvin) can enhance reds and yellows, while cool light (higher Kelvin) can make blues and greens pop. Choose lighting that complements your collection.
Finally, step back and admire your work! You've created a dynamic, personal display that transforms your space. It's a reflection of you, curated by you. Live with it for a few days. Sometimes, you'll notice small adjustments you want to make after seeing it in different lights and at different times of day. That's perfectly normal! Your salon wall is a living entity, ready to evolve with you. Take a photo of the finished wall from a few different angles and distances – it's great for personal satisfaction and a useful record for future reference or adjustments.
Maintaining Your Salon Wall
Once your masterpiece is hung, a little care goes a long way in keeping it looking its best. Regular maintenance is key, especially with a dense hang where dust can settle in between pieces.
- Dusting: Gently dust frames and the wall itself with a soft brush or a microfiber cloth. For delicate or unframed pieces, use a soft brush or a can of compressed air from a safe distance.
- Cleaning: For framed pieces with glass, spray glass cleaner onto a cloth first, then wipe the glass. Never spray directly onto the glass, as liquid can seep under the frame and damage the artwork or matting. For unframed pieces or canvases, be extremely cautious. Avoid moisture unless you are certain the artwork's medium can handle it. Consult a professional conservator for specific cleaning advice for valuable or delicate pieces.
- Environmental Control: Maintain a stable room temperature and humidity level. Extreme fluctuations can damage artwork, especially pieces on canvas or paper. Keep the wall away from direct heat sources like radiators or fireplaces if possible.
- Checking Hardware: Periodically check that all hooks, wires, and anchors are still secure, especially for heavier pieces. Over time, walls can settle or hardware can loosen slightly. A quick check can prevent a potential disaster.
You can find more comprehensive tips on caring for different types of art in Art Care 101.
Adding or Swapping Pieces Over Time
One of the joys of a personal collection is that it grows and changes. Your salon wall doesn't have to be static! Adding new pieces or swapping out existing ones is part of the evolution.
- Adding a New Piece: Look at your existing arrangement and identify a spot where the new piece would fit visually. Does it complement the surrounding art in terms of color, style, or theme? Use the paper template method for the new piece to test its placement on the wall without making holes. You might need to slightly shift one or two existing pieces to make room or improve the flow. Having photos and measurements of your original layout (as suggested in Step 4) can be a helpful reference.
- Swapping a Piece: If you're replacing a piece, consider the size and hanging method of the artwork you're removing. Can the new piece use the same hardware or hole? If not, you'll need to patch and paint the old hole before hanging the new piece. Try to find a replacement piece that fits the visual space left by the old one, or be prepared to rearrange the surrounding pieces.
- Embrace the Evolution: Don't be afraid to experiment. Your salon wall is a reflection of your evolving taste and collection. It's okay if it changes over time. Each addition or swap adds another layer to the story. Consider taking a photo of the entire finished layout, along with key measurements, as a comprehensive reference for future changes.
Hanging on Challenging Walls & Spaces
Not all walls are flat, smooth, and easy! Salon hangs can look fantastic in less conventional spots, but they require extra consideration.
- Textured Walls (Brick, Stone, Heavily Textured Plaster): As mentioned in Step 3, these require specialized fasteners. You'll need a drill with appropriate masonry bits and wall anchors designed for the material. Ensure the anchor is long enough to get past the surface texture and into the solid wall structure. Cleat systems can also be beneficial here as they distribute weight over a larger area and can help bridge slight unevenness.
- Staircases: Hanging art along a staircase wall adds drama and visual interest. You have two main options: follow the angle of the stairs (creating a dynamic, diagonal flow) or keep the tops of the frames level (creating a more traditional, stepped look). Planning with paper templates is highly recommended for staircase hangs to visualize the arrangement along the incline and ensure comfortable viewing angles as you ascend or descend. Measure carefully relative to the stair treads or risers.
- Corners & Alcoves: Don't overlook these! A small salon hang in a cozy corner or alcove can create an intimate, curated moment. Treat the space as a mini-wall and apply the same principles of curation and layout planning.
- Rooms with Sloped Ceilings: Similar to staircases, you can follow the slope or create horizontal lines. A mix can also work, with larger pieces anchoring the lower, taller sections and smaller pieces filling the space as the ceiling slopes down. Templates are your friend here too.
Considering Art Insurance
If your salon wall includes valuable pieces, it's worth considering art insurance. While standard homeowner's or renter's insurance might cover some artwork, it often has limitations on value or specific types of damage. A dedicated art insurance policy can provide more comprehensive coverage for theft, damage (including accidental), and loss, often covering the full market value. Given the density of a salon hang, the risk of accidental bumps or damage during adjustments is slightly higher, making insurance a sensible consideration for peace of mind, especially for significant investments.
Common Mistakes to Avoid
Even with the best planning, things can go wrong. Here are a few pitfalls to watch out for:
- Overcrowding: While salon style is dense, avoid cramming pieces so tightly that they become visual noise. There should still be a sense of intentional arrangement, not just chaos. The negative space, even if small, is important.
- Ignoring Scale: As mentioned, ensure the overall size and density of the hang fit the room. A tiny cluster on a huge wall looks lost; a giant hang in a small room feels oppressive. Also, consider the scale of individual pieces relative to each other and the room's furniture. Avoid hanging pieces that are too small and get lost within the density unless they are intentionally grouped or used as connectors.
- Poor Weight Distribution: Don't put all your heaviest pieces in one small area unless the wall structure can handle it. Distribute weight across the wall and use appropriate fasteners. Always test your anchors!
- Hanging Too High: Even with a floor-to-ceiling hang, the center of the overall composition should ideally be around eye level for comfortable viewing (around 57-60 inches or 145-152 cm from the floor), or centered on a piece of furniture. Avoid having the entire hang start too high up. Consider the height of typical viewers (both standing and sitting) when determining the overall height range.
- Skipping the Plan: Trying to just wing it and hammer as you go is a recipe for extra holes and frustration. Plan your layout first, using the floor, templates, or digital tools. Document your measurements! Take a 'before' photo!
- Ignoring Lighting: Even a great hang can fall flat without considering how light hits the pieces throughout the day and evening. Plan for lighting to make your art shine. Be mindful of direct sunlight fading delicate pieces.
- Not Considering the Room's Existing Decor: While the hang is a focal point, it should ideally complement, not clash with, the furniture, rug, and other elements in the space. Think of the wall as part of the larger room composition.
- Using the Wrong Hardware: This is a big one! Using a standard nail for a heavy framed piece on drywall is asking for trouble. Always match your hardware to the weight of the art and the type of wall.
- Not Testing Anchors: A quick tug can save you from a piece crashing down later. Don't skip this simple step.
FAQs About Salon Hangs
Can I mix different frame styles?
Absolutely! Mixing frame styles adds to the eclectic, curated feel of a salon hang. Just ensure there's some overall harmony, perhaps through color or material, so it doesn't look too chaotic. It's about personality, not perfect uniformity. As mentioned earlier, sometimes a unifying element like a consistent mat color or repeating a dominant frame color can help tie diverse frames together visually. Pairing a sleek metal frame with an ornate vintage one can create a dynamic contrast.
How close should the pieces be?
There's no strict rule, but typically closer than a traditional hang. Aim for 2-4 inches (5-10 cm) between frames. Trust your eye – what looks good to you is what matters most. Step back and squint! The space between pieces is just as important as the pieces themselves in creating visual rhythm.
Do all the pieces need to be the same style?
Not at all! The beauty of a salon hang is mixing styles, periods, and mediums. A contemporary abstract can look fantastic next to a vintage photograph or a classical print. It's about creating interesting juxtapositions and showing the breadth of your taste. It's your personal museum!
What if I make a mistake and put a hole in the wrong place?
It happens! Don't panic. Small nail holes are easy to fill and paint over. That's why Painter's Tape and the template method can be helpful for planning. Consider it a small battle scar on the journey to a great wall. It's just plaster, after all.
Can I include objects other than framed art?
Yes! Mirrors, decorative plates, small shelves with objects, or even textile pieces can be incorporated to add texture and variety to your salon wall. Use them to break up the rectangles and add visual interest and dimension. Just be mindful of their weight and how they visually interact with the surrounding art. Ensure the style of these non-art objects complements the art and the overall aesthetic.
How do I hang pieces without frames, like canvases or prints on boards?
Canvases can often be hung directly using D-rings and wire or sawtooth hangers on the stretcher bars. Prints on rigid boards might need specialized hangers or can be mounted onto a backing board with a hanging system. Consider floating frames for a clean look. For more detailed tips, check out How to Display Art at Home.
How do I clean and maintain a salon wall?
Dust regularly with a soft brush or microfiber cloth. For framed pieces with glass, use a standard glass cleaner (spray onto the cloth, not the glass). For unframed pieces or canvases, be very gentle and avoid moisture unless you know the artwork can handle it. Consult a professional conservator for valuable or delicate pieces. Keep the room's humidity stable. You can find more tips in Art Care 101.
How do I incorporate pieces that are different depths (e.g., a framed print vs. a deep canvas)?
This is a common challenge! You can use spacers or standoffs behind the thinner pieces to bring them out from the wall, creating a more uniform depth across the arrangement. Alternatively, embrace the difference and let the varying depths add another layer of visual interest and dimension to the composition.
What's the best way to measure for hanging pieces with D-rings and wire?
Attach the D-rings securely to the back of the frame, usually about one-third of the way down from the top. String a wire between them, leaving a little slack. Hold the piece against the wall where you want the top of the frame to be. Pull the wire taut upwards at the center point, as if it were resting on a hook. Measure the distance from the top of the frame down to this taut wire point. That measurement is where your hook needs to go on the wall. Remember to document this measurement! Think of the taut wire as the peak of a triangle – you're measuring from the top of the frame down to that peak.
Can I hang art on challenging walls like textured surfaces or staircases?
Hanging on textured walls like brick, stone, or heavily textured plaster requires different fasteners than drywall. You'll likely need a drill with appropriate bits (masonry bits for brick/stone) and specialized wall anchors designed for those materials. Ensure the fastener is long enough to get past the texture and into the solid wall structure. Sometimes, a cleat system can help distribute weight more evenly on uneven surfaces.
Hanging on a staircase wall presents a different challenge – the angle. You can follow the angle of the stairs for a dynamic look or keep the tops of the frames level for a more traditional feel. Planning with paper templates is especially helpful here to visualize the flow along the incline. Always measure carefully relative to the stair treads or risers, and consider the viewing angle as you ascend or descend.
Can I hang valuable art in a salon style?
Yes, absolutely! Salon style is used in museums and galleries, so it's perfectly suitable for valuable pieces. The key is using the appropriate, secure hanging hardware for the weight and wall type (as discussed in Step 3). For very valuable pieces, you might consider using security hooks that prevent easy lifting or even consulting a professional art installer. Ensure the environment (light, humidity) is suitable for conservation, as you would with any valuable artwork. Remember to protect delicate pieces from direct sunlight! Consider getting art insurance for valuable pieces.
How can I add or swap pieces over time without ruining the whole arrangement?
This is where good planning and documentation pay off! If you used paper templates or documented your measurements, you have a map. When adding a piece, see where it fits into the existing rhythm and negative space. You might need to shift a few surrounding pieces slightly. If swapping, note the size and hanging point of the piece you're removing and try to find a replacement with similar dimensions or adjust the hanging point accordingly. Embrace the evolution – your wall can grow and change with your collection! Consider taking a photo of the entire finished layout, along with key measurements, as a comprehensive reference for future changes.
What about the cost of framing or professional installation?
Framing can be a significant investment, especially for multiple pieces or custom sizes. Get quotes from local framers or explore online options for more affordable solutions like standard-sized frames or DIY kits. Professional installation is recommended for very heavy or valuable pieces, or if you're tackling a complex layout like a staircase. Costs vary based on location, the number of pieces, and their weight/size. Factor these potential costs into your budget when planning your salon hang.

Conclusion: Your Wall, Your Story, Evolving
Creating a salon-style art hang is a deeply personal process. It's an opportunity to showcase the art you love, reflect your personality, and transform a simple wall into a vibrant, engaging space. It might take a little planning, maybe a bit of trial and error (and yes, maybe an extra nail hole or two!), but the result is a unique installation that is entirely yours. View your collection not just as individual pieces, but as a collective statement, a visual conversation that tells your unique story. It's a living, breathing part of your home, ready to evolve as your collection and your life do. It's an ongoing creative project, not a one-time task.
So, gather your art, clear the floor, and start playing. Your walls are waiting to tell your story. Turn that blank space into a reflection of your world.
If you're looking for new pieces to add to your growing collection, feel free to buy art directly from my studio. Every piece has a story, just waiting to become part of yours.
Perhaps you'll even find a piece that sparks a whole new section of your salon wall, a new chapter in your home's visual diary. The possibilities are as endless as your collection.


