
Relief Printmaking for Beginners: Linocut & Woodcut Essentials
Master relief printmaking (linocut, woodcut)! This beginner's guide covers essential blocks, tools, inks, paper, and safety. Learn expert tips to avoid mistakes and create stunning first prints.
The Ultimate Beginner's Journey: Mastering Relief Printmaking (Linocut, Woodcut)
The magic of printmaking is undeniable, wouldn't you agree? That moment when you peel back the paper to reveal an image, born from your hands and tools, is utterly captivating. For me, the magic isn't just in the reveal; it's also deeply embedded in the meditative rhythm of the carving, the focused concentration as ink meets brayer, and the anticipation building with each step. It’s a craft that combines the quiet, almost hypnotic act of carving with the surprising thrill of transformation, from a simple block to a vivid impression.
As an artist who has spent countless hours exploring various printmaking techniques, I've come to appreciate the profound connection one can forge with the material and the tools. This broader allure often pulls us in, but it's the specific techniques within the printmaking umbrella that truly allow us to dive deep. In this guide, we'll focus specifically on relief printmaking – whether it's linocut with its smooth, flowing lines or woodcut with its rich, organic textures. It's a tactile and rewarding entry point for anyone curious about this ancient art. Unlike techniques like etching or engraving, which involve incising lines into a plate and often using acid to bite the image, relief printmaking distinguishes itself by printing from the raised surfaces – a surprisingly intuitive and hands-on process. My goal here is to equip you with everything you need, from choosing the right block and tools to understanding inks, papers, and essential cleanup, demystifying the process and empowering you to create your very first prints.
But I know what you might be thinking: where do I even begin? Walking into an art supply store, with its towering shelves and endless aisles, can feel like navigating a veritable labyrinth of choices, a beautiful but overwhelming maze where every shiny tool whispers promises (and price tags). It's a feeling I know well; I've spent hours staring at options, wondering if I'm making the "right" choice. (Honestly, it's less like choosing a tool and more like being a kid in a candy shop, but with way more existential dread about your artistic future). My aim here is to cut through that noise, share a bit of my own trial-and-error wisdom, and provide you with a clear, curated path to gathering the essential supplies for embarking on your own relief printmaking journey. By the end of this guide, you’ll have a clear understanding of what you need and why, setting you up for success. Now, let’s get carving!
The Foundation: Choosing Your Printing Block
Your journey begins with the printing block itself – the surface you'll carve your design into. This is where your vision takes physical form, and choosing the right material can significantly impact your experience. Think of it as the canvas for your carving tools, but with a character all its own, waiting to tell your story. It's almost like choosing a dance partner; each block has a distinct personality, and some will make for a smoother, more graceful performance than others. Let's dive into the very foundation of your print: the block itself.
Understanding Your Canvas: Block Types
Block Type | Characteristics | Carving Feel | Ink Holding | Best For | Durability/Longevity |
|---|---|---|---|---|---|
| Traditional Battleship Gray Linoleum | Denser, natural materials (linseed oil, cork dust, wood flour), eco-conscious. | Requires more effort but holds fine detail, crisp lines, smooth cuts. | Non-porous, ink sits on surface for vibrant, consistent transfer. | Fine details, sharp edges, clean prints. | Very durable, holds up to many impressions if stored properly. Can dry out and become brittle over decades. |
| "Soft-Cut" or "Easy-Carve" Blocks | Synthetic, petroleum-based (e.g., Speedball Speedy-Carve), very soft, less sustainable. | Exceptionally easy to carve, like firm rubber; less detail retention. | Non-porous, similar to traditional lino but can sometimes smudge if over-inked. | Young artists, those with hand strength limitations, bold designs. | Less durable, prone to dents and surface degradation. Can become brittle or degrade over time, especially if not stored properly. |
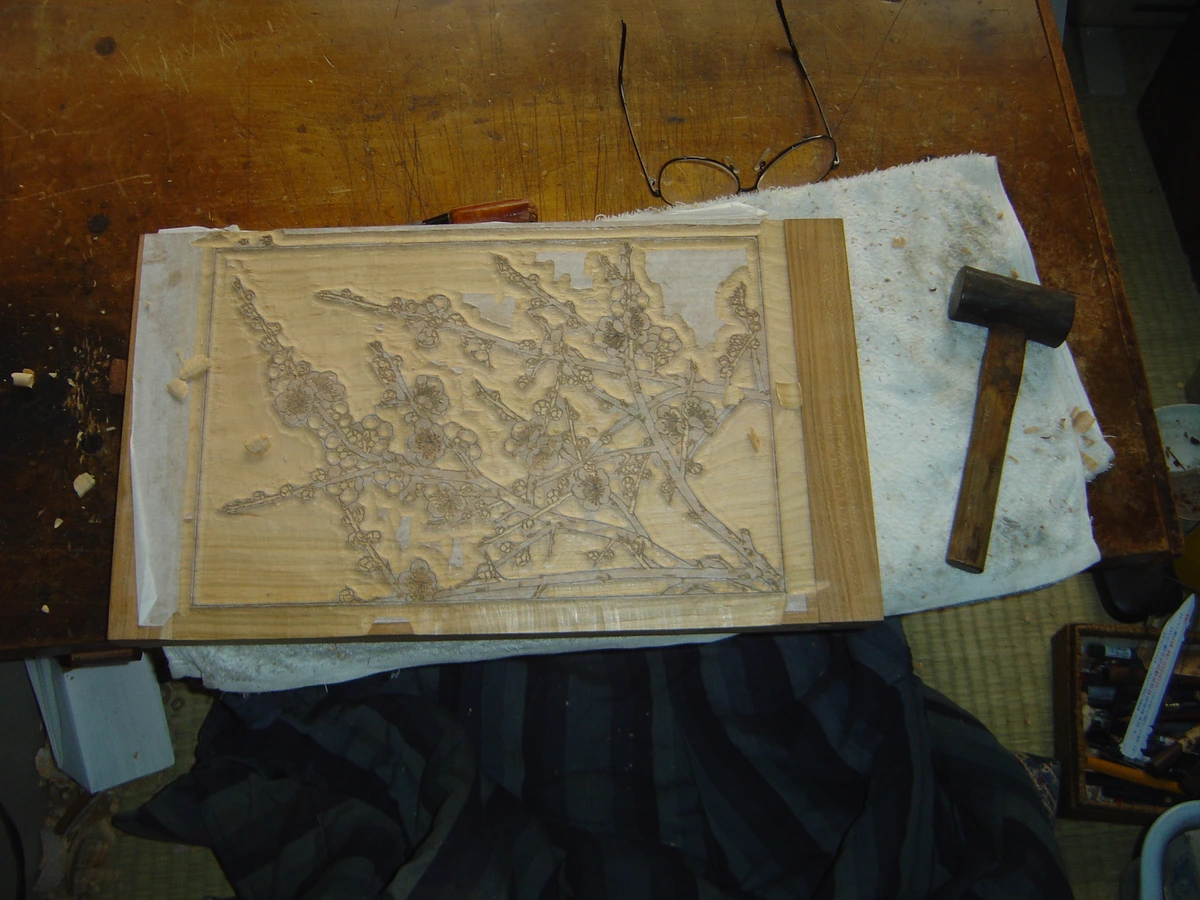
| Wood Blocks (e.g., Shina Plywood, Basswood) | Natural material, distinct grain, varied hardness. | More challenging; grain influences cuts, creating organic textures. Can splinter. | Absorbs ink slightly into the grain, giving a softer, more textured impression. | Organic textures, expressive prints, traditional aesthetic, interacting with grain. | Highly durable, especially hard woods, can last for hundreds of years and thousands of impressions if cared for. |
Linoleum Blocks
Linoleum is often recommended for beginners, and for good reason. It's relatively soft and forgiving, making it easier to carve without excessive hand strain. And like me, you might notice a distinct, earthy scent when you start carving – a subtle reminder of its natural origins that instantly transports me to my studio.
A key advantage of linoleum is its non-porous surface, which means the ink sits right on top, giving you beautifully vibrant and consistent transfers. You'll generally find two main types, both often called 'linoleum' but with distinct characteristics. You might also encounter mounted linoleum (glued to a wooden block) versus unmounted linoleum. Mounted blocks offer stability and height, which some artists prefer for comfort, but unmounted linoleum can be more flexible and economical.
Just be aware that traditional linoleum, especially if old or very cold, can sometimes chip rather than cut cleanly – a small frustration I've definitely encountered! What I mean is, it's not always the smooth, buttery carving experience you dream of. Sometimes it's more like trying to cut cold butter with a dull knife!
- Traditional Battleship Gray Linoleum: This is the classic, made from natural, renewable materials like linseed oil, cork dust, and wood flour. It's denser than synthetic options, requiring a bit more effort to carve, but it holds fine detail beautifully, yielding crisp lines. I remember starting with this, and while my hands definitely felt it after long sessions, the satisfaction of those clean, almost buttery edges was truly motivating. It felt like I was doing real work! This natural composition also makes it a more environmentally conscious choice; being largely biodegradable, it generally has a lower ecological footprint in both production and disposal compared to its synthetic counterparts.
- "Soft-Cut" or "Easy-Carve" Blocks: These are synthetic, petroleum-based alternatives, incredibly soft, almost like firm rubber. Popular examples include Speedball Speedy-Carve blocks. They're excellent for very young artists or those with hand strength limitations, though they might not hold the absolute finest details as well as traditional lino. While easier to carve, their petroleum base makes them less sustainable, and truthfully, the long-term environmental impact from microplastics and disposal is a concern for many eco-conscious artists. I've found they can sometimes become brittle or degrade over time, especially if not stored properly. If you're keen on exploring linocut further, you might enjoy my Beginner's Guide to Linocut Printmaking.
Wood Blocks
Wood offers a completely different feel and aesthetic. Woodcut is one of the oldest printmaking techniques, and it carries with it a rich history, from early European prints to the vibrant Ukiyo-e works of Japan. Carving wood is more challenging than linoleum; the natural grain of the wood will significantly influence your cuts. Sometimes it dictates the flow of your lines – carving with the grain can feel smooth and fluid, while going against it offers more resistance and can create a distinct, chiseled texture. This interaction with the material is both a challenge and a delightful surprise, lending your prints an organic, textured look. And there's nothing quite like the subtle scent of wood shavings as you carve – that earthy, almost sweet aroma that tells you you're working with something ancient and alive! The process itself can be deeply satisfying for those who enjoy working with natural materials. Unlike linoleum, wood's fibrous nature means it can absorb ink slightly into the grain, often contributing to that characteristic organic, textured look you see in traditional woodcuts.
For beginners, softer woods like shina plywood or American basswood are good starting points. If you're looking for something with a bit more challenge but still manageable, cherry or maple can offer beautiful results with their finer grain, though they demand sharper tools and more patience. On the environmental side, always look for wood that is sustainably sourced (FSC-certified, for example) to ensure your artistic journey isn't contributing to deforestation. Some contemporary synthetic blocks are even exploring recycled plastics, offering another eco-conscious option to consider. Remember, whether you're using a solid block or plywood (which has multiple layers that can sometimes splinter differently, creating unexpected textures or challenges and demanding a different approach to carving, particularly when you encounter the different grain directions in each ply), the wood's character will shine through. If the texture of wood calls to you, delving into the Introduction to Woodblock Printing might be your next step.
Ultimately, you'll need to consider what kind of lines and textures you want to achieve. A sharp, crisp design might lean towards traditional linoleum, while a more expressive, textured piece might call for wood. Either way, the block is where your artistic journey truly begins, a silent partner waiting for your vision to emerge. With your chosen block in hand, the next step is to equip yourself with the tools that will bring your vision to life.

Sculpting Your Vision: Carving Tools & Safety
Now, for the fun part: the tools that bring your design to life! These are your extensions, your artistic voice translated through steel. Quality here truly makes a difference, both in your comfort and the outcome of your prints. While it's tempting to go for the absolute cheapest option, investing a little more upfront in quality tools will save you a lot of frustration (and potential injury). I've had my share of slipping tools and frustrated sighs – usually because I was too lazy to sharpen my gouge or didn't know how to use it properly at first. It's a learning curve, and my early blocks are full of 'oops' marks! I still remember the time I tried to force a dull U-gouge through a particularly tough spot, and it just skittered across the surface, leaving a trail of frustration rather than a clean cut. I've even sent a small chunk of linoleum flying across the room once, narrowly missing my coffee mug – a stark reminder that a sharp tool truly is a safe tool. (Seriously, I've had a few too-close-for-comfort moments with dull blades, and let's just say my fingernails are grateful for my eventual commitment to sharpening). Learning to handle these tools is part of the joy, really.
Before you even start carving, it's crucial to grasp the concept of negative space. In relief printmaking, the areas you carve away are the ones that won't receive ink, and therefore will appear as the color of your paper (or white) in the final print. Conversely, the raised areas are what will hold the ink and transfer your image. This mental flip is essential for planning your design and ensuring your vision translates correctly to the block. If you want a thin white line, you carve it out; if you want a thin black line, you carve around it, leaving the line itself raised. It's a fundamental aspect that dictates how your image emerges, almost like sculpting light and shadow with your tools.
Gouges and Knives
Most carving sets will include a variety of gouges and knives. Understanding their purpose is key:
Tool Type | Blade Shape | Primary Use | Feel of the Cut |
|---|---|---|---|
| U-Gouges | U-shaped | Clearing larger areas, broader, rounded lines | Smooth, sweeping channels, rounded troughs |
| V-Gouges | V-shaped | Fine lines, details, outlines | Sharp, angular cuts, precise grooves |
| Detail Knives | Straight/Angled | Very precise, thin cuts, trimming edges | Clean, straight scores, crisp separations |
When we talk about V-gouges, you'll find different angles, from fine V-gouges (e.g., 30-degree or smaller, perfect for delicate lines, tiny details, and 'drawing' with steel) to broader V-gouges (e.g., 60-degree or wider, great for outlines and defining shapes). These variations offer a huge range of expression and control over your line quality. Think of a U-gouge as a small shovel, great for scooping out material and creating soft, rounded valleys. A V-gouge, on the other hand, is like a fine pen, creating sharp, incisive lines. For deeper cuts or specific textures, you might also encounter bent gouges (curved blades for scooping out material) or chisels (flat blades for straight lines or planing surfaces), though these are often for more advanced work. Remember, the depth of your cut significantly impacts the final print: shallow cuts might leave subtle traces of ink, creating nuanced shading and softer edges, while deeper cuts will result in clean, stark white areas, perfect for strong contrasts and shadows.
Choosing a Set and Keeping Them Sharp
For beginners, a basic set from brands like Speedball or Pfeil (for a higher quality investment) is a great start. When choosing, pay attention not just to the blade, but also to the handle type. You'll find various designs, from short, ergonomic 'mushroom' handles that fit snugly in your palm to longer, straight handles offering more leverage and reach. It's a personal preference, but comfort is key for those longer carving sessions. I've found that a handle that feels natural in your hand can make all the difference, turning a chore into a focused pleasure.
Seriously, a sharp tool is a safe tool – a dull blade requires more force, making it prone to slipping and potentially injuring yourself (been there!). So, investing in a sharpening stone down the line is a wise decision. You'll find different types, like water stones (which require soaking before use, often offering a faster cutting action and a very fine edge) and oil stones (used with honing oil, a bit slower but providing excellent results). The key is to maintain a consistent bevel angle on your tools – that precise, angled cutting edge. This consistency ensures the tool slices cleanly through the material, rather than tearing or getting stuck, making your carving smoother, more precise, and safer. It truly makes the blade a joy to use, providing control and prolonging its life. Learning to feel the edge and maintain that angle is, in itself, a bit of a zen practice, a tiny meditation on precision.
Always carve away from yourself, and use a bench hook to keep your block stable – it’s a simple piece of equipment, a small wooden fence really, that makes a world of difference for safety and control. Why is it so crucial? Because it physically prevents your block from slipping while you apply pressure with a sharp tool, minimizing the chance of an accidental cut to yourself or your workspace. It's like having a tiny, quiet assistant holding your work steady, without the need for coffee breaks. For storage, I highly recommend a tool roll, a dedicated box with fitted slots, or even a magnetic strip on your wall to keep blades protected and prevent accidental injury. And speaking of safety, don't forget eye protection and good ventilation, especially if you're really digging into tougher materials or using solvents for cleanup. That moment when the steel glides through the block, giving you satisfying feedback through your hands – that's the connection with your tools, the tangible responsiveness that shapes not just the block, but your understanding of the material. Even a few minutes of mindful sharpening can transform a frustrating carving session into a fluid, enjoyable one!

The Lifeblood: Inks and Ink Slabs
Alright, with safety in mind, let's talk about inks! The ink is what finally brings your carved image to paper, giving it life and color. The choice of ink largely depends on your desired finish and, perhaps more importantly for a beginner, your cleanup preferences! Trust me, cleaning up is half the battle (and sometimes half the fun, if you have a good playlist going).
Choosing Your Ink: Water-Soluble vs. Oil-Based
Ink Type | Characteristics | Pros | Cons | Cleanup |
|---|---|---|---|---|
| Water-Soluble Inks | Water-based, often non-toxic, generally lower pigment load. | Easy cleanup with soap & water, faster drying for layering. | Can dry quickly on slab/block, less vibrant than oil-based, can reactivate. | Soap and water. |
| Oil-Based Inks | Pigment suspended in oil, often higher pigment load, distinctive smell. | Richer, more vibrant colors, longer working time, excellent saturation. | Requires mineral spirits for cleanup, slower drying on paper. | Mineral spirits or specialized removers; good ventilation needed. |
Water-Soluble vs. Oil-Based Inks
- Water-Soluble Inks: Ideal for beginners due to easy cleanup with just soap and water. They generally have a lower pigment load, meaning there's less concentrated color compared to oil-based inks, which can sometimes translate to slightly less vibrancy or opacity. This often contributes to them being slightly less vibrant, though many brands offer excellent quality. They dry faster, which can be both a blessing (quicker layering for multi-color prints) and a curse (less working time if you're meticulous, as the ink starts to stiffen on the slab or block). Be mindful that water-soluble inks can reactivate if they get damp after drying on the block or paper – meaning moisture can re-dissolve the dried ink, which can be a small frustration I've definitely learned to manage! Speedball offers a good range for starters. While largely odorless, some might have a faint, clean scent.For layering multiple colors, you'll eventually need to consider registration, which is simply how you align the paper perfectly for each color pass. A common beginner method is creating a basic L-shaped jig from cardboard taped to your printing surface to ensure your block and paper are always in the same spot. It's a fun challenge that, for me, adds another layer of delightful complexity to the printmaking journey! You'll also want to keep an eye on the lightfastness of your chosen inks; a highly lightfast pigment will resist fading over time, a crucial consideration if you're creating art to sell or display permanently.
- Oil-Based Inks: These generally offer richer, more vibrant colors due to a higher pigment load (more concentrated pigment particles), resulting in excellent saturation and opacity. They also provide a longer working time, which can be useful for more complex inking or if you prefer a slower, more deliberate process. But be warned: the distinctive smell of oil-based inks and the mineral spirits required for cleanup is a part of the experience! For me, that smell has become synonymous with serious studio work, though it's definitely an acquired taste that requires good ventilation.Cleanup requires mineral spirits or specific oil-based ink removers, which means a bit more effort and sometimes better ventilation. They also dry much slower on paper, which can be great for rich saturation but requires careful handling of finished prints. If you're in a hurry for your prints to dry, you might also explore ink modifiers like cobalt driers, which can speed up the process, but always use them sparingly and with good ventilation. You might also encounter other ink additives or mediums, like retarders (which slow down drying, giving you more working time, a lifesaver on hot days when ink skins over quickly!) or extenders (which increase the volume of ink and its transparency without significantly reducing color saturation). Brands like Akua Intaglio (which are water-washable but behave like oil-based, offering the best of both worlds for many artists) or Gamblin are popular.
Beyond these, think about the transparency or opacity of your inks. Transparent inks allow underlying colors to show through, creating beautiful overlays and blends, perfect for multi-layered prints where you want colors to interact – imagine printing a transparent yellow over a solid blue layer to effortlessly create a vibrant green, right on the paper! Opaque inks will cover previous layers completely, giving strong, solid blocks of color. Understanding this will open up a whole new world of creative possibilities as you plan your prints!
Understanding Ink "Tack" and Viscosity
Ink tack refers to its stickiness or viscosity. Think of it like pulling warm, thick honey – that resistance you feel when you pull your brayer across the ink. What matters most for your print is the effect tack has:
- Higher tack ink feels very sticky and pulls at the brayer and paper. This often gives a crisper, cleaner print because it lifts cleanly from the block and adheres precisely to the paper, almost like a strong suction cup.
- Lower tack ink is smoother and less sticky, which can be easier to roll but might lead to less precise detail or a slightly softer edge as it releases from the block.
You'll develop a feel for it over time, influencing your choice of brayer and how much pressure you apply. For instance, a softer brayer might be better for lower tack inks to ensure good pickup, while a harder brayer can handle high tack inks without getting bogged down. And before you start printing in earnest, always do a proof print on a scrap piece of paper. This lets you test your ink consistency, how it transfers, and if you've missed any areas of your block. It's a lifesaver!
Ink Slabs
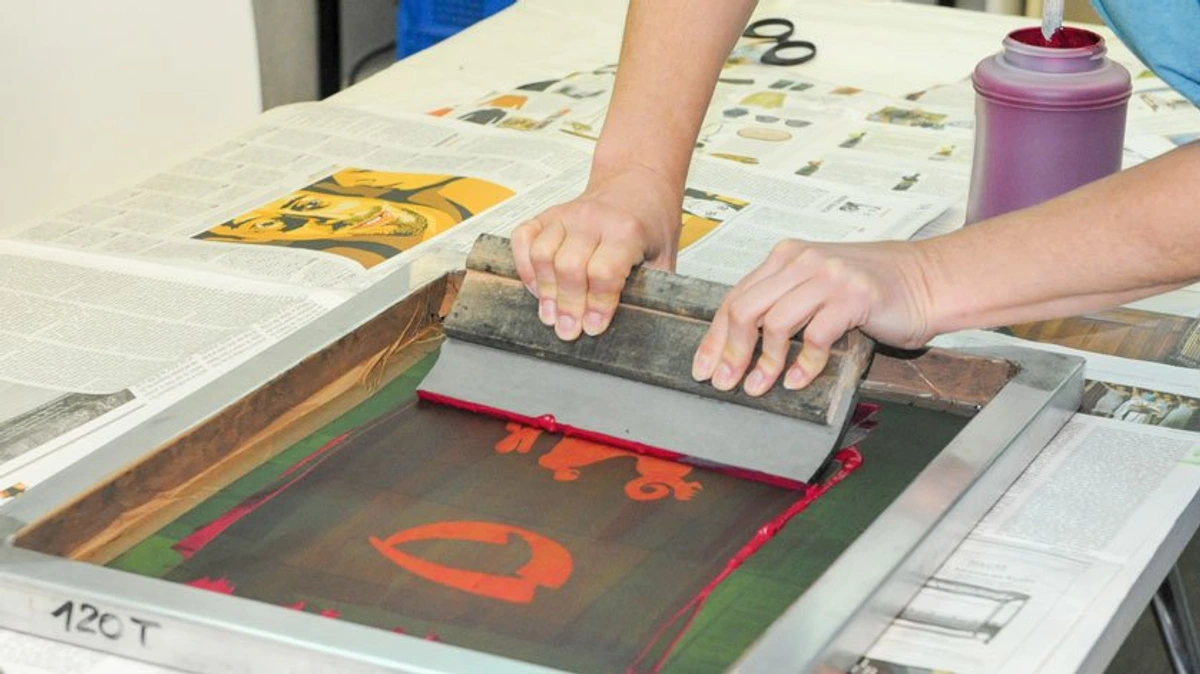
So, you've chosen your inks, but where does this colorful magic actually happen before it meets your block? You'll need a non-porous surface to roll your ink out on – your ink slab. A simple piece of tempered glass (with sanded edges for safety!), an acrylic sheet, or even an old ceramic tile works perfectly. Many artists, myself included, find a thin layer of silicone matting on top of the glass can offer added grip and also slightly dampen the sound of rolling, which is a small comfort during long sessions. This surface is absolutely crucial for getting an even, consistent layer of ink on your brayer before applying it to your carved block. Think of it as your mixing palette and your brayer's runway. Trust me, inking directly from the tube onto your block is a rookie mistake I made, leading to very sad, uneven prints. You want to hear that satisfying, slightly sticky 'zzzzzzip' sound as your brayer glides across a thin, uniform film of ink, not a gloppy mess – it’s the sound of success, of ink being properly prepared! I’ve definitely learned that lesson the hard way, leaving me with a collection of surprisingly wonky early experiments. A well-prepared ink slab is the unsung hero of a successful print, ensuring your ink is perfectly conditioned for transfer. And remember, that slab needs cleaning too – a good wipe-down after each session will save you a lot of grief.
Spreading the Love: Brayers (Rollers)
With your ink ready, the brayer becomes your essential partner in applying it evenly to your carved block. It's a simple tool, but absolutely essential for good, consistent prints. The amount of inking pressure you apply with your brayer, combined with its hardness and the ink's tack, all play a role in how evenly and completely the ink transfers to your block. It's a delicate dance, a push and pull that you’ll learn by feel.
When choosing a brayer, you might hear the term durometer – this refers to the hardness of the rubber roller. A higher durometer means harder rubber, and a lower durometer means softer.
- Soft Rubber Brayers (lower durometer): These are versatile and work well for most linoleum and wood blocks. They conform slightly to the block's surface, ensuring good ink transfer into the raised areas and being more forgiving with slightly uneven surfaces. Speedball makes durable, affordable options that are a great starting point. The weight of your brayer can also subtly influence your ink application; a heavier brayer can feel more stable and help lay down a consistent layer.
- Hard Rubber Brayers (higher durometer): Preferred by some for very fine detail or when working with slightly uneven block surfaces. Because they are less yielding, hard brayers tend to transfer ink more uniformly to the highest points of the block and are less likely to push ink into slightly lower, uncarved areas – that's why they help preserve crisp, unprinted areas. However, they are less forgiving if your block or surface isn't perfectly flat.
Start with one or two brayers in different sizes (e.g., a 4-inch and a 6-inch) to accommodate various block sizes. Proper cleaning after each use is vital to maintain their condition; dried ink on your brayer (and its handle!) is a nightmare to remove and will ruin future prints. And believe me, cleaning ink off a dried brayer is a chore I've learned to avoid at all costs – often involving more elbow grease than I'd care to admit! It’s a battle you don’t want to fight. With your block carved and your brayer ready, let's consider the surface where your art will finally call home: paper, waiting to receive its colorful kiss.
The Canvas: Choosing Your Paper
Weight, Absorbency, and Texture
The paper is not just a surface; it's an integral part of your print. Its texture, absorbency, and weight will all influence the final look. Think of it as the ultimate partner to your ink and block, and remember that subtle variations in how you handle the paper and apply pressure are what give each impression its unique "artist's hand." For me, the choice of paper is almost as personal as the subject I choose to carve; it dramatically shapes the mood of the final piece.
Let's talk weight first. Heavier papers (e.g., 100gsm or more) tend to hold up better to the pressure of printing and absorb ink without buckling. The "gsm" (grams per square meter) is a clear metric of the paper's substance. But if you're browsing in a North American art store, you might also see paper weight listed in pounds (lb), like 80lb or 100lb drawing paper. Generally, a higher number in both gsm and lb indicates a thicker, more substantial paper. This also impacts how the paper receives the impression; a sturdier paper can take more rubbing or press pressure without degrading, leading to a more consistent ink transfer. For general linocut and woodcut, I usually recommend starting with papers around 100-150gsm (or roughly 60-90lb). If you plan on doing heavier hand-printing or using a press with more pressure, moving up to 200gsm (110lb) or more can make a big difference, preventing buckling or tearing. Lighter papers can crease or tear more easily and are often a recipe for frustration when you're just starting out.
Next, absorbency and sizing. Papers designed for printmaking are often slightly absorbent, allowing the ink to transfer cleanly and evenly without bleeding. This is also where sizing comes in – a substance (often gelatin or starch) added to the paper pulp or surface to reduce its absorbency. It’s important not to confuse "sizing" (a treatment that affects how paper interacts with liquids) with the "size" of the paper (its physical dimensions). Think of sizing like a subtle sealant, or perhaps a primer coat on a wall; it controls how much your paper drinks the ink, preventing spread and helping to keep lines sharp. Highly sized paper is less absorbent, meaning the ink tends to sit more on the surface, which can result in sharper, crisper lines, almost like painting on a non-porous canvas. Less sized paper is more absorbent, allowing the ink to soak in slightly, often creating a softer, more integrated look. Most printmakers prefer papers with a moderate to low amount of sizing for optimal ink transfer and vibrancy.
Finally, texture. From smooth (great for crisp details) to slightly textured (adding another dimension to your print), the paper's surface will interact with the ink and the block's details. The grain of the paper, the direction in which its fibers are aligned, can subtly affect how it responds to pressure and how the ink lays down, essentially influencing how smoothly the brayer glides or how evenly hand pressure is distributed. It's often subtle, but printing with the grain can sometimes yield a smoother impression. Japanese papers, like mulberry or kozo, are often revered for their strength, absorbency, and beautiful subtle textures, even at lighter weights. You might also encounter papers with deckled edges, which are the feathery, untrimmed edges left from the papermaking process. Personally, I adore them; they add a beautiful, handcrafted aesthetic to your final prints, a small touch of elegance that whispers of tradition and care. Beyond these, you might consider paper finishes like matte, which offers a soft, non-reflective surface, or satin, which has a subtle sheen, both of which can dramatically change how your ink appears and how the light interacts with your finished print.
Don't be afraid to experiment with different types of paper you might have on hand – a good quality drawing paper can sometimes surprise you! But for truly crisp prints, investing in dedicated printmaking paper, like Rives BFK or Stonehenge, is a worthwhile step. If you're struggling with ink not transferring perfectly, try slightly dampening your paper with a fine mist of water for a softer, more absorbent surface – but always test first! Remember, practice makes perfect, and you can always explore more of my art for sale for inspiration on what's possible in the world of prints and other media.
Ultimately, your paper choice plays a significant role in the overall aesthetic and feel of your final print. What kind of texture will best complement your design? Now, with your block, ink, and paper chosen, we're almost ready to bring your vision to life – just a few more unsung heroes to cover.

Helpful Extras: The Small but Mighty Allies
Beyond the core tools, a few other items will make your printmaking experience smoother and more enjoyable. These are the unsung heroes of your studio, often overlooked but incredibly useful, making the inevitable artistic mess a little more manageable – or at least, helping you contain it.
Design & Transfer Aids
- Pencils and Tracing Paper: Essential for transferring your design onto the block. I usually draw my design on tracing paper using a soft graphite pencil (like a 2B or 4B for better transfer), flip it, and then rub the back to transfer a mirror image onto the block. This mirroring step is absolutely crucial because relief printing reverses your image! Remember that in relief printing, the areas you carve away will be the white (or paper-colored) parts of your print, forming the negative space, while the raised areas will hold the ink and create your image. This mental flip is key! For example, if you want "ART" to appear correctly in your final print, you must carve "TRA" onto your block. I still vividly remember the first time I carved text without mirroring; the print came out as a perplexing jumble, a secret language only legible in a mirror – a good laugh, but a lesson hard-learned. Alternatively, carbon paper can also be used for transferring designs. Its main advantage is precision, as it allows for very crisp, clear lines, especially for intricate designs. However, carbon paper can sometimes leave faint smudges that are difficult to erase, and the transferred lines can be harder to adjust compared to a pencil transfer, where lighter lines offer more flexibility.

Printing Aids & Safety
- Baren or Wooden Spoon (for Hand Rubbing): If you're not using a press (most beginners don't!), these provide excellent, even pressure for hand rubbing your prints. A baren is a traditional Japanese tool, a smooth, disc-shaped pad used to rub the back of the paper to transfer ink. Personally, I love the meditative rhythm of a smooth wooden spoon – perhaps a well-worn beech or bamboo one. It's simple, effective, and I've found it gives me a great feel for the transfer. The slightly convex curve of a good wooden spoon can actually help distribute pressure more evenly than a perfectly flat object. The key is that a smooth, firm surface allows for consistent friction and pressure across the paper, ensuring every part of your inked block makes contact. Just use consistent, firm circular motions across the back of your paper. In a pinch, any smooth, flat object like a large metal spoon, a smooth, clean rock, or even the back of a ceramic mug can do the job!
- Cutting Mat: A self-healing cutting mat is a game-changer; it protects your table and helps keep your blades sharper by providing a forgiving surface. A lifesaver for your kitchen table (or whatever surface you've claimed as your studio), and a good investment for keeping your cutting edges sharp.
- Bench Hook: (Yes, worth mentioning again!) This simple piece of equipment makes a world of difference for safety and control, preventing slips and ensuring precise cuts while you carve. It's like having a tiny, quiet assistant holding your work steady, without the need for coffee breaks.
- Good Lighting: This might seem obvious, but proper lighting is paramount for carving. A well-lit workspace, perhaps with an adjustable task lamp, reduces eye strain and helps you see fine details, preventing accidental slips and ensuring precision in your cuts. Trust me, trying to carve in dim light is a recipe for frustration and less-than-stellar results.
- Clean Workspace: This sounds obvious, but keeping your workspace tidy and free of debris is paramount. A stray crumb or tiny wood shaving on your inked block can easily transfer to your paper, leaving an unwanted mark. It's the little things that'll get ya!
- Eye Protection & Ventilation: Don't forget eye protection, especially if you're really digging into tougher materials. And speaking of safety, always ensure good ventilation if using any solvents for cleanup – nobody wants a studio that smells like a gas station, or worse, gives you a headache.
Cleanup & Maintenance
- Rags/Paper Towels: Absolutely indispensable for cleanup and wiping tools. Keep a stack of lint-free shop towels or old cotton rags (like cut-up old t-shirts) handy; you'll use more than you think, turning a rainbow of ink into a pile of colorful rags.
- Mineral Spirits or Eco-Friendly Cleaner: If you're using oil-based inks, a proper cleaner is non-negotiable. Always check the ink manufacturer's recommendations. For eco-friendly options, look for plant-based cleaners like soy-based solvents, or other biodegradable options specifically designed for oil-based ink removal. You can also seek out low-odor or odorless mineral spirits for a much more pleasant, less pungent studio experience, which I highly recommend for beginners. Always check product labels for clarity on environmental impact, and remember, good ventilation is your friend here.
- Protective Gloves: To keep your hands clean, especially with oil-based inks. There's nothing quite like trying to scrub ink off your hands after a long carving session, only to realize it's now permanently embedded under your fingernails. Save yourself the trouble; gloves are your friend.
- Cleaning Your Block: Always clean your block thoroughly after each printing session – paying special attention to the carved areas where ink can accumulate and dry. Dried ink in these areas can build up and ruin future impressions, filling in your fine details! A soft brush (like a stiff bristle brush or an old toothbrush) and the appropriate cleaner for your ink type will do the trick, ensuring your block is ready for its next life (or next printing session!). Remember, cleaning your block thoroughly after each printing session is key; dried ink in the carved areas can build up and ruin future impressions!
- Cleaning Your Ink Slab: Don't forget your ink slab! A clean slab is crucial for consistent inking. Wipe it down thoroughly with your chosen cleaner after each use to prevent dried ink from building up and affecting your next rolling session.
A Glimpse into History: The Enduring Legacy
Beyond just the "what" and "how" of printmaking, there's a deeper "why" that truly resonates with me. Why does this all matter beyond the sheer joy of creation? Because while we focus on modern supplies, it's worth remembering that relief printmaking has roots stretching back centuries, serving as a powerful engine for cultural and intellectual exchange long before digital media existed. For me, understanding this history is like discovering the grand family tree of my own artistic endeavors; it connects my small studio to a vast, global tradition. It's humbling to think that the same fundamental principles I use today were once employed by artists centuries ago to spread ideas, news, and stories across the globe.
These pioneers, working with rudimentary tools compared to today's options, pushed the boundaries of what was possible with carved blocks and ink, not just for art, but for spreading ideas, news, and stories. Their legacy reminds us that the essence of printmaking lies in the vision and skill of the artist, not just the tools themselves. Look closely at old scientific texts, for instance – many of their detailed illustrations were once created through printmaking!
Its influence stretched far and wide:
- Cultural Dissemination: From the earliest known woodcuts in ancient China – vital for disseminating religious texts and images – to early European prints where masters like Albrecht Dürer shaped narratives and information, and the vibrant Ukiyo-e prints of Japan made famous by artists like Katsushika Hokusai (whose iconic "The Great Wave off Kanagawa" remains a global phenomenon) and Hiroshige capturing everyday life and fleeting beauty, printmaking was crucial in spreading artistic movements and even popular culture across continents and social strata.
- Industrial Revolution: Printmaking played a pivotal role in the mass production of images and patterns, democratizing visual culture in ways previously unimaginable.
- Scientific Advancement: It was instrumental in the creation and widespread sharing of scientific illustrations, maps, and botanical drawings, fundamentally changing how knowledge was collected and understood. Imagine trying to explain complex anatomy without detailed prints!
- Political & Social Commentary: Artists used the accessibility of printmaking to disseminate powerful messages, critiques, and even propaganda, shaping public opinion for centuries. Think of the satirical prints that could sway public sentiment.
It's a beautiful thought, connecting our modern endeavors to a long line of creators who saw the power in the repeated impression. It makes me feel part of something much larger, a quiet tradition that echoes through time. If you're fascinated by this heritage, I highly recommend exploring The Enduring Legacy of Ukiyo-e: Japanese Woodblock Prints and Their Global Impact. This deep lineage grounds our contemporary explorations, making each pull of a print a quiet echo of history, reminding us that we are part of a continuous conversation through art.
My Curator's Wisdom: Lessons from the Studio Floor
As you gather your supplies, remember this isn't just about accumulating tools; it's about building a foundation for creative expression and finding your unique flow. My personal journey as an artist, which you can read more about on my timeline, has shown me that the best approach is often to start simple and expand as your skills and interests grow. Looking back, there are a few things I wish I'd truly grasped when I first started: that the process itself is as rewarding as the final product. The act of carving, the smell of the ink, the focused concentration – it all contributes to a truly unique creative flow. It's a wonderfully messy, engaging dance with materials, and sometimes, those 'mistakes' turn into the most delightful 'happy accidents' – I've certainly had prints where a smudge or an unexpected texture became my favorite part, proving that perfection isn't always the point! I learned that often, the most beautiful pieces emerge from an embrace of imperfection, a willingness to let the material guide you. I once had a client rave about a tiny, unplanned textural detail in a print – a moment where a slip of the gouge created a perfect, accidental accent. It just reinforces that sometimes, the magic is in letting go.
Here are a few nuggets of wisdom from my own printmaking adventures, the kind of insights I'd share over a cup of coffee:
- Start Simple, Invest Smart: While it's tempting to go for the absolute cheapest option, investing a little more upfront in quality tools will save you a lot of frustration. A good beginner set can take you very far. Focus on learning the techniques before investing heavily. You can always upgrade later, or discover you prefer making abstract art with dots! What does starting simple look like for your creative journey? Perhaps, as you grow, you'll even explore advanced techniques like reduction printing (using one block to print multiple colors by gradually carving away more of the block – considered advanced due to its irreversible nature; you can't put material back once removed, making each cut a high-stakes decision and demanding meticulous planning!) or multi-block printing (using a separate block for each color, which requires meticulous alignment and foresight, akin to a complex puzzle and often involving precise registration jigs).
- Safety First, Always: Always carve away from your body, and keep your workspace tidy. A sharp tool is less likely to slip. Trust me, I've had my share of minor mishaps, and they're easily avoidable with a bit of mindfulness. My worst studio injury wasn't a deep cut, but a nasty splinter from a poorly stored block – proof that even the small things count. How will you make safety a non-negotiable part of your routine?
- Experimentation is Key: Don't be afraid to try different papers, inks, or carving styles. That's where true discovery happens, and you might stumble upon a technique that truly resonates with you. Some of my most interesting pieces came from trying an ink on a paper I thought wouldn't work, just because I had it lying around. What unexpected combinations will you discover? Remember, keep a 'mistake' pile! Sometimes a print you initially dislike will teach you the most, or even inspire a new direction later.
Relief printmaking is a deeply rewarding art form. It forces you to think about positive and negative space, about line and texture, and the delightful surprise of seeing your vision come to life in multiple impressions. The anticipation as you peel back the paper – will it be perfect? Will there be a happy accident? – is a feeling like no other. What will your first print reveal? Perhaps you'll even be inspired to visit my museum in 's-Hertogenbosch to see how these fundamental principles play out in other art forms, and how a rich history informs contemporary creation. It’s all part of the glorious, endless conversation of art. And ultimately, what will you learn about yourself as you carve and print?
Your Next Steps: From Supplies to First Impressions
So, you've got your supplies, you've read the guide – now what? The block is waiting, the ink is calling, and your creative journey is just about to truly unfold. Here's how to turn that wisdom into action:
- Start Simple: Begin with a small, uncomplicated design. Focus on getting comfortable with your tools and understanding how different cuts translate to the print.
- Practice Carving: Use a scrap piece of your block to practice different gouges and knives. Get a feel for the material and how much pressure to apply.
- Proof, Proof, Proof: As I mentioned earlier, always make proof prints! It saves paper, ink, and a lot of frustration. Test your inking, your pressure, and your alignment. Don't forget to test your ink consistency on a scrap piece of paper before committing to your final block!
- Embrace Imperfection: Your first prints won't be perfect, and that's okay! Each "mistake" is a learning opportunity. Celebrate the unique character of your hand-pulled prints, because sometimes those happy accidents are what make a piece truly special.
Remember, the journey of printmaking is as rich as the destination. What will your first print reveal? The magic is in your hands. Now, go create!
Frequently Asked Questions (FAQ)
Printmaking is full of questions, and that's a good thing! It means you're learning and exploring. Here are some common ones I get, straight from the studio floor:
What is registration in printmaking and why is it important?
Ah, registration! This is the art of precisely aligning your printing block (or blocks) and your paper, especially crucial when you're doing multi-color prints. Imagine trying to print a blue layer, then a yellow layer, and you want them to overlap perfectly to create a crisp green – that's where good registration comes in. Without it, your colors will be misaligned, creating blurry or disjointed images. For beginners, simple cardboard jigs are a great start, but more advanced techniques involve pin registration systems. It's a fun challenge that adds another layer of precision (and occasional frustration!) to the printmaking process.
Can I just grab any old drawing paper for printmaking?
While you can technically use regular drawing paper, you'll likely find dedicated printmaking papers are much better. Drawing paper might not absorb ink evenly, can buckle under pressure, or tear more easily. Think of it like baking: you can use all-purpose flour for a delicate cake, but cake flour will give you a much better result. Experimentation is always encouraged, of course, but for crisp, professional-looking results, specialized paper is highly recommended. You'll thank yourself for the investment.
What's the core difference between linocut and woodcut?
The primary difference lies in the material of the printing block. Linocut uses linoleum, which is softer and grainless, allowing for smooth, fluid cuts and fine detail. Woodcut uses wood, where the natural grain influences the carving and can impart a distinct texture to the print. Wood is generally harder to carve and often requires different tools or techniques due to its fibrous nature, especially when carving with or against the grain. Each offers a unique dialogue with the material and its own aesthetic charm.
How do I clean and store my carving tools effectively?
Wipe your tools clean with a lint-free rag immediately after each use. If using oil-based inks, you'll need a bit of mineral spirits or an eco-friendly solvent designed for oil-based cleanup. For rust prevention, a light coat of oil (like 3-in-1 oil or even mineral oil) can be applied to the blades before storing them. Always store tools in a dedicated box or roll to protect their edges and prevent accidental injury. Keep them sharp; dull tools are harder to use, less effective, and frankly, more dangerous. A well-maintained tool is a happy tool, and a happy artist! Taking care of your tools is like taking care of your hands – they're essential.
Are there eco-friendly ink options available for beginners?
Yes, absolutely! Many brands now offer water-soluble, non-toxic inks that are much easier to clean up and kinder to the environment. Look for inks labeled as "water-soluble," "non-toxic," or "eco-friendly" from reputable art supply brands. These are an excellent choice for beginners concerned about environmental impact and harsh chemicals, and I always encourage artists to seek out greener alternatives when they can. It's a small change that can make a big difference, and it makes studio cleanup a breeze.
Why are my prints patchy, or why isn't the ink transferring evenly?
Patchy prints are a common beginner frustration, and I've been there! It usually comes down to a few key culprits:
- Uneven Ink Application: This is a two-parter. Either your ink isn't rolled out evenly on your slab (aim for a thin, consistent layer that sounds slightly tacky as you roll), or your brayer didn't transfer ink evenly to your carved block (roll across the block multiple times in different directions to ensure full coverage).
- Insufficient/Inconsistent Pressure: You're not applying consistent, firm pressure when printing. Really lean into that baren or spoon when pressing down on the paper, making sure to cover all areas of your block.
- Paper Issues: Sometimes the paper itself (too dry, wrong type, or incorrect sizing) can affect transfer. Dampening your paper slightly can sometimes help, especially with drier papers.
- Brayer Condition/Type: Check your brayer! If it has dried ink on it, or if it's too hard or too soft for the viscosity of your ink, it won't pick up or transfer ink evenly. A soft brayer might struggle with very high-tack ink, for example, or a hard brayer might miss subtle textures if your block isn't perfectly flat.
- Temperature: Both the room and ink temperature can affect tack. Colder conditions can make ink stiffer and harder to roll evenly, leading to patchy results. If your studio is chilly, try to warm the ink slightly before use, perhaps by placing the tube in a bowl of warm water for a few minutes. This can significantly improve its rollability and transfer, making for a much happier print session.
Always do a proof print to identify the issue before attempting your final piece! It's your best detective tool.
What are some common mistakes beginners make in relief printmaking?
Oh, where do I begin? We all make them! Beyond patchy prints, I've seen (and made) these common ones:
- Forgetting the Mirror Image: Carving text or a specific orientation without remembering it will print backward. Always double-check your design for reversal! It’s a classic rookie error that’ll give you a good chuckle (eventually).
- Over-Carving: Removing too much material, or accidentally carving into areas that should print. Remember, you can always carve more away, but you can't put it back! Plan your cuts carefully.
- Dull Tools: Trying to carve with dull tools, leading to slips, frustration, and a higher risk of injury. Keep those tools sharp!
- Inadequate Cleanup: Leaving ink to dry on tools, brayers, or slabs, making cleanup a nightmare and potentially damaging your equipment. Trust me, future you will thank present you for cleaning up properly.
- Impatience: Rushing the carving or printing process. Printmaking is meditative; enjoy each step, test thoroughly, and learn from every impression.
- Misunderstanding Positive/Negative Space: This is a fundamental conceptual hurdle for many beginners. Not grasping that you carve away what you don't want to print. The carved-away areas will be white (or paper color), while the raised areas will hold ink and print. If you want a thin white line, you carve it out. If you want a thin black line, you carve around it, leaving the line itself raised. It takes a bit of a mental flip, but once it clicks, it's incredibly powerful and opens up a new way of seeing your designs.
What about accidental cuts or gouges that are too deep during carving?
Don't panic! It happens to everyone, myself included. For small, shallow accidental cuts, you can sometimes carefully fill them with a bit of wood filler or even thick white glue (PVA glue), allowing it to dry completely and then carefully carving over it. For deeper gouges, it's often best to embrace it. Sometimes these unexpected marks can add character to your print, turning a "mistake" into a "happy accident" that makes your piece unique. However, if the cut fundamentally alters the integrity of your key design elements or is in a spot that cannot be creatively integrated (like slicing through the main eye of a portrait!), it might be "catastrophic" to that particular design. At that point, learn from it, accept it as a practice block, and start fresh on a new block. Every 'flaw' is a lesson waiting to be learned. You got this!
My brayer is getting sticky and hard to roll. What should I do?
A sticky brayer is usually a sign of dried ink residue, even tiny bits you can't see, or sometimes just very high-tack ink on a slightly warm day. First, try cleaning it again thoroughly with the appropriate cleaner for your ink type (soap and water for water-soluble, mineral spirits for oil-based). Ensure you're rolling it out on a clean surface until it moves smoothly. If it's still sticky, gently wipe it with a rag lightly dampened with mineral spirits (even for water-soluble brayers, a tiny bit of mineral spirits can sometimes help cut through stubborn residue, just be sure to follow with soap and water). For oil-based inks, a dedicated brayer wash works wonders. Also, ensure your studio isn't too warm; heat can increase ink tack. Sometimes, a gentle scrub with a soft brush and soap can remove embedded particles. Keep that brayer smooth, and your printing life will be much happier!
How should I store my inks to ensure they last?
Proper ink storage is key to extending their shelf life. Generally, store inks in a cool, dark place away from direct sunlight and extreme temperature fluctuations. Ensure the lids are tightly sealed after each use to prevent air exposure, which can cause inks to skin over or dry out. For oil-based inks, some artists even store them in the refrigerator to prolong their working life, but always allow them to come to room temperature before use to ensure optimal consistency and rollability. Water-soluble inks are less sensitive but still benefit from airtight storage, and storing tubes upright can help prevent any separation or leakage over time. Good storage prevents waste and ensures your colors are ready when inspiration strikes!


