
Woodblock Printing: Ancient Craft, Enduring Magic, and My Personal Journey
Explore the timeless world of woodblock printing: its rich history, intricate process, comparisons to other relief techniques, and how this ancient magic continues to inspire contemporary artists like me.
Woodblock Printing: Ancient Craft, Enduring Magic, and My Personal Journey
You know, there are these moments when an art form just reaches into your chest and gives your heart a gentle squeeze. For me, that’s woodblock printing. It's not just a 'that's pretty' kind of feeling; it’s a deep, almost ancestral hum, like the wood itself remembers millennia of stories of human touch and intention. I’ve felt it myself, the quiet reverence when I hold a freshly carved block, the scent of timber grounding me, connecting me to countless artists who’ve stood where I stand. It’s ancient, tactile, and, I'll be honest, a bit intimidating. But the story it tells, not just through the final image, but through the very patient, deliberate process of making it? Absolutely captivating. In this article, I want to pull back the curtain on why this ancient magic still obsesses me, covering its history, the tangible process, its surprising endurance in our digital age, and how it stacks up against its printmaking cousins – and hopefully, spark a bit of that magic in you too.
What Exactly Is Woodblock Printing?
At its heart, woodblock printing is one of the oldest forms of printmaking, and what we’re primarily discussing here is woodcut. It's a prime example of relief printing, where the raised parts of the matrix print the image, in stark contrast to intaglio printing, like etching, where recessed lines hold the ink. Imagine carving an image into a piece of wood – often fruitwoods like cherry or pear for their fine grain, or historically, even plumwood in China, or sometimes a smoother Shina plywood in Japanese traditions, valued for its fine, even grain and consistent carving properties. You then ink the raised surfaces, and press that block onto paper or fabric to transfer the design. It's essentially a giant, hand-crafted stamp, but with incredible nuance and artistic potential. When working with multiple colors, you'll typically use a key block for outlines and color blocks for filling in specific hues. In a world saturated with digital perfection, there's something utterly grounding about a hand-carved, imperfect print. For me, the slow, intentional act of creating something tangible from wood and ink is a visceral reminder of human effort, a quiet rebellion against the instant gratification of screens, demanding patience and offering a profound connection to the past.
A Quick Trip Through Time: Where Did It All Begin?
So, who thought of this genius idea first? While popular consensus often points to China in the 3rd century (where it started as a utilitarian method for patterns on textiles, like beautiful silks, and for reproducing religious texts, particularly Buddhist sutras, slowly blossoming into art and even serving as an early form of mass media for popular imagery), it's worth noting that Korea also has incredibly early examples, like the Mugujeonggwang Daedaranigyeong from the mid-8th century. From these origins, the technique travelled, making its most famous journey, for many of us, to Japan. There, it truly flourished, giving us the vibrant, iconic Ukiyo-e prints – those incredible 'pictures of the floating world.' Artists like Hokusai and Hiroshige, with their dramatic landscapes and elegant figures, basically perfected the multi-block color printing technique. Their work not only captivated audiences in Japan but also had a profound impact on Western art, sparking the Japonisme movement among European artists like Van Gogh and Monet. If you've ever found yourself wondering about that whole captivating world, you can dive a bit deeper into the enduring legacy of Ukiyo-e: Japanese woodblock prints and their global impact right here on my site. Europe, too, embraced woodblock printing early on, not just for books and devotional images (Albrecht Dürer immediately springs to mind) but also as a vital tool in the spread of information, playing a significant role in movements like the Reformation by disseminating pamphlets and broadsides. It’s fascinating how a technique can span continents and millennia, isn't it? It just goes to show some ideas are too good to stay contained.
The "How-To" Without Actually Doing It (Yet!): The Process
Okay, so how does this magic actually happen? It's not rocket science, but it certainly takes a steady hand and a good dose of zen.

credit, licence
Step 1: Design & Transfer
First, you've got your idea. You sketch it out, maybe refine it a bit, and then you need to get it onto your woodblock. Sometimes you draw directly, other times you transfer it using carbon paper or even a photographic method. Crucially, whatever you draw will appear in reverse on the print, which is a mind-bender if you're not used to thinking mirror-image. I’ve definitely messed up a few 'left' and 'right' signs because of this. Text? Forget about it. My brain just flips a switch and rebels. I remember once trying to carve a motto for a friend’s gift, and after printing, it read like a cryptic message from an alternate dimension – a truly unique piece, if not quite what I intended!
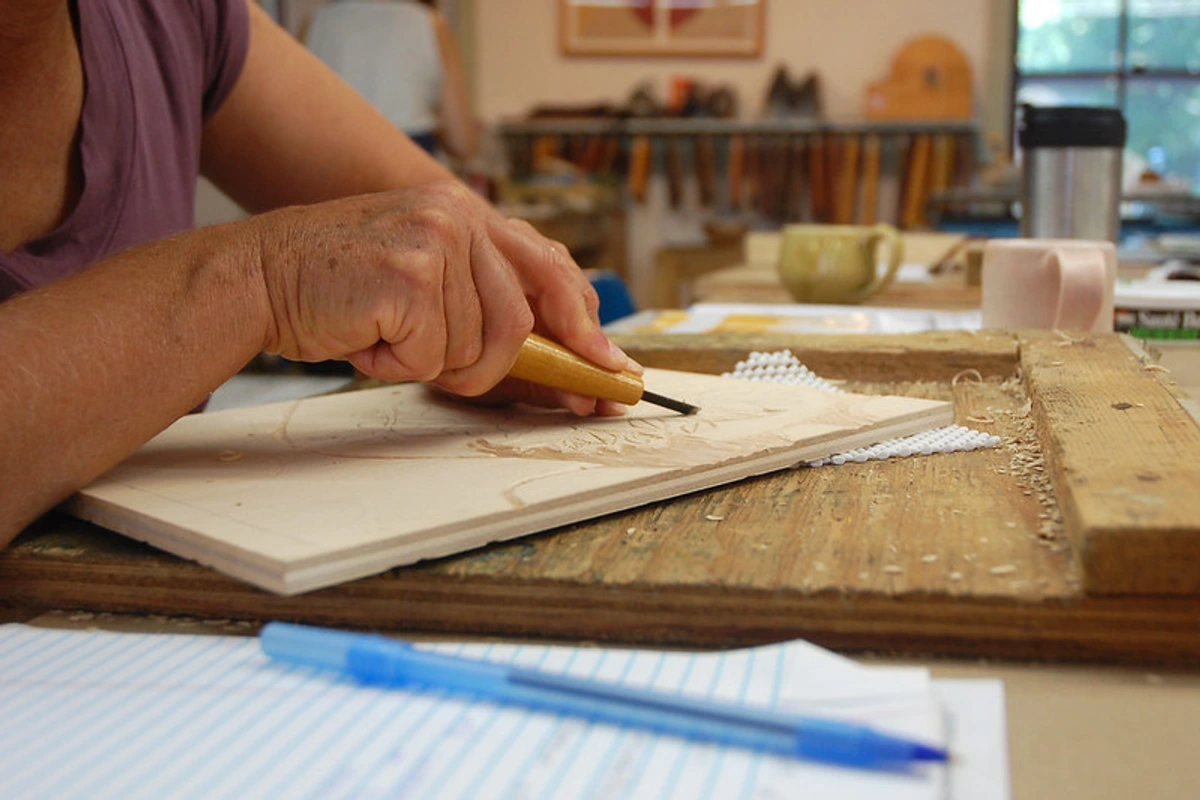
Step 2: Carving - The Heart of the Matter
This is where the real transformation happens. Using specialized gouges (those scoop-shaped tools for clearing larger areas) and knives (for cutting fine lines and details, like a V-gouge for sharp V-shaped cuts or a U-gouge for broader, rounded channels), you carefully carve away the parts of the woodblock that you don't want to print. The areas you leave raised are the ones that will pick up the ink. It's a subtractive process, and there's no 'undo' button here. One wrong slip, and you've got an unintended line that becomes part of your masterpiece (or, if you’re like me, a good excuse to call it ‘abstract expressionism’ and move on, or just start over). It’s incredibly meditative, but also requires serious focus. You become acutely aware of the grain of the wood – how it resists, how it yields, and how its direction can influence the smoothness or jaggedness of your cut. Softer woods like pine or plywood are often used by beginners because they're easier to carve, making them forgiving for initial experiments. For more detailed work, however, harder woods like cherry or maple are preferred, as they hold finer lines and resist compression better. It's a conversation with the material, really, and sometimes the wood argues back, often with a splinter, or a stubborn refusal to let your knife go exactly where you want it. My worst enemy? A tiny, invisible knot that derails a perfectly straight line.
Step 3: Inking Up!
Once your block is carved, it's time for ink. Typically, you use a brayer (a roller) to spread an even, thin layer of ink over the raised surfaces of the block. There are different types of brayers, from hard rubber for crisp, even coverage to softer rubber for more textured applications, each affecting the final print. The type of ink varies too – oil-based for richness and slower drying, water-based for quicker work and easier cleanup. And the paper? That's another vital choice. Traditional Japanese woodblock printing often uses delicate, absorbent Washi paper, known for its strength and ability to pick up fine details, while Western artists might opt for sturdier printmaking papers, each bringing its own character to the final piece. The cool thing is, you can print on almost anything: paper, fabric, even some smooth wood surfaces! It's a delicate balance; too much ink and you might get a muddy, indistinct print where fine details are lost, too little and your print looks faded or patchy. Finding that sweet spot often involves a few test prints and, if I'm honest, a healthy dose of frustration, often resulting in a few 'ghost prints' where the ink just decided to disappear.
Step 4: The Press (or Rubbing Spoon) & Registration
Finally, the moment of truth! You carefully lay your paper onto the inked block. Then comes the pressure. In traditional Japanese woodblock printing, artists often use a baren – a hand tool designed to rub the back of the paper, transferring the ink. Western methods might use a printing press. Either way, consistent, even pressure is key to a good impression because it ensures an even transfer of ink across the entire design, preventing patchy areas or smudges. For multi-color prints, you also need to master registration – the precise lining up of the paper perfectly over each subsequent color block to ensure all elements align without unsightly overlaps or gaps. Peeling back that paper to reveal the print is still a thrill, every single time. It's like unwrapping a little gift you made yourself, fresh from the creative oven.
The whole journey, from concept to final print, is less about speed and more about embracing the rhythm of creation. It's a beautiful, messy, rewarding dance. This intricate process is the heart of woodblock printing, but it's also part of a larger, fascinating family of printmaking techniques, each with its own quirks and charms. And once you've felt that magic, you truly start to understand why this art form has endured.
Woodblock vs. Its Cousins: A Little Printmaking Family Feud
But how does this ancient art form hold its own against its printmaking relatives? Now, you might be thinking, 'Isn't that just like linocut?' And yes, they're definitely cousins in the relief printmaking family. The core process of carving away material is similar. The big difference is, well, the material! Linocut uses linoleum, which is softer, grainless, and much easier to carve because of its pliable nature, yielding clean, crisp lines, often with a modern feel. The result is typically sharp, graphic, and less textural than wood. Wood, on the other hand, has a grain that can be incorporated into the design – sometimes intentionally, sometimes it's just 'there,' giving an organic texture linoleum can't quite replicate, leading to bold, expressive, often painterly strokes.

credit, licence
Then there's wood engraving, which is another cousin, but a distinct one. While woodcut (which is what we've primarily been discussing) uses the plank grain and is carved around the lines you want to print (a relief method) – resulting in those bold, expressive lines I mentioned – wood engraving uses the end grain of much harder wood, allowing for incredibly fine lines and tonal variations, often carved with a burin. Think of it as painting with light and shadow; visually, while still a relief method, it often yields much finer detail and smoother tonal gradations, akin to a delicate pencil drawing or even an intaglio print, than a typical woodcut.
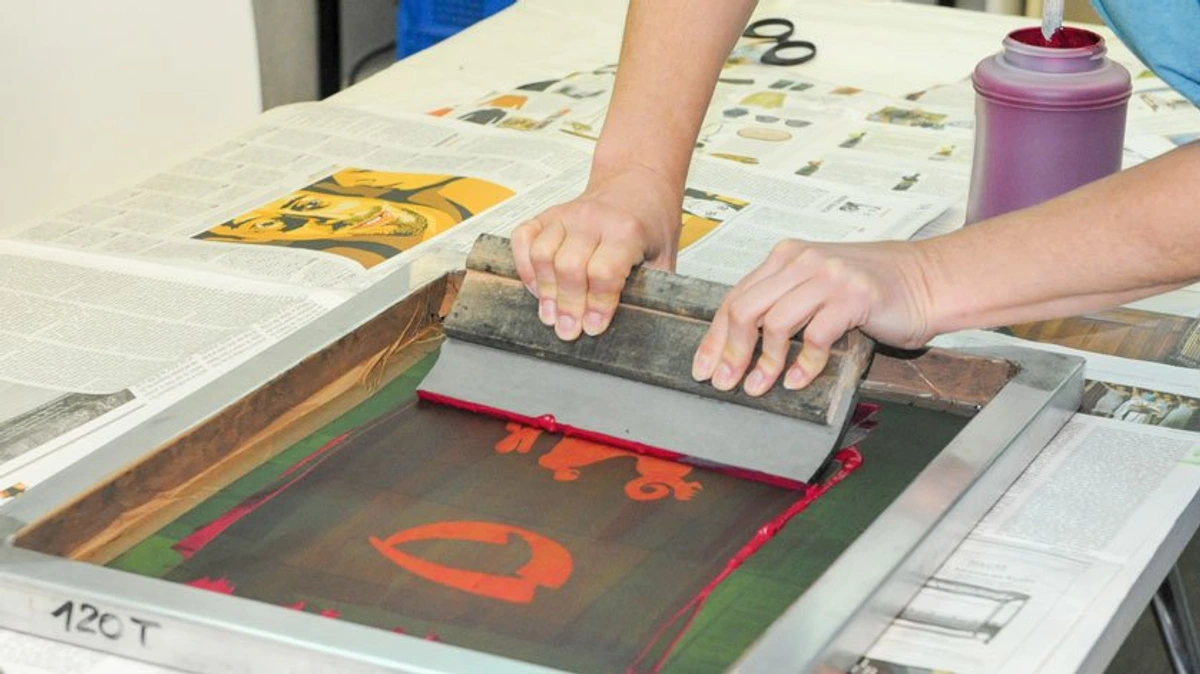
And then there's screen printing, which is a whole different beast. Instead of carving, you're pushing ink through a stenciled mesh. It's fantastic for vibrant, flat colors and textiles, but it lacks that direct, carved line quality of woodblock, producing a flatter, more graphic aesthetic.
To summarize the family differences, here’s a quick overview:
Technique | Material | Grain | Carving Direction | Typical Output & Aesthetic |
|---|---|---|---|---|
| Woodcut | Wood (plank/side grain) | Visible/Integral | Around desired lines (relief) | Bold, graphic, expressive, often painterly, textural |
| Linocut | Linoleum | Grainless, pliable | Around desired lines (relief) | Clean, crisp, sharp lines, modern, less textural |
| Wood Engraving | Wood (end grain) | Very fine/invisible | Into desired lines (intaglio-like relief) | Exceptionally fine detail, smooth tonal gradations, delicate, drawing-like |
Each technique has its own personality, its own strengths, and its own unique way of speaking. It's a rich family, this printmaking world, and each member brings something unique to the table, helping us artists find our perfect creative fit.
Beyond the Masters: Woodblock Today
While understanding the rich printmaking family tree is fascinating, the story doesn't end with historical masterpieces. Woodblock printing is far from a relic; contemporary artists are constantly pushing its boundaries, experimenting with scale, color, and subject matter. Think of artists like Katsutoshi Yuasa, known for his intricate, often digitally-influenced yet traditionally carved prints that explore themes of urban landscapes, or Tuula Moilanen, who creates strikingly modern, sometimes abstract, compositions using traditional Japanese techniques, often focusing on nature and patterns. You see it in graphic design, in fine art galleries, and even in street art. There's a powerful movement towards reclaiming traditional crafts, and woodblock printing, with its hands-on nature and unique aesthetic, fits right in. For me, it’s a reminder that even in my own abstract and colorful prints, the echoes of these ancient techniques are always present. The desire to create, to transfer an idea from mind to material, is timeless. If you're curious about my own explorations in art, you might enjoy seeing my art for sale or learning about my artistic journey – you’ll see how these ancient principles subtly inform even my most contemporary pieces.
FAQ: Just Some Things You Might Be Wondering
- Is woodblock printing hard to learn? "Like any craft, it takes practice. The basic carving for a single-color print, creating simple shapes or bold lines, is surprisingly accessible with a few tools and some patience. Start with something simple, like carving a basic geometric shape or a stylized leaf, and let your curiosity guide you. However, mastering the intricate details, achieving perfect registration for multi-color designs, or experimenting with subtle tonal gradations? That's where the real dedication comes in, and frankly, it can be a lifelong pursuit. But hey, anything worth doing, right?"
- What kind of wood is best for woodblock printing? "Softwoods like pine or plywood are often used by beginners because they're easier to carve, though they might not hold super fine details. For more detailed work, hardwood like cherry or maple is preferred, as it holds finer lines and lasts longer for multiple editions. Japanese printmakers famously use Shina plywood for its smooth, even grain and consistent carving properties."
- Can you print multiple colors with woodblocks? "Absolutely! This is where it gets really exciting (and challenging). For each color, you typically need a separate block, with one designated as the 'key block' that carries the primary outline or darkest tone, and others as 'color blocks' for the fills. Or, you can do a reduction print where you carve away more of the same block between each color layer, printing the lightest colors first and progressively carving away the block for darker layers. As we discussed, it requires careful registration – the precise lining up of the paper perfectly each time – to ensure all the colors align without unsightly overlaps or gaps. This can be tricky, often leading to a few discarded prints, but when it works, it's pure magic."
- What's the difference between woodcut and wood engraving? "Good question! Both use wood, but they differ significantly in how they're carved and what part of the wood is used. Woodcut (which is generally synonymous with traditional woodblock printing) uses the plank grain (side grain) of the wood, and the image is carved around the lines you want to print (a relief method). This often results in bold, expressive lines and a somewhat raw, direct aesthetic. Wood engraving, on the other hand, uses the end grain of much harder wood, allowing for incredibly fine lines and tonal variations, often carved with a specialized tool called a burin. Think of it as painting with light and shadow, almost like etching, and visually, it yields much finer detail and smoother tonal gradations, akin to a delicate drawing, than a typical woodcut. So, while both are wood-based printmaking, their visual languages are quite distinct."
My Final Thoughts: Why We Still Carve
In a world moving at lightning speed, there's a profound beauty in slowing down and engaging with a process that hasn't fundamentally changed for centuries. Woodblock printing isn't just about making an image; it's about connecting to a lineage of artists, to the material world, and to that quiet, persistent urge to create something tangible. It’s a testament to human ingenuity and the enduring power of art to tell stories, evoke emotions, and leave an impression, literally. For me, the meditative rhythm of carving and the surprise of the print echo in my own artistic philosophy, where traditional methods inform contemporary abstraction. If you ever visit my museum in 's-Hertogenbosch, you'll find works that explore this very dialogue between ancient techniques and modern expression, often through vibrant, abstract forms born from traditional principles, showcasing how the tactile nature of art endures. I hope this journey into the world of woodblock printing has sparked a bit of that ancestral hum in you, too. Maybe it’s time to pick up a gouge yourself?


