Encaustic Painting: Ancient Wax Art, Techniques & My Creative Journey
Discover the captivating world of encaustic painting. Explore its ancient origins, unique materials, detailed process, creative challenges, and mixed-media possibilities through my personal artistic journey.
Encaustic Painting: My Luminous Journey into Ancient Wax Art & Modern Techniques
Sometimes an art form just hits you differently, doesn't it? For me, that was encaustic painting. Before that, my brain probably conjured up images of dusty museum artifacts or, honestly, just the smell of beeswax candles and forgotten emergency supplies. I certainly didn't imagine a vibrant, luminous, and incredibly tactile medium that would quite literally melt its way into my artistic heart. It’s a process that feels both deeply meditative and wonderfully unpredictable, a beautiful dance between control and letting the wax guide you, leading to art that truly endures. I want to share why this ancient art form has captured mine, exploring its fascinating history, the magic of its materials, the mesmerizing process that brings it to life, some common challenges you might encounter, and even how it blends with other media. Think of this as your personal guide, from its ancient origins to its vibrant contemporary applications – a journey I hope you'll be inspired to explore yourself, perhaps even inspiring a visit to a museum like ours in 's-Hertogenbosch to see art that endures.
A Brief Trip Back in Time: The Ancient Roots of Wax Art
It’s often said that there's nothing truly new under the sun, and encaustic is a shining (or perhaps, glowing) example of that. We're talking ancient. Seriously ancient. The earliest known examples of encaustic date back to the 5th century BC, originating with the Greeks. They used it for painting ships, adding strength and weatherproofing, and likely for decorating statues and architectural elements, demonstrating its versatile application across both practical and artistic endeavors. While less documented than the Greeks or Romans, evidence suggests various wax-based techniques might have also been explored in other ancient cultures for similar purposes, showcasing a widespread early appreciation for wax's protective and aesthetic qualities.
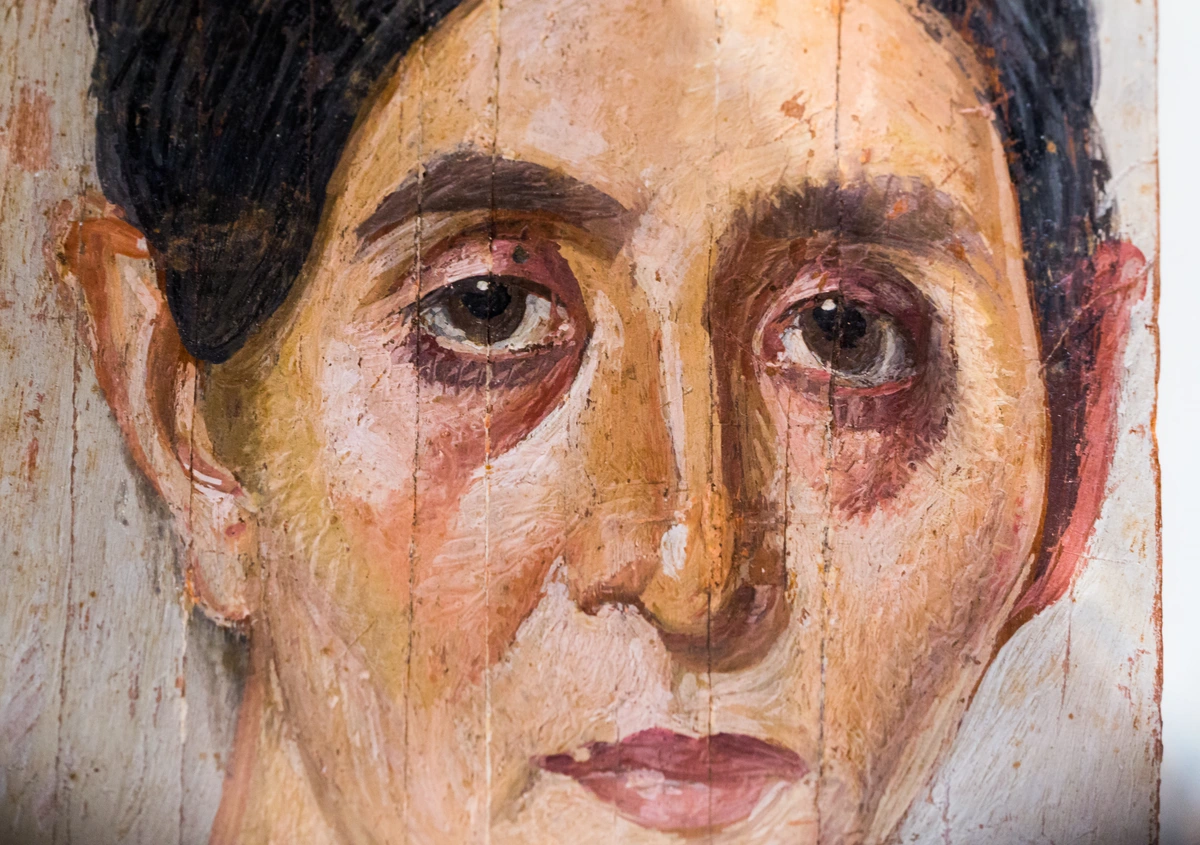
The Romans later adopted it, using it in impressive wall paintings in places like Pompeii and Herculaneum, which, when rediscovered centuries later, sparked new interest. However, it was the Egyptians, or more specifically, the Romano-Egyptians, who truly gave us the most breathtaking historical evidence of encaustic's power: the Fayum mummy portraits. These incredibly lifelike and vibrant depictions of the deceased, often made on wood panels, have survived for over 2,000 years with their colors largely intact. Think about that for a second! Our modern paints often fade or crack, but these wax masterpieces just... endure. That kind of permanence, that whisper across millennia, is incredibly alluring, isn't it?
After flourishing in the ancient world, encaustic saw a decline in popularity during the Middle Ages and Renaissance. Other, simpler mediums like tempera and fresco gained traction, perhaps because artists preferred the ease of working at room temperature, without the need for specialized heating tools or the laborious process of preparing the wax. For centuries, it became less common, but never entirely forgotten. Its major comeback arrived in the 18th century as archaeologists rediscovered ancient sites, like Pompeii and Herculaneum, bringing renewed interest in classical art and sparking experimentation. The Neoclassical movement further fueled this resurgence, as artists sought to emulate the durability and luster of ancient art. Then, in the 20th century, modern artists enthusiastically embraced encaustic for its textural possibilities and archival qualities. Pioneers like Jasper Johns utilized encaustic in his iconic flag paintings, showcasing its ability to create rich, textured surfaces, while abstract expressionists found new ways to convey emotion and depth with its unique properties. It’s a testament to the enduring influence of ancient art and a reminder that some good ideas just can't be kept down, much like a stubborn memory you can't quite shake. It makes you wonder what other ancient secrets are waiting to be rediscovered, doesn't it? This rich history, steeped in resilience and artistic ingenuity, truly laid the groundwork for the fascinating medium we explore today, highlighting its continuous appeal from antiquity to contemporary art.
So, What Exactly IS Encaustic Painting? (Beyond Just “Hot Wax”)
At its heart, encaustic painting is the process of painting with heated beeswax, often mixed with a tree resin, typically damar resin, for hardness, clarity, and a higher melting point, and colored with pigments. The word "encaustic" itself comes from the Greek enkaustikos, meaning "to heat or burn in," which perfectly describes the essential process of fusing the layers – the core principle that differentiates encaustic from other wax-based mediums. This continuous application of heat to melt and blend each layer is what gives encaustic its unique depth and incredible durability. While other resins and waxes can be used – you might even hear about cold wax medium (a paste made from beeswax, solvent, and resin, used cold and distinct from hot encaustic, offering a different set of textural possibilities) – damar is overwhelmingly preferred for its exceptional transparency, durability, and its ability to prevent stickiness once cooled. This makes the finished artwork much more robust and less prone to dust attraction, plus it adds a beautiful luster, a subtle sheen that truly makes it glow.
When we talk about pigments, artists today use high-quality, professional-grade powdered pigments specifically designed for art, which you mix directly into your molten wax. Historically, pigments would have been laboriously ground from minerals like vibrant ochres and lapis lazuli, or from plants and other natural sources. This process was often inconsistent, making it difficult to achieve precise hues, and in many cases, introduced toxic substances. It's worth noting that working with raw pigments, especially historical ones, required (and still requires) careful handling due to potential toxicity – think about the historical use of lead white or cadmium, which are known neurotoxins. Compared to ancient times, modern pigments like titanium white offer vastly improved lightfastness and consistency, ensuring the vibrancy of your artwork endures even longer, and with significantly enhanced safety for artists. Always prioritize artist-grade pigments for consistency and safety. The beauty of encaustic is how these pigments are suspended in the translucent wax, allowing light to penetrate and play within the layers. You might start by mixing your own wax and resin, but for many, myself included, pre-mixed encaustic medium (a blend of beeswax and damar resin) is a fantastic starting point, saving time and ensuring a consistent formula. Just add your pigments! Sometimes I even use commercially prepared encaustic paints, which are essentially pre-pigmented blocks of wax medium, making the process even quicker. And speaking of materials, I appreciate that encaustic relies on natural, renewable resources like beeswax and tree resin, which feels like a gentle nod to sustainability in my practice.
Imagine a canvas, but instead of liquid paint, you're working with molten, colored wax. It's fluid when hot, solidifies almost instantly when cooled, and can be reheated and re-manipulated over and over. This gives it a unique set of characteristics, distinctly different from, say, acrylics or oils:
Characteristic | Description |
|---|---|
| Luminosity & Depth | Translucent wax allows light to penetrate, refract, and glow within layers, creating incredible depth. |
| Texture & Impasto | From smooth, glass-like surfaces to thick, sculptural layers, it invites tactile exploration. |
| Permanence | Extremely robust once fused and fully cured, resistant to moisture and yellowing. |
| Versatility | Can be carved, built up, embedded with objects (encaustic collage), polished, or left matte. |
Let's unpack a few of those:
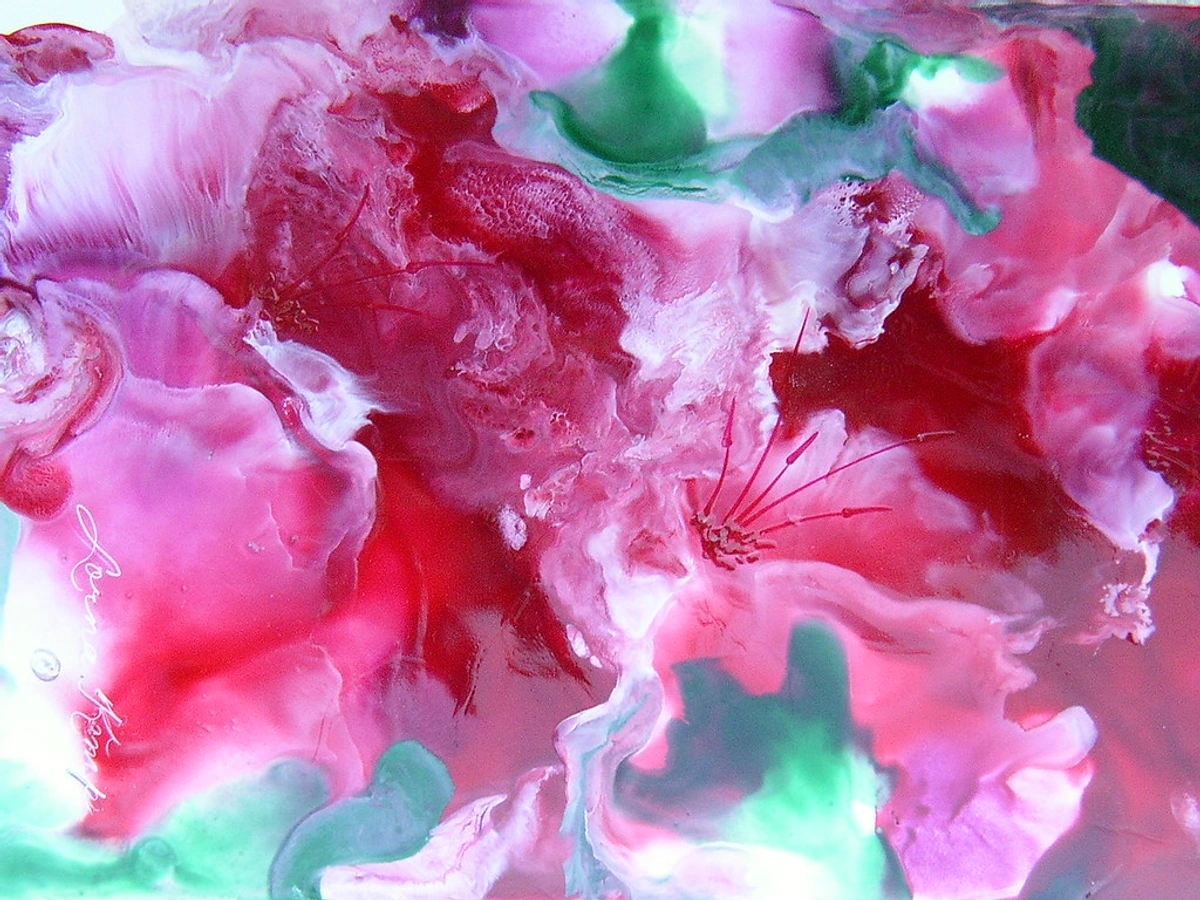
- Luminosity and Depth: The wax, being translucent, allows light to penetrate and refract within the layers, creating an internal glow and incredible depth as layers build up. It's like looking into a warm, soft pool of light, or perhaps a frosted windowpane, but with an inner radiance that emanates from within the layers themselves. This inner light is what truly captivates me. It's not just a surface glow; it's a light from within, a soft, almost ethereal quality. One time, I was trying to create a misty effect for a landscape. Instead of fighting with opaque layers, I leaned into the translucency, applying a very thin, almost clear layer over a busy background. The resulting internal glow transformed the piece, giving it that perfect luminous mist I hadn't quite foreseen. That's the magic!
- Texture and Impasto: Oh, the texture! You can create smooth, glass-like surfaces or thick, sculptural layers. It’s a dream for artists who love to explore tactile experiences in their work; it truly invites the viewer to feel the surface (metaphorically, of course – please don’t actually touch!). I often find myself creating richly textured pieces, almost like tiny landscapes, where the wax itself becomes a sculptural element.
- Permanence: As those Fayum portraits prove, once properly fused and fully cured – a process where the damar resin and wax chemically harden over several weeks, reaching their maximum durability – encaustic is incredibly robust. Think of it like a freshly varnished wooden table; it needs time to fully set and achieve its strength. This hardening makes it resistant to moisture and environmental damage, and unlike many oil paints, it won't yellow over time if properly maintained. That said, it is susceptible to scratching if not handled with care, can soften and even warp in extreme heat (so definitely keep it away from direct sunlight or hot car interiors!), and is prone to cracking if flexed or dropped. You might also notice a whitish haze, known as blooming, appear on the surface over time; this is a natural oxidation process of the wax that can easily be buffed away with a soft cloth. It's a bit like the bloom you see on high-quality chocolate, or the waxy coating on a fresh plum – a harmless, natural occurrence.
- Versatility: You can carve into it, build it up, embed objects (encaustic collage), polish it to a sheen, or leave it matte. Its ability to create both delicate details (think figurative works with subtle skin tones) and bold, abstract gestures makes it incredibly adaptable. I've embedded everything from dried leaves to shredded paper, even tiny pieces of metal, and the wax embraces them, holding them in suspended animation. The possibilities for mixed media are immense.
When I started my journey, I was fascinated by how this medium could offer such a rich, almost edible texture, while also being capable of incredible subtlety. It reminds me a bit of how memories work – some are sharp and clear, others are layered and hazy, but all contribute to the overall picture. This 'dance between control and letting the wax guide you' often means I might begin with a clear intention, only for the heat or the flow of the molten wax to create an unexpected blend of colors or a texture I hadn't foreseen. Instead of fighting it, I've learned to lean into these moments, allowing the material's inherent properties to inform the final piece, often leading to something far more interesting than my initial plan. Doesn't that sound like a liberating way to create?
Fusing vs. Curing: The Keys to Encaustic Permanence
These two terms are absolutely critical for understanding encaustic's renowned durability, but they refer to distinct stages in the artwork's life. Fusing happens during the creation process. It's the active melting of one wax layer into the layer beneath it using heat (from a heat gun or torch). This creates a homogenous, cohesive bond between all the layers, preventing delamination and ensuring the structural integrity of the artwork. Proper fusing is what makes your painting a single, unified skin of wax, rather than a stack of independent layers. Think of it as welding the wax together.
Curing, on the other hand, happens after the painting is complete. It's the natural, gradual hardening process of the damar resin within the wax, which typically takes several weeks (or even months, depending on thickness and environmental conditions) to fully achieve maximum hardness and scratch resistance. During curing, the wax becomes significantly more robust and less susceptible to minor surface damage. It’s a bit like cement drying; it looks solid quickly, but its true strength develops over time. Both fusing and curing are indispensable for creating an encaustic piece that will truly endure for centuries, as proven by the ancient masters.
The Tools of the Trade: Essential Gear for Your Waxy Adventure
Alright, let's talk about the gear. Stepping into encaustic means embracing a whole new set of tools, and if you're like me, half the fun is getting all the gadgets! Because, let's be honest, every new artistic venture comes with its own collection of delightful (and sometimes slightly intimidating) instruments. With encaustic, heat is the star player, so you'll absolutely need equipment to keep that wax molten and to fuse your layers. It's all about control and careful application of warmth, and a dedicated workspace is key. And remember that natural, subtle honey scent from the beeswax? It's lovely, but still means proper ventilation is non-negotiable!
Heating & Fusing Essentials:
- Heated Palette: This is where your colored wax blocks sit, melting into a glorious pool of pigment, ready for your brush. Think of it as a warm desktop for your paint, keeping it at a consistent working temperature. This is a non-negotiable item, and thankfully, good quality ones are more accessible than ever. I remember my first palette; it felt like a tiny stove for my art.
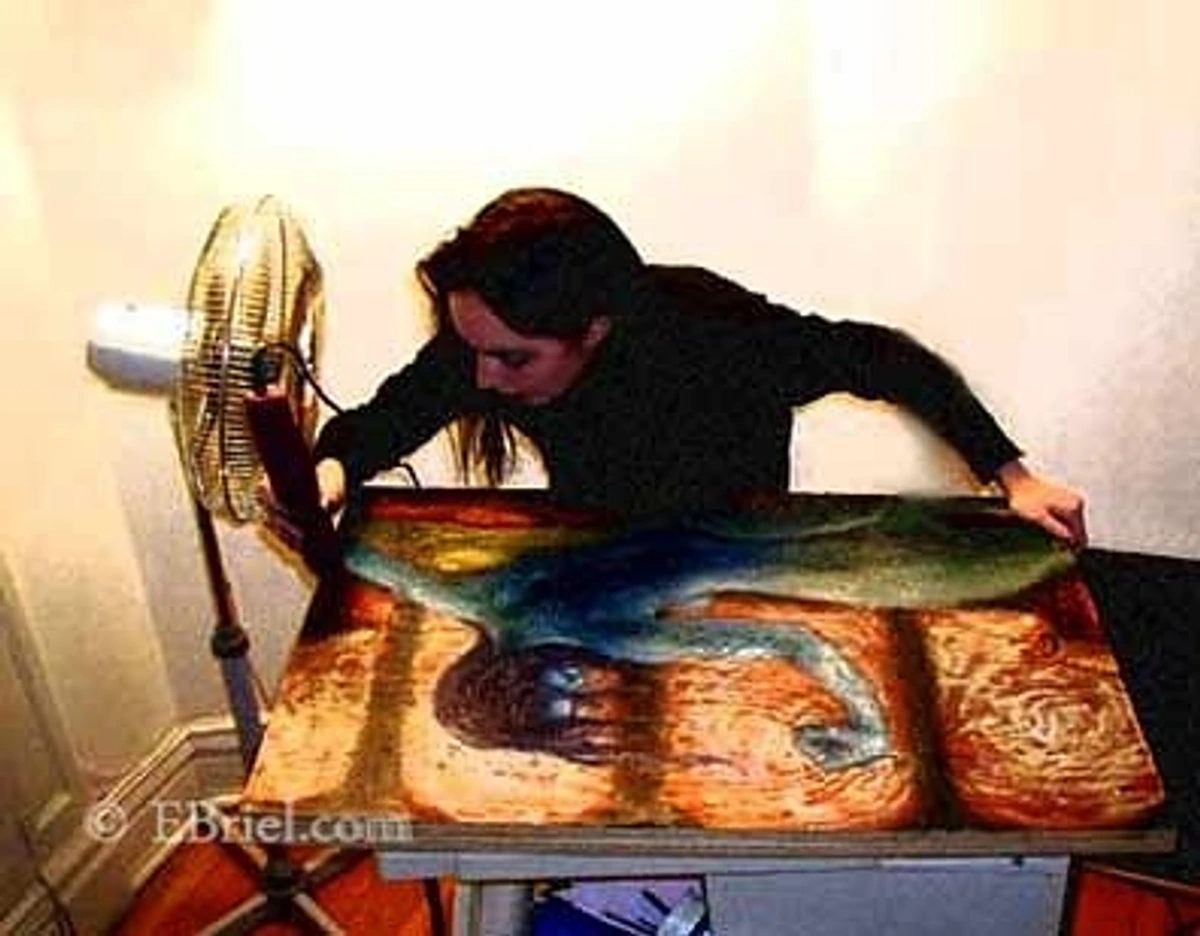
- Heat Gun or Torch: My absolute must-have. After you apply a layer of wax, you use a heat gun (or a small butane torch, carefully!) to fuse it. This melts the new layer into the previous one, creating a solid, cohesive bond and that signature encaustic sheen. Without proper fusing, layers can delaminate and fall apart over time – and trust me, nobody wants that after all your hard work! It's the key to the medium's durability, permanently integrating each application. A heat gun provides a broader, gentler heat, great for larger areas or delicate fusing (like working with embedded papers). A small torch, on the other hand, offers a more intense, localized flame, ideal for quick fusing, creating specific effects like bubbles, lifting color, or textural nuances, or getting into tight spots. I tend to reach for my heat gun most often, valuing its consistent and controlled heat for most of my work, though the torch definitely has its dramatic moments.
Application & Manipulation Tools:
- Brushes and Applicators: Natural bristle brushes (like hog hair) work wonderfully because they can withstand the heat without melting, retain their shape, and offer good wax retention and release. Synthetic brushes are generally a no-go, as they'll just fuse into your artwork! Various metal tools for scraping, incising, or building up wax are also indispensable. Some artists even use craft irons, heated styluses for fine details, or a specialized soldering iron tip for intricate line work or small areas. For those on a budget, simple tools like sturdy palette knives or even old credit cards can be repurposed for scraping and texturing wax. I've found that having a variety of brush sizes and shapes opens up so many possibilities.
- Scrapers and Carving Tools: For when you want to reveal layers underneath, create intricate textures, or even add sgraffito details. There’s something incredibly satisfying about carving into warm wax, almost like sculpting. You can also explore specialized encaustic tools like textured rollers, stamps, or even integrate metallic powders or iridescent mediums into your wax for unique visual effects, adding a touch of magic to your creations.

credit, licence
Safety & Support:
- Ventilation: This isn't exactly a "tool," but it's non-negotiable for safety. Working with heated beeswax and damar resin generates fumes. While you might notice a faint, pleasant honey-like scent from the beeswax, ensuring proper ventilation (an open window, a fan, or even a specialized fume extractor) is crucial for your health and comfort. I always make sure my studio is well-aired before I even think about heating wax. Trust me, your lungs will thank you. Some individuals may find the fumes irritating even with good ventilation, so always pay attention to your personal sensitivity.
- Safety Precautions: Beyond ventilation, always work in a fire-safe space. Keep a fire extinguisher nearby and never leave heated wax unattended. I also recommend wearing gloves, eye protection (especially if using a torch!), and long sleeves to prevent accidental wax burns – this stuff is hot and can splatter! When I first started, I invested in a basic starter kit, which provided many of these essentials, making the initial dive much less intimidating.
I remember my first time using the heat gun. It felt like I was wielding a miniature dragon's breath, carefully coaxing the wax to do my bidding, or sometimes, to surprise me with its own artistic choices. It's a very hands-on, almost alchemical process where you learn to work with the material, not against it. There's definitely a learning curve, and yes, sometimes I still make a lovely, waxy mess, but that's part of the adventure, right? So, with these essential tools in hand, imagine holding them, ready to bring your vision to life and embark on the creative process itself! Are you feeling the heat yet?
Getting Started: A Peek into the Encaustic Process
With the right tools in hand, let's dive into the actual process of creating an encaustic piece. The process itself is wonderfully iterative and forgiving, which is something I deeply appreciate. Mistakes aren't really mistakes; they're just opportunities for a new layer. There's an initial investment in equipment, yes, but once you have your setup, the creative flow begins. Here's a simplified look at how it generally works:
- Preparing Your Rigid Foundation: You start with a rigid, absorbent surface. Wood panels (like birch or plywood) are common because the wax needs something porous to cling to, providing a good mechanical bond. This "mechanical bond" is crucial: the wax literally grabs onto the tiny fibers of the wood, locking itself in place. Think of it like a thirsty sponge soaking up water; the wood's absorbency creates a 'tooth' for the wax. Without this crucial absorbency and rigidity, the wax might flake off or crack, much like paint on a slick, unprepared surface or a flexible canvas. Cradled wood panels, with their built-in support frame, are particularly preferred for their enhanced rigidity, crucial to prevent the wax from cracking if the artwork flexes. This rigidity is paramount, as flexible supports like canvas are a definite no-go for this reason – the wax, once cooled, becomes brittle and inflexible. Any bending or flexing of a canvas will inevitably cause the rigid wax layers to fracture, leading to cracks and delamination. Sometimes artists apply a thin, absorbent gesso specifically formulated for encaustic to their wood panels to further enhance adhesion and create a uniform surface.
- Layering Color and Form: Apply thin layers of molten wax, one at a time. Each layer can be a different color, opaque or translucent. You're not just painting; you're building a multi-dimensional surface. This is where the magic of luminosity truly begins to take shape, allowing light to travel through the wax.
- Fusing: The Alchemy of Heat: After each layer, or every few layers, you fuse the wax with a heat gun or torch. This is the magical part where the wax transforms, melting the new layer into the previous one, creating a solid, cohesive bond and that signature encaustic sheen by fully integrating the new wax into the existing layers. Proper fusing is not just about aesthetics; it's vital for durability, ensuring a solid, cohesive artwork that will stand the test of time and preventing individual layers from delaminating or flaking off, much like those ancient Fayum portraits. It's the critical step that transforms separate layers into a single, unified skin of wax, and can even be used to create subtle textures or 'lift' underlying colors to the surface.
- Manipulation: Carving, Collaging, and Texturing: While the wax is still warm, or even after it's cooled and you've reheated it, you can manipulate it. Carve into it, scrape it back to reveal underlying colors, embed papers, fabrics, dried plant material, photographs, or small found objects (a technique known as encaustic collage). This embedding technique creates fascinating narratives, suspending tiny treasures within the luminous wax. You can also use stencils for precise patterns or create intricate textures. The possibilities for mixed media are immense. This is where I often bring in external elements, finding immense joy in the juxtaposition of wax and other textures, building stories within the layers.
- Polishing: The Final Reveal: Once your piece is completely cooled and cured (which can take a few days to a few weeks, allowing the damar resin to fully harden and the wax to reach its maximum durability, similar to how oil paint dries over time), you can buff it gently with a soft, lint-free cloth to bring out a beautiful sheen and enhance its luminosity. This final step often feels like revealing a hidden treasure.
My personal journey with encaustic has been about embracing this fluidity. It's not about achieving a perfect line, but about the interplay of layers, the happy accidents of melting, and the surprising textures that emerge. It's a conversation with the material, really – a beautiful dance of push and pull, where the wax often has its own unexpected wisdom to share. And sometimes, the material wins, but in the best possible way, revealing something unexpected and beautiful. Can you already picture your first encaustic creation, or perhaps, the conversation you'll have with the wax? Why not try a small experiment at home or look for local workshops to begin your own unique journey?
Why I'm Head Over Heels for Encaustic: The Unmistakable Appeal
Honestly, there are so many reasons this ancient medium has me utterly captivated. It offers a sensory and emotional experience unlike any other art form I've encountered, a truly immersive journey that speaks to something deep within me. I find myself returning to it again and again, drawn by its unique qualities and the sheer joy it brings to my creative practice.
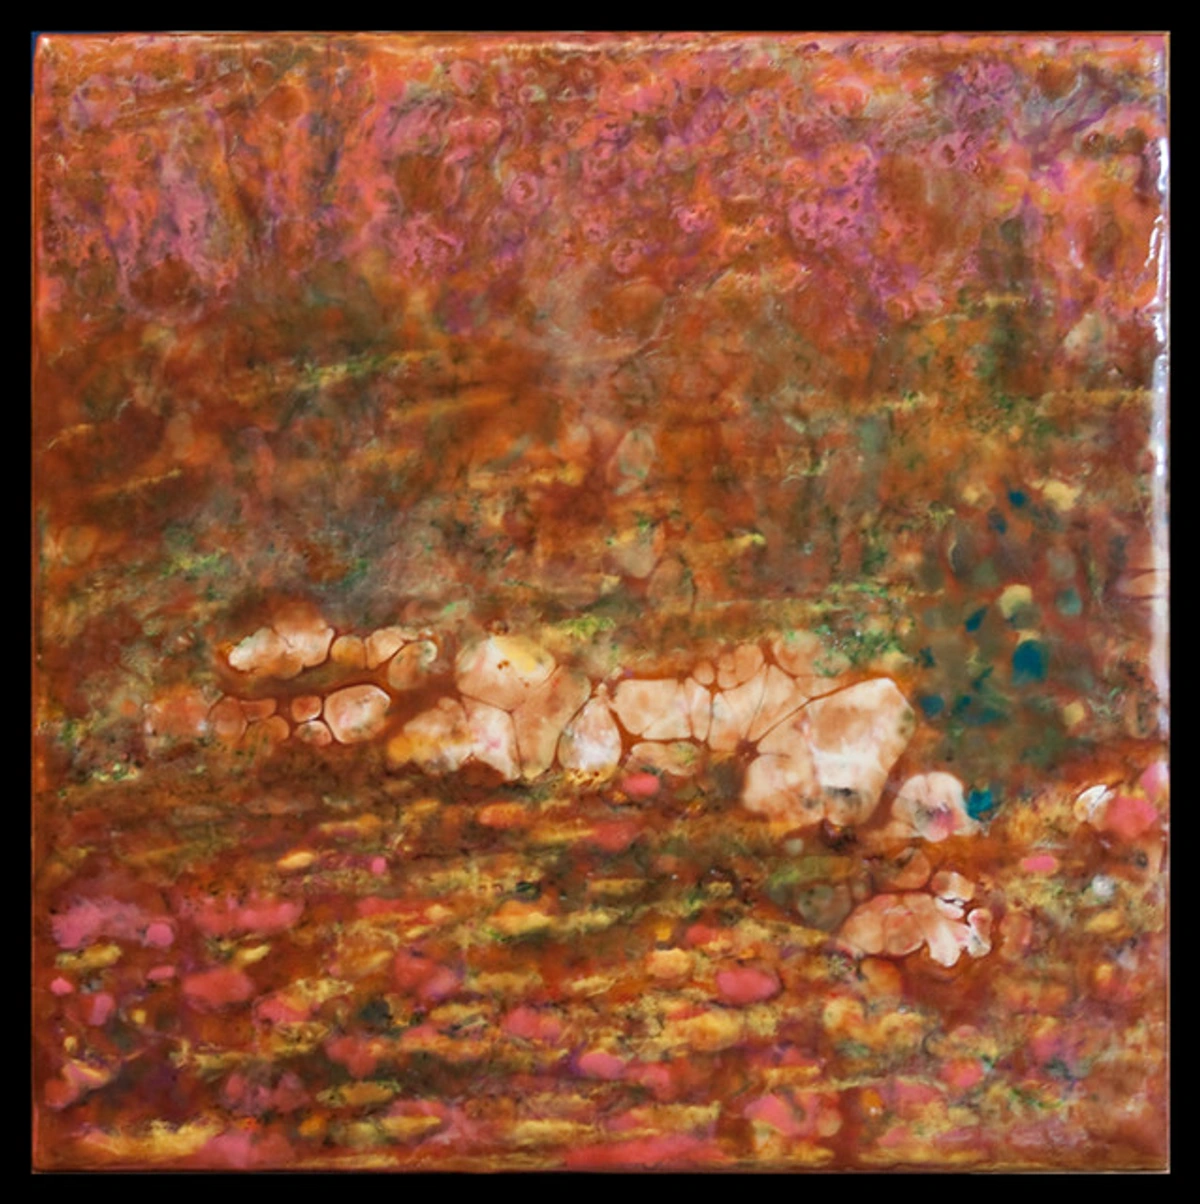
- Tactile Engagement: You can feel an encaustic painting, not just with your eyes, but almost with a phantom touch. The dimensionality, the ridges, the smooth expanses – it invites a metaphorical exploration, begging you to lean in and discover its secrets (even if you shouldn't actually touch it in a gallery!). This physical presence gives the work a grounded, almost sculptural quality that constantly draws me in, allowing me to build up lush textures that feel rich and inviting, much like the surface of my 'Garden Wall' piece.
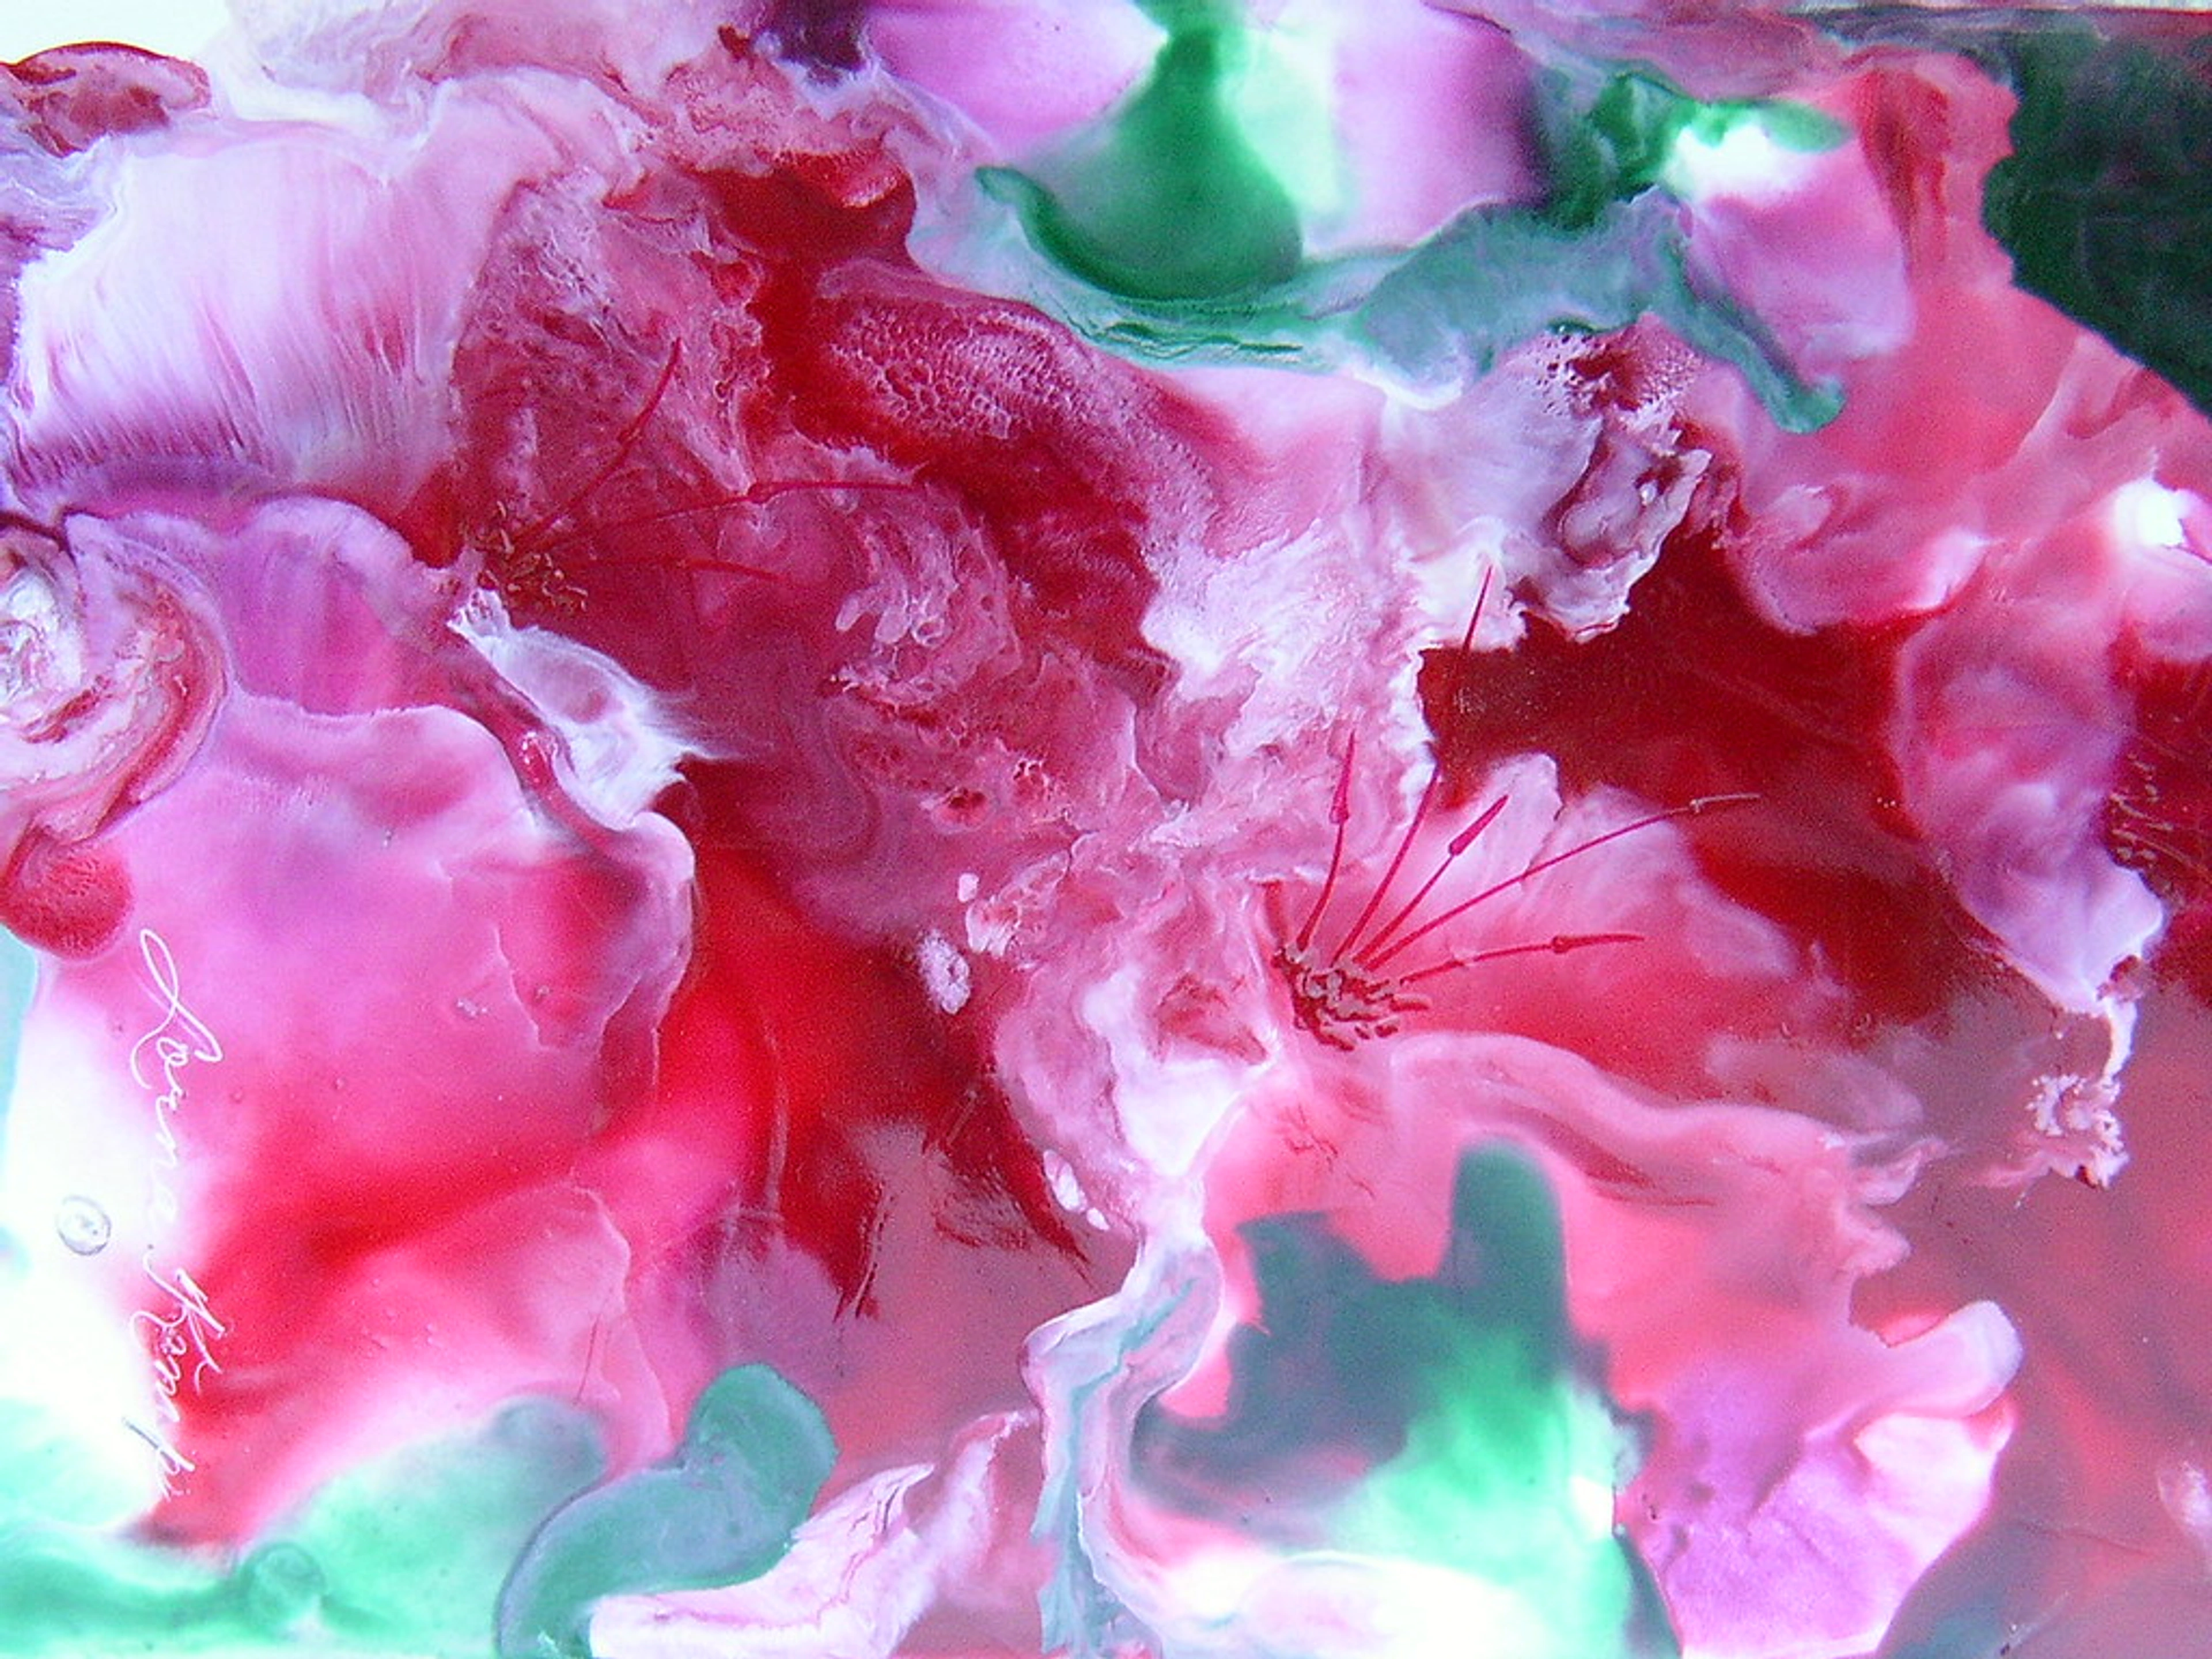
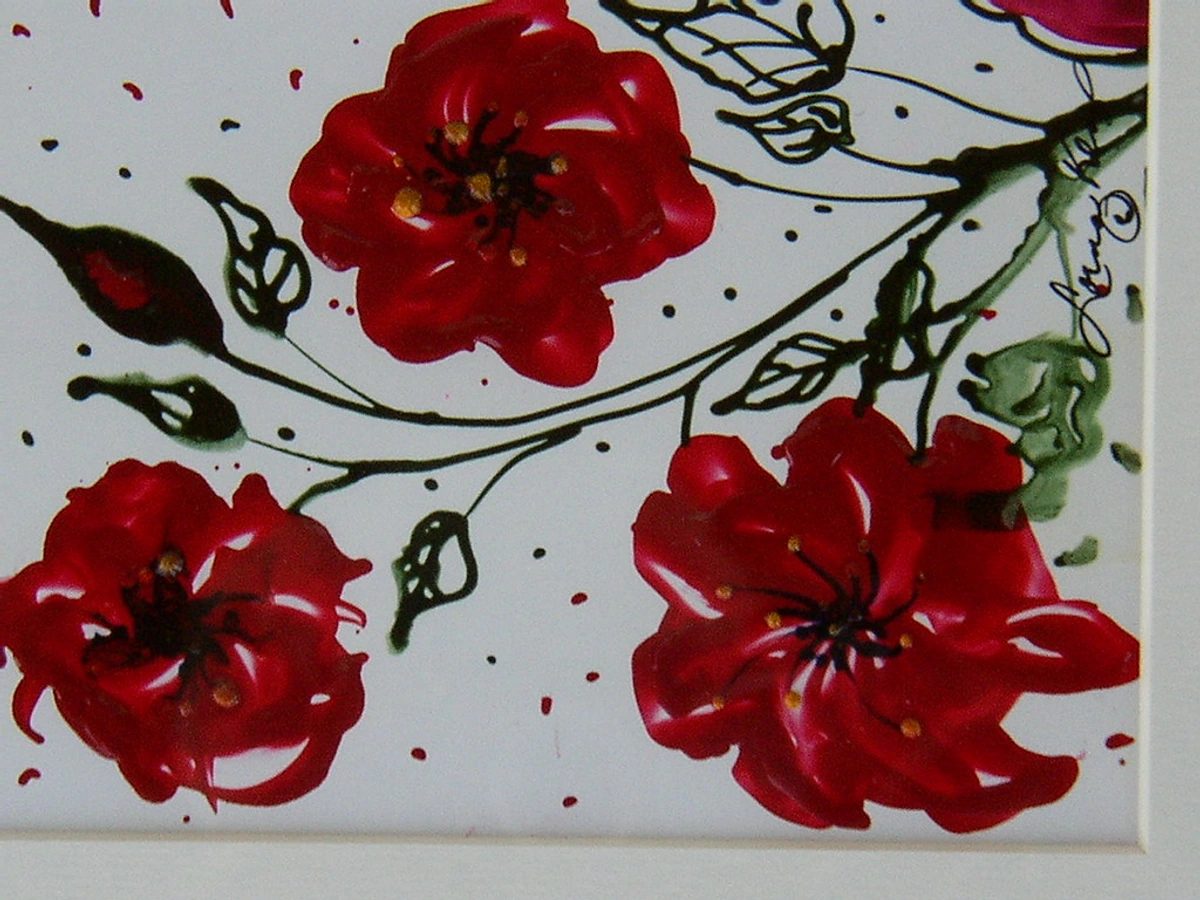
- Light and Luster: That inner glow I mentioned? It’s simply unparalleled. The way light plays across the translucent surface, penetrating and revealing subtle shifts in color and texture from within, is something you just have to see in person to truly appreciate. It truly allows an artist to "paint with light" in a very literal sense, creating an ethereal quality that feels alive, capable of conveying anything from the subtle glow of a misty morning to the vibrant intensity of a sunset. When I'm working with vibrant colors, like the reds in the poppy painting, the wax captures and radiates light in a way no other medium can – it feels like it's breathing. It’s a magic trick the wax plays, making the colors sing from within, imbuing the artwork with a palpable sense of inner life.
- Versatility in Expression: Whether you're drawn to figurative work, abstract exploration, or mixed media experiments, encaustic can do it all. Its layered nature lends itself beautifully to creating rich, complex abstract art, and its unique ability to capture subtle nuances of light and shadow can be particularly effective for portraiture or still life, giving figures an almost ethereal quality. Contemporary artists continue to push the boundaries: Jean Denis, for instance, creates compelling portraits showcasing remarkable depth and luminosity in skin tones by meticulously building translucent layers, while Joanne Mattera is known for her minimalist, textured abstracts that explore light and surface through subtle shifts in wax thickness. Encaustic is a medium that constantly challenges and inspires me, offering a unique voice and endless possibilities for personal expression. This ability to build layers, knowing that each one subtly influences the others, creates a unique depth that you just don't get with other mediums. It's a bit like life, isn't it? Every experience, every layer, contributes to the whole, forming a rich tapestry of existence. I remember one piece where I was struggling to achieve a particular depth in a landscape. After numerous attempts, I decided to just let the wax dictate, applying a thin, translucent layer over a busy background. The heat gun did its magic, and suddenly, the landscape emerged with a luminous, misty quality I hadn't planned but instantly loved. It was a beautiful reminder that sometimes the best art happens when you surrender to the medium's inherent properties. What unexpected beauty might you uncover?
Navigating the Wax: Common Challenges and My Personal Solutions
Now, while I could sing encaustic's praises all day, it wouldn't be a complete picture without acknowledging the learning curve and a few common frustrations. Think of them not as roadblocks, but as interesting puzzles the wax presents, and I've certainly solved a few in my time! These challenges, however, are part of the process, much like learning any new skill, and they ultimately lead to a deeper understanding of the medium.
- Cracking: This is often the most heartbreaking challenge for beginners and pros alike. It usually happens when the wax layers are too thick, or when the wax cools too quickly, causing internal stress from uneven expansion or contraction of the wax relative to the support. This absolute rigidity is precisely why the choice of substrate is so paramount. My solution? Work in thinner layers, ensure adequate fusing, and always use a rigid support like a cradled wood panel. I learned this the hard way with an early piece that developed hairline cracks despite looking perfect just hours before – a truly gut-wrenching moment. A gentle reheating and re-fusing can sometimes mend minor cracks if you catch them early.
- Pitting or Air Bubbles: These pesky little imperfections can appear if you overheat the wax, don't fuse adequately, or trap air between layers. It's like the wax is trying to tell you something! I've found that proper fusing after every layer, using a heat gun with a gentle, sweeping motion, helps a lot. If bubbles do appear, a quick, focused burst of heat from a torch can often pop them. Sometimes, I even embrace them as a textural element, but usually, they're a sign to slow down and fuse more carefully.
- Blooming: We touched on this earlier, but it's worth mentioning again. That whitish haze is just the natural oxidation of beeswax, making your painting look a bit... fuzzy. It's not damage, and it doesn't mean your painting is ruined! I simply buff my cured pieces with a soft, lint-free cloth. It's a quick fix that brings back the luster every time, almost like giving your art a little pamper session. Think of it like the natural dusty coating on plums or the powdery white on high-quality dark chocolate; it's a sign of natural wax properties, easily removed.
- Brittleness in Cold & Softening in Heat: While durable, encaustic can become brittle in very cold temperatures (below 50°F / 10°C), making it susceptible to cracking if bumped or flexed. Conversely, extreme heat (above 150°F / 65°C, or even direct, intense sunlight in a hot car) can cause the wax to soften, warp, or even melt, potentially leading to drips or altered textures. Proper curing is key, and it's best to avoid displaying or storing pieces in areas with extreme temperature fluctuations, such as unheated garages in winter, direct AC vents, or drafty windows. Room temperature environments are generally ideal. (Don't ask me how I know – let's just say a piece once had a very unfortunate encounter with a cold garage during winter, and another with a particularly sunny window.)
- Uneven Fusing: Sometimes, you'll get areas that look properly fused and others that still show distinct brushstrokes or look dull. This is often just a matter of practice and getting a feel for your heat tool. I recommend working in smaller sections and making sure each area receives consistent heat until it just begins to glisten. It's a delicate balance, like finding the perfect temperature for your coffee. You'll get there, I promise! Embracing these challenges has actually made me a better artist. It's taught me patience, observation, and the beauty of working with the material's inherent properties rather than trying to force it. Every "mistake" has been a valuable lesson, and honestly, sometimes the most beautiful textures come from those unplanned moments. What lessons might the wax teach you?
Frequently Asked Questions About Encaustic Painting (My Unofficial Q&A)
Curiosity is a wonderful thing, and I get a lot of questions about this fascinating medium. Here are a few common ones, answered from my perspective:
Q: Is encaustic painting durable, and how long does it last?
A: Absolutely! As those ancient mummy portraits show, encaustic is incredibly stable and durable. Once fully cured (allowing the damar resin to fully harden over a few weeks for maximum resilience) and properly fused (the process of melting layers together during creation), modern encaustic paintings are considered archival and can last for centuries. They are resistant to moisture and yellowing. The key is this combination of proper fusing during creation and allowing adequate curing after completion. Just treat it like any other fine art – avoid extreme temperatures (which can soften the wax) and direct sunlight, and don't scratch it with sharp objects! For cleaning, a gentle buff with a soft, lint-free cloth is usually all that’s needed, which also remedies any natural blooming (a whitish haze) that might occur over time. While robust, remember it's still wax, so avoid dropping or sharply impacting the piece, as this can cause the wax to crack or chip.
Q: Is encaustic difficult for beginners?
A: "Difficult" might be the wrong word. It requires a different approach and some specific tools, so there's an initial learning curve to mastering the heat and the wax flow. But fear not! Increasingly affordable starter kits are available, making it more accessible than ever, and many artists begin with a basic heated palette and heat gun. For those on a tighter budget, you can even begin with a simple electric hot plate for melting wax (ensure it's dedicated for art use and well-ventilated!) and a craft iron or a basic heat gun for fusing, gradually adding specialized tools as you become more comfortable. Once you get the hang of fusing, it's actually quite forgiving. You can always melt it down and start again! I truly believe anyone can learn to love it, especially if you enjoy the tactile joy of working with your hands and a little bit of playful experimentation – it's how I fell in love with it! Start small, experiment, and don't be afraid to make a beautiful mess.
Q: What surfaces can be used for encaustic?
A: You need a rigid, absorbent surface. Wood panels (like birch or plywood) are ideal because they won't flex or warp, and the wax has something porous to grip onto, creating a strong mechanical bond. The rigidity of the support is paramount to prevent the wax from cracking. Flexible supports like canvas are a definite no-go for this reason – the wax, once cooled, is brittle and will inevitably crack if the support bends. Sometimes artists apply an encaustic gesso to enhance adhesion further.
Q: Are there fumes to worry about?
A: Yes, when beeswax and damar resin are heated, they release fumes. Proper ventilation (an open window, a fan, or even a specialized fume extractor) is essential for your health and comfort. You might enjoy the natural honey scent of beeswax, but always prioritize safety first! Some individuals may find the fumes irritating even with good ventilation, so pay attention to your personal sensitivity. A dedicated studio space with good airflow is highly recommended.
Q: Can encaustic be used for abstract art?
A: Oh, absolutely! Its layering capabilities, textural possibilities, and inherent luminosity make it a phenomenal medium for abstract expression. Many contemporary encaustic artists work purely in abstraction, leveraging the medium's unique properties to create incredibly evocative and dynamic pieces. It’s one of the reasons I find it so appealing – the material itself often guides the abstract forms, almost creating them for you.
Q: Is encaustic painting expensive to start?
A: The initial cost of equipment (heated palette, heat gun, brushes, wax medium) can feel like a significant barrier for some. However, like any specialized art form, it's an investment in tools that will last. Many art supply stores offer starter kits that bundle the essentials at a more accessible price point. You can also begin with a very basic setup (a hotplate for melting wax, a cheap brush, and a heat gun) and gradually add specialized tools as you become more comfortable. Think of it as investing in a new hobby – the initial outlay pays off in endless creative joy and the unique art you'll create!
Exploring Beyond Wax: Encaustic & Mixed Media Magic
One of the most exciting aspects of encaustic, for me anyway, is its incredible openness to collaboration with other artistic mediums. It's a bit like inviting other artists to a party – some blend seamlessly, others create fascinating contrasts, but they all add to the vibrancy! Its unique properties allow for stunning mixed media effects that are hard to achieve with other paints. For me, this is where the real creative adventure begins, seeing how different elements can interact and tell a richer story.
You can embed almost anything that isn't too moist or prone to rot directly into the wax layers – think photographs, papers, fabrics, dried plant materials, even small found objects like metal or shell fragments. This encaustic collage technique allows for endless narrative possibilities, suspending memories or textures within the luminous wax. But beyond embedding, encaustic also plays beautifully with a range of dry and oil-based media on its surface.
For example, I often use oil sticks or oil pastels to add definition, vibrant lines, or subtle color shifts directly onto a cooled encaustic surface. Imagine using an oil pastel to create a soft, blended sunset gradient over a fused wax layer – the wax provides a wonderful tooth for these materials to adhere to, and the oil content in the sticks is compatible, allowing for smooth blending. You can also experiment with graphite, charcoal, or colored pencils for fine details or atmospheric effects, creating a fascinating interplay between the matte dry media and the subtle sheen of the wax. Charcoal might create a soft, smudged effect on a slightly warm wax surface, while a sharp colored pencil can incise crisp lines. Some artists even incorporate inks or pigment sticks directly into the molten wax or on top of fused layers for specific staining or luminous effects, where the translucent wax can amplify the ink's vibrancy.
The trick is always to consider the compatibility and drying times of the additional medium. Generally, water-based media like acrylics or watercolors are best applied to the rigid support before any wax layers, often sealed with an absorbent acrylic gesso specifically formulated for encaustic to ensure a stable, receptive surface. This creates a fascinating foundation for the wax. But the possibilities are so vast, transforming a simple wax painting into a complex, multi-layered narrative. It's truly a playground for experimentation, where the unexpected often leads to the most compelling discoveries. And it constantly informs new ways of seeing and creating, which is why I often find myself incorporating these layered effects in my own art for sale. What unexpected combinations will you explore?
My Waxy Conclusion: A Medium That Melts Hearts and Inspires Creativity
So, there you have it: my slightly rambling, entirely enthusiastic take on encaustic painting. It's more than just a technique; it's an experience, a conversation with history, a dance with heat, and an endless exploration of texture and light. It truly melts hearts and inspires creativity. If you ever get the chance, I highly encourage you to delve into the world of encaustic – even just by appreciating a piece in a gallery or trying a small starter kit at home. You might find, as I did, that this ancient art form still has plenty of magic to share, and perhaps, a piece of it will melt its way into your own collection or inspire a visit to a museum like ours in 's-Hertogenbosch to see art that endures.
I even find myself experimenting with these layered effects and incorporating other mediums like oil sticks or pastels in my own art for sale, as this medium constantly informs new ways of seeing and creating. It’s a truly extraordinary medium, and I wouldn’t trade my messy, waxy studio for anything. Who knows what new possibilities artists will uncover with encaustic in the years to come? I, for one, can't wait to see, and I hope you're inspired to join my journey and discover its enduring allure for yourself!


