
Sculpting Abstract Texture: Beyond the Brush with Unconventional Tools
Explore the tactile world of abstract art beyond brushes. I delve into unconventional tools, historical context, and diverse mediums to sculpt texture and emotion, inviting a profound sensory experience.
Beyond the Brush: Sculpting Texture & Emotion in Abstract Art
Confession time: I have a bit of a love-hate relationship with traditional paintbrushes. Don't get me wrong, they're utterly essential for certain applications, the bedrock of painting. But for me, they often feel like just the beginning of the story, not the whole narrative. There's a vast, exhilarating world of tactile expression waiting to be unleashed when you dare to look beyond the brush. It’s where the real magic, the unexpected depth, and the truly unique textures in my abstract art come to life. The truth is, while brushes offer control and precision, they can sometimes feel too predictable, limiting the raw, spontaneous marks and the untamed energy I crave.
This deep dive isn't just about my personal journey; it's an invitation to explore the boundless possibilities of texture in abstract art, guiding you through the often-overlooked tools and techniques that sculpt more than just paint – they sculpt emotion. Throughout art history, texture has been a silent language, from the rough impasto of Van Gogh to the material explorations of Art Informel and Tachisme artists like Jean Fautrier and Wols, who pushed beyond conventional tools to imbue their work with raw, visceral feeling. This article aims to pull back the curtain on my own process, showing you how to find your voice through unexpected mark-making.
Why Texture? It’s More Than Just Visual – It’s a Deep Conversation
This desire to move beyond the brush stems from my deep belief in the power of texture to communicate on a level beyond the purely visual. For me, texture isn't just about what you see; it's about what you feel, what it invites you to touch (even if you can't, really). It's the physical embodiment of emotion, a silent whisper, or a sudden shout on the canvas. A "whisper" might be a subtle, delicate imprint of a leaf, inviting quiet contemplation, while a "shout" could be the bold, impasto ridges created by a palette knife, demanding attention. Beyond the emotional, texture profoundly influences our perception of depth and scale, making a flat canvas feel expansive or intimately enclosed.
Texture is a primal invitation, bypassing the logical brain and speaking directly to our deep-seated connection with the material world. It plays with light and shadow, creating a dynamic surface that shifts throughout the day. Sometimes, a texture can even evoke a memory, a feeling of rough bark or smooth stone, bridging the gap between the canvas and our lived experience, hinting at the passage of time or a forgotten history. Flat surfaces can be beautiful, but textured ones tell a deeper story, inviting you closer, encouraging a different kind of engagement. It’s like adding an extra layer of whispers to the canvas, or a sudden, joyful burst of sound that resonates with your soul.
If you're curious about the broader impact of this element, I've previously explored this in depth in my article on The Role of Texture in Abstract Art: A Sensory Exploration.

credit, licence
My Improvised Tool Kit: A Tour of the Unexpected
My studio is less a temple of pristine art supplies and more a workshop of joyful chaos, often resembling a mad scientist's lab or a toddler's playroom after a particularly energetic session. (My partner, bless her patient soul, often jokes that it looks like a tornado just passed through, leaving behind a glorious mess of possibilities, and honestly, she's not wrong.) It's here that I've amassed an arsenal of tools that would probably make a traditionalist blush, but for me, they are invaluable. This constant hunt for new ways to make a mark – that unique impression or gesture on the canvas – is at the heart of my artistic journey. It’s about finding the unexpected beauty in the mundane. While the tool is key, remember that the consistency of your paint is its indispensable partner; a thick, luscious heavy body acrylic will perform very differently with a scraper than a fluid one, allowing for those dramatic peaks and valleys I adore. The real magic of this kit lies in its ability to transform everyday objects into potent instruments of artistic expression.
A Note on Safety: While embracing experimentation, please always prioritize safety. If you're using anything sharp, brittle, or potentially messy, take appropriate precautions like wearing gloves, using protective eyewear, and ensuring good ventilation for certain mediums. My studio may be chaotic, but my fingers remain (mostly) intact!
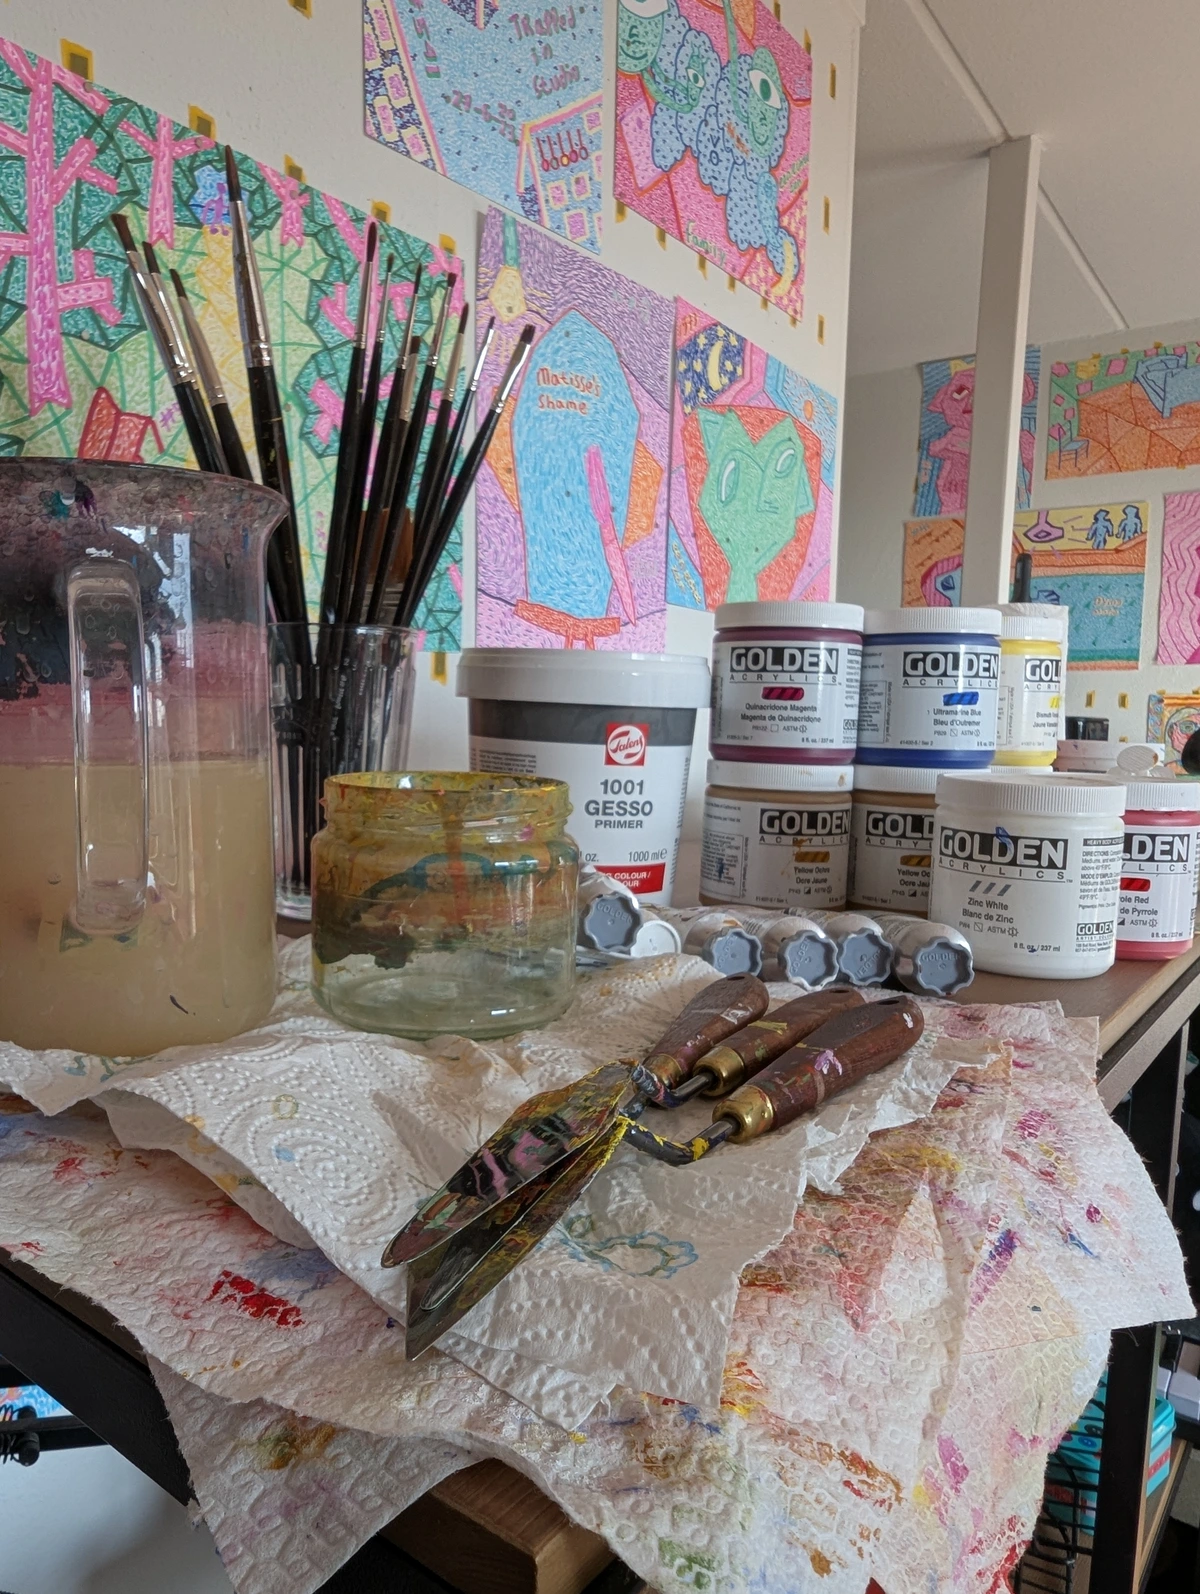
The Humble Scraper & Palette Knife: My Trusty Sidekicks
Ah, my trusty sidekicks! These aren't just for mixing paint, oh no. They're for sculpting mountains and valleys, for dragging streaks of emotion across the canvas, and for those glorious moments of perfectly imperfect scraping. My hand often reaches for one of these before a brush. It's almost an intuitive gesture, a kind of dance, especially when I’m wrestling with an idea that feels too big for a tiny brushstroke. Consider using the flat edge for broad, smooth applications (ideal with heavy body acrylics for clean lines), the corner for sharp, incisive lines, or dragging it through wet paint with varying pressure to create a raw, striated effect. For more on how I use these, see My Palette Knife, My Voice: A Personal Guide to Creating Texture and Emotion in Abstract Art.
I remember one afternoon, feeling particularly blocked, I just started aggressively scraping layers of wet paint with the side of a palette knife, intending to remove it. Instead, it created these incredible, unexpected ridges and valleys that formed the backbone of a new piece. It was a beautiful 'happy accident' that redefined my approach. It's why I always advocate for Embracing Happy Accidents in your art.

Nature's Imprints: Leaves, Twigs & Stones
Sometimes, inspiration quite literally blows in through the window or gets picked up on a walk. Connecting my art to the natural world in this way feels incredibly authentic. What treasures might you find on your next stroll? The varied textures of nature offer an endless palette for unique marks.
- Leaves: With their intricate vein patterns, they can be pressed gently or firmly into wet paint for delicate, organic imprints, suggesting fragility or growth. The type of leaf and its natural texture (smooth, rough) will dramatically alter the result. Best used with medium to thick consistency paints like heavy body acrylics or even fluid acrylics mixed with a gel medium for a crisp impression.
- Twigs: When dragged, they create spontaneous, expressive lines – a wild, untamed mark compared to a brushstroke. The varying thickness and rough bark of a twig create an unpredictable quality, perfect for energetic gestures. Thicker paints are ideal here, allowing the twig to sculpt rather than just scratch.
- Stones: Small stones can be dabbed or scraped for unique, earthy textures, adding a grounded, almost ancient feel to the surface. A flat pebble pressed firmly leaves a different mark than a jagged one dragged lightly. Works well with both thick and medium consistency paints, depending on the desired subtlety.
- Feathers: Softly brushed across the canvas, they can create wispy, ethereal textures, adding a sense of lightness or fleeting movement. The delicate barbs leave a distinctive, feathery trace. Best with slightly more fluid paints or washes to allow the feather to glide, or dabbed with thicker paint for a more stippled effect.
These natural elements are truly about bringing the organic world directly to your canvas, a tangible piece of outside, in.
Household Heroes: Combs, Cardboard & Kitchen Utensils
You know how sometimes you look at a household item and think, "What if...?" My studio is full of those 'what ifs'. My partner often jokes that I spend more time in the kitchen looking for art supplies than actually cooking, and honestly, she might have a point. The world is full of potential mark-making tools if you just shift your perspective and dare to experiment!
- Combs: Not just for hair; with their evenly spaced teeth, they create fantastic parallel lines and grooves, perfect for suggesting movement or a subtle pattern. The rigidity of plastic combs allows for sharp, defined marks, while a rubber comb might offer a softer, more blurred effect. Experiment with different tooth spacing for varying line densities. Works best with heavy body acrylics or texture paste to hold the defined grooves.
- Corrugated Cardboard: Torn and dragged, it can produce bold, raw ridges and a beautiful, uneven texture. The torn edges leave a particularly aggressive mark, perfect for conveying energy or distress. Experiment with the cardboard's wetness; a slightly damp piece will create a softer, more blended mark than a dry, abrasive one. Consider tearing across the corrugations for a more chaotic line, or along them for defined, parallel channels. Different types like single-wall or double-wall cardboard will yield remarkably different effects. It’s the unexpected tear and drag that reveals its true potential, especially with thick, sculptural paints.
- Spatulas: For broad, sweeping gestures or for applying a smooth, thick layer of paint, they're surprisingly effective. A silicone spatula offers a different drag and flexibility than a metal one, allowing for nuanced control over the application's weight and flow. They're great for pushing paint around with intention. Excellent for moving generous amounts of heavy body acrylic or oil paint across large surfaces.
- Scrubbing Brushes: Stiff bristles can be used to stipple, scrub, or create rough, agitated textures, adding a sense of chaos or energy. Think of a wire brush for an almost industrial scrape, or a stiff nylon brush for a more organic, prickly feel. Different bristle types and stiffness will yield dramatically different results. Best with medium to thick consistency paints for pronounced textural impact.
And as I rummage through my cupboards, the line between 'household hero' and 'truly unexpected' often blurs, leading to even more adventurous finds, each one a potential new avenue for The Art of Mark-Making: Expressive Lines and Gestures in Abstract Painting.

The Power of the Really Unexpected
And then there are those moments, usually when I'm feeling a bit stuck, when I just grab anything. It's about seeing beyond the item's intended purpose and imagining its mark-making potential. What kind of trace will it leave? These are the moments of pure, unadulterated artistic discovery. It's also where the spirit of assemblage sometimes creeps in, where the object itself becomes part of the art, not just a tool. Once, I even tried to press my old, crumpled grocery receipt into wet paint, and while it didn't make my masterpiece, the crinkled lines were surprisingly interesting!
- Bubble Wrap: Can create fascinating circular patterns when pressed into wet paint, adding a playful, almost digital, or cellular texture. Vary the pressure for different levels of detail and paint transfer. Works best with a generous amount of medium to thick paint for a clear impression.
- Old Netting or Fabric Scraps: Can add delicate, almost ghostly impressions, creating a subtle layer of history or concealment. Lace, burlap, or even onion bags can offer unique textural grids. Best with fluid to medium consistency paints that can seep through the mesh or create a ghost-like stain.
- Plastic Forks/Knives: Offer surprisingly sharp edges for scratching, scoring, or dragging, creating fine lines, furrows, or even aggressive gouges depending on the pressure and paint consistency. Excellent with thick paints for deep grooves or thin paints for delicate scratches.
- Sponge/Cloth: Dabbing, blotting, or dragging can produce soft, blurred, or mottled effects, adding atmospheric depth and organic variations. The absorbency and texture of the sponge or cloth will dictate the mark. Works across all paint consistencies; a dry sponge with thick paint for stippling, a damp cloth with fluid paint for washes.
It's a treasure hunt for new mark-making possibilities. This constant search for the 'next big texture' is a huge part of my Journey with Mixed Media, pushing the boundaries of what a painting can be by integrating these unconventional tools and the unique marks they leave.
Summary of Textural Tools and Effects
Category | Example Tools | Typical Texture Effect | Potential Application/Feeling |
|---|---|---|---|
| Traditional | Scraper, Palette Knife | Ridges, Valleys, Scrapes, Broad applications, Sharp lines | Energy, Structure, Boldness, Definition |
| Nature's Imprints | Leaves, Twigs, Stones, Feathers | Delicate organic patterns, Spontaneous lines, Earthy dabs, Wisps | Fragility, Growth, Primal, Ethereal |
| Household Heroes | Combs, Cardboard, Spatulas, Brushes | Parallel lines, Raw ridges, Sweeping gestures, Agitated stipples | Movement, Chaos, Industrial, Smoothness |
| Truly Unexpected | Bubble Wrap, Netting, Plastic items | Circular patterns, Ghostly impressions, Fine scratches, Soft mottles | Playfulness, History, Aggression, Atmosphere |
Beyond Acrylics: Exploring Paint Types and Consistency for Texture
While heavy body acrylics are undoubtedly my go-to for their thick consistency and beautiful texture-holding capabilities – they dry quickly, allowing me to build layers without endless waiting – it's worth exploring how other paint types and mediums can enhance your textural journey. The right consistency is paramount; too thin, and your exquisite marks will simply flatten out. It's a balance I'm always experimenting with, and it's a key aspect of Exploring Texture in Abstract Art: Techniques and Materials.
- Heavy Body Acrylics: As mentioned, these are ideal. Their inherent viscosity allows them to hold peaks, troughs, and intricate patterns perfectly. You can build significant impasto effects that dry relatively quickly. Look for brands with a high pigment load for even more vibrant textural impact.
- Fluid Acrylics: While less ideal for strong impasto on their own, fluid acrylics can be mixed with gel mediums (which add body and transparency) or modeling paste (which adds opaque bulk and dries hard) to create custom textural compounds. This allows for fine control over density and flexibility, effectively transforming them into a heavy body equivalent, but with a different handling feel and drying time.
- Oil Paints: Offer a significantly longer open time, which can be fantastic for working and reworking textures, blending seamlessly, and creating subtle gradations. However, their slow drying time demands patience – a quality I sometimes lack! Using impasto mediums specifically designed for oils, or even alkyd mediums, can significantly boost their textural capabilities and speed up drying, giving you more of that immediate gratification. For a deeper dive into this technique, check out What is Impasto Painting?.
- Texture Pastes & Gels: Don't limit yourself to paint! Incorporating specialized texture pastes, gels, or even sand, grit, or glass bead mediums can introduce an entirely new dimension of tactile engagement and visual interest before paint even touches the surface. I’ve even dabbled with cold wax medium for its matte, sculptural qualities, and the luminous depth of encaustic (wax and pigment) which absolutely demands tools beyond the brush for its unique textures and layered effects. When choosing these, consider whether you want a matte or gloss finish, as this significantly impacts the final visual effect, often interacting uniquely with light.

credit, licence
Integrating These Wonders into the Workflow
It's not just about finding these tools; it's about how you weave them into your process. How do these disparate elements come together in a cohesive artistic process? Each tool adds its unique voice to the chorus, creating a complex narrative that builds up in layers. My mixed media approach often involves building up surfaces with these unconventional tools before applying significant color, allowing the texture itself to be a foundational element. This contrasts with a traditional brush-first approach, where texture might be an afterthought. And, of course, the scale of the artwork plays a huge role; a large canvas might invite broad sweeps with a household spatula or even a plaster trowel, while a smaller, more intimate piece might call for the delicate etchings of a twig or a plastic fork. Don't forget that the drying time of your chosen mediums is a critical factor here, dictating how quickly you can layer, incise, or manipulate textures without muddying or disturbing previous marks.
I often start with broad, brush-applied layers for foundational color, then introduce textures with my unconventional tools, letting each layer dry (or almost dry) before the next. This creates a fascinating dialogue between smoothness and grit, flatness and dimension. It's a dance between the intentional and the accidental, a tactile conversation unfolding on the canvas. For a complete overview, see My Step-by-Step Abstract Painting Process.
This continuous evolution and discovery of new techniques are central to my artistic timeline. The resulting works, filled with these rich textures, are often available in my art for sale section, offering a tangible piece of this experimental journey. For more insights into my essential tools, explore A Guide to My Favorite Abstract Painting Tools.
Embracing Experimentation: The Joy of Discovery
This journey beyond the brush is very much a part of my overall artistic philosophy. It's a testament to the idea that rules in art are meant to be bent, if not outright broken. Don't be afraid to make a mess, to try something outlandish. That's where the magic often hides, in the space between what's expected and what's suddenly, gloriously new. Have you ever looked at a common object and wondered, "What kind of mark could that make?" That's the mindset! I genuinely believe that Experimentation is the Heart of Creativity, allowing us to uncover unique expressions and push our personal artistic boundaries.
Common Textural Challenges & Solutions
Experimentation is thrilling, but sometimes things don't go as planned. It's all part of the process, and recognizing common pitfalls can save you a lot of frustration. Here are a few ways I navigate the inevitable bumps in the road:
- "Too Much Texture": Sometimes you get carried away, and the texture becomes overwhelming or detracts from the composition.
- Solution: Allow it to dry, then gently sand down prominent areas, or apply a thin, translucent wash of paint over it to soften the effect while retaining some underlying texture. Don't be afraid to paint over a texture if it's not working; it can become a subtle ghost of what was, adding depth.
- "Muddying Colors with Texture": When layering wet paint with tools, colors can blend undesirably.
- Solution: Work in layers, allowing each layer to dry (or partially dry) before applying the next. Alternatively, use a lighter touch or a different tool to scrape into a wet layer rather than dragging a new color through it. Consider working with a limited palette for a cohesive result.
- "Texture Not Holding / Premature Drying": Your intricate marks flatten out as the paint dries, or the paint dries too quickly for effective texturing.
- Solution: This usually means your paint is too fluid. Switch to heavy body acrylics or mix in an impasto medium or modeling paste to give your paint more structural integrity. If paint is drying too fast, try adding a retarder to your acrylics or working in smaller sections.
- "Paint Cracking with Thick Applications": Applying paint or texture paste too thickly, especially without flexible mediums, can lead to cracking as it dries.
- Solution: Incorporate flexible mediums (like a flexible modeling paste or heavy gel medium) with your paints, or build up very thick textures in thinner, sequential layers, allowing each to dry thoroughly. This reduces stress on the surface as it cures.
- "Unintentional Marks / Tool Residue": Sometimes the tool leaves a mark you didn't anticipate or want, or small bits of natural tools (like leaves) adhere to the canvas.
- Solution: Embrace it! Some of my favorite textures came from "mistakes." If it's truly distracting, treat it as a new layer to paint over or incorporate into the evolving composition. For residue, gently remove it once dry, or integrate it as a mixed media element if it works with the piece.
Frequently Asked Questions (FAQ)
Q: What kind of paint works best with these textural tools?
A: Heavy body acrylics are my absolute go-to. Their thick consistency holds texture beautifully, whether I'm scraping, dabbing, or pressing. Oil paints can also work wonderfully, but their longer drying time requires a bit more patience – something I often struggle with! For even more pronounced texture, I definitely recommend incorporating gel mediums or modeling paste into your fluid acrylics, or using them directly.
Q: Do I need to prepare my canvas differently for heavy texture?
A: Absolutely, and this is crucial for durability! For very heavy textures or when incorporating sculptural elements, I always recommend starting with a robust surface. A good quality, heavy-duty canvas, wood panel, or even cradled board is essential. Applying a layer or two of gesso (a primer) can also create a more stable, slightly absorbent base for your texture mediums to adhere to. Sometimes, I even build up a preliminary texture with modeling paste before any paint goes on, creating a truly layered foundation for the piece.
Q: How do you ensure textured pieces are durable and archival?
A: This is a great question that often gets overlooked! For long-lasting textured work, I generally stick to artist-grade acrylics and professional texture mediums, which are designed for durability and longevity. If I use natural elements like leaves or twigs, I make sure they are thoroughly dried and sealed with a clear acrylic medium or varnish to prevent decay or shedding over time. For any mixed media, a final layer of quality varnish or sealant is non-negotiable; it helps protect the surface from dust, UV light, and general wear, ensuring the texture remains intact and beautiful for years to come. Think of it as the artwork's protective shield!
Q: How do you clean these unconventional tools?
A: For most household items like plastic combs or cardboard, a quick rinse with warm water and soap is usually enough if the paint is still wet. Some, like very textured cardboard or delicate leaves, are often happily single-use – and that's perfectly fine! Palette knives clean easily with a cloth and solvent (if using oils) or just soap and water (for acrylics). For porous items like sponges or certain natural tools, a thorough rinse immediately after use is key, but sometimes, their unique properties mean they have a limited lifespan as a tool. The more unique the tool, the more creative you might need to be with cleaning, or simply accept its temporary nature!
Q: Where do you find inspiration for new texture tools?
A: Everywhere! I look at packaging, natural elements on walks (the rough bark of a tree, the pattern of a dried leaf), old household items slated for the bin (a worn-out scrubbing brush, an old toothbrush). Anything with an interesting surface or edge could be a potential tool. Sometimes, I even wander through hardware stores, looking at tools not for their intended purpose, but for the unique marks they might make. Beyond the physical, I find inspiration in the unexpected textures of old books, the worn patinas of antique furniture, the subtle decay of urban walls, or even the pixelated grit of digital art that I then try to translate into a tangible, tactile experience on canvas. It's a constant, playful quest!
The Enduring Magic of Texture: Your Unique Voice
For me, the journey beyond the brush is about more than just technique; it's about pushing the boundaries of expression and finding new ways to tell my story on canvas. It's about finding your unique voice, one scrape, dab, or drag at a time. So, I encourage you: look around your own home, go for a walk, or simply visit a hardware store with fresh eyes. What unconventional tool will you discover that unlocks a new dimension in your art? Share your favorite unexpected tool discoveries in the comments below or tag me on social media – I'd love to see what you're creating! The next time you visit my museum in 's-Hertogenbosch, I hope you'll look closely at the surfaces of my abstract pieces, allowing the textures to draw you in and whisper their own stories, perhaps recognizing the unexpected tools that helped create them.


