
DIY Floating Frame for Canvas Art: A Comprehensive Guide
Unlock the secret to displaying your canvas art like a gallery pro! This guide offers a personal, step-by-step walkthrough on building your own floating frame, elevating your artwork with a professional touch. Discover materials, tools, and essential tips for a stunning finish.
Your Masterclass: Building a Floating Frame for Canvas Art - The Ultimate DIY Guide
I’ve always believed that the magic of art isn’t confined to the canvas itself. It extends to how it’s presented, how it lives in a space, and how it captivates the eye. You know, whether it’s a canvas you’ve poured your soul into, a cherished piece you've collected from my gallery at [/buy], or perhaps a piece you're creating right now – the presentation is paramount. Here at ZenMuseum, my mission is deeply personal: to not only create art but also to share the joy of its creation and, crucially, its presentation. This masterclass is a testament to that belief, designed to equip you with the knowledge and skills to craft the ultimate display for your masterpieces. I truly believe every piece of art deserves its moment to shine, and trust me, there's nothing quite like a floating frame to do just that. It creates this subtle, almost magical illusion that your canvas is suspended within its embrace, with a delicate space all around it, allowing your art to breathe, to command attention, and to truly stand out. It’s a clever trick of the eye, for sure, but one that instantly adds a touch of sophistication and gallery-worthy professionalism to any piece, transforming it into its very own bespoke stage. This isn't just about protection; it's about elevation, giving your work the reverence it deserves. For me, it transforms a simple canvas into a statement piece, a concept I explore deeply in my own abstract creations and teach in my workshops. This comprehensive guide leaves no stone unturned, ensuring you become a master of floating frame creation.
Now, you might be thinking, "Building a frame? That sounds a bit daunting, doesn't it?" And honestly, for a while, I thought so too. My own studio, often a glorious chaos of colors and ideas (you should see it after an intense painting session!), isn't always the most organized workshop. But I promise you, once you break it down, crafting a floating frame is incredibly rewarding. It’s like giving your artwork a quiet declaration that this piece is important, that it truly demands attention. It's a journey from raw lumber to a polished display, and every step is a chance to connect more deeply with your art. It’s a bit like discovering the hidden strengths in yourself, or uncovering the nuanced meanings in an abstract piece from my own collection at [/den-bosch-museum].
Why a Floating Frame? A Deeper Dive into its Artistic Impact
Before we dive into the nuts and bolts, let's really think about why a floating frame is such a game-changer for art. It's not just a trend; it's a profound design choice that influences how your art is perceived and interacts with its environment. I often find myself reflecting on this when I’m conceptualizing new pieces for my gallery or envisioning how a client will display their new acquisition. The frame, you see, is the final brushstroke, the last chord in the symphony of creation.
It's a fantastic, budget-friendly way to elevate even simple canvas prints or smaller pieces, transforming them into undeniable focal points in your space. If you've been wondering how to give your art that high-end, gallery-quality look without breaking the bank, then grab your measuring tape and let's embark on this rewarding journey together. You're about to discover how accessible and satisfying this DIY project can be. You might even surprise yourself with what you can create! This comprehensive guide will walk you through every step, ensuring your masterpiece gets the display it deserves. From selecting the perfect wood to the final polish, we'll cover it all, so your art can command the attention it deserves – just as any good piece of art should, whether it's a bold abstract expression or a delicate, minimalist study. If you're eager to learn more about choosing art that truly resonates, you might also enjoy my thoughts on [/finder/page/choosing-art-for-your-living-room].
The Magic of Floating Frames: Why Bother? Elevating Your Art's Presence
So, why go through the effort of building one yourself when you can just buy a ready-made frame? Well, beyond the sheer satisfaction of a DIY project (which, trust me, is immense when you see the finished result!), a floating frame offers a distinct aesthetic advantage that truly sets your artwork apart. Unlike traditional frames that often cover the very edges of your canvas, a floating frame leaves a small, deliberate gap – the "float" – between the canvas and the frame itself. This allows the entire artwork, including those beautiful wrapped edges, to be fully visible and appreciated. It’s particularly stunning for abstract art where every brushstroke and edge tells a part of the story, or for pieces with intentional gallery-wrapped sides that you don't want to hide. Imagine a bold, expressive piece – the floating frame creates an aura around it, enhancing its presence without ever competing. For art with significant texture, like those created using an [/finder/page/exploring-texture:-my-favorite-techniques-for-adding-depth-to-abstract-paintings], this non-contact display is absolutely crucial, protecting delicate impasto layers. This non-contact benefit also extends to delicate photographs mounted on rigid panels or mixed-media pieces with protrusions; it ensures the artwork remains pristine. I’ve even seen it beautifully complement digital art printed on metal or acrylic, giving these modern mediums a classic, gallery-quality presentation. It's truly a versatile choice for almost any two-dimensional artwork that benefits from a distinct, unencumbered presence.
For me, and I think for many artists and art lovers, it’s also about control and artistic integrity. I love being able to choose the exact wood, the perfect finish, the precise depth that complements my art. It's an extension of the creative process, really, ensuring the frame becomes a harmonious part of the artwork's presentation, rather than just an afterthought. I remember once, I had a particularly vibrant abstract piece, "Boom X4" (Boom X4, abstract, colorful, dot art, vibrant, geometric, circular patterns, red, orange, yellow, blue, purple, pink, green, playful, energetic), and no off-the-shelf frame quite captured its energy. Building a custom floating frame allowed me to choose a dark, almost charcoal-stained wood that truly made the colors pop – a level of bespoke detail you rarely find, something I cherish when considering how my work is displayed, perhaps at /den-bosch-museum. This level of bespoke control is truly liberating.
And let’s not forget the significant cost savings! Custom framing can be quite expensive, especially for larger or non-standard canvas sizes, and building it yourself is a highly budget-friendly alternative that still delivers that coveted high-end, gallery-quality look. Think about it: for the price of one professionally custom-framed piece, you could likely build two or three yourself, and learn a valuable skill in the process. Beyond aesthetics and cost, a floating frame also offers better protection for your canvas, especially if it has delicate edges or impasto textures that you don't want a traditional frame to press against or damage. It keeps the artwork secure while providing a safe, non-contact perimeter, a principle I apply in my own studio when considering the longevity of my pieces for /buy. This kind of thoughtful presentation extends the life of your art, which, for a collector, is invaluable. For me, and I believe for many artists, the ability to custom-build a frame is also an extension of the artistic process itself. It's about maintaining artistic integrity from conception to display, ensuring that the presentation perfectly aligns with the artwork's message and aesthetic. It's a final, intentional stroke in the journey of creating.
Beyond the Canvas: Other Artworks That Benefit
While we often associate floating frames with stretched canvases, their versatility extends far beyond. I've found them to be an incredible solution for a range of two-dimensional artworks that benefit from a distinctive, unencumbered presentation. For example:
- Cradled Wood Panels: These offer a rigid support for paintings (oil, acrylic), mixed media, or even photographs mounted directly. A floating frame perfectly complements their solid construction and often painted sides.
- Metal or Acrylic Prints: Modern mediums like these, with their sleek surfaces and often vibrant colors, gain an immediate gallery-worthy presence when showcased in a floating frame. The subtle shadow line adds a sophisticated contrast.
- Delicate Mixed Media or Textiles: For artworks with three-dimensional elements, protrusions, or fragile edges, the non-contact nature of a floating frame is crucial. It protects without pressing against or obscuring the artwork's unique texture.
- Textured Artworks (Impasto, Collage): Pieces with significant surface texture, like my impasto paintings [/finder/page/what-is-impasto-painting] or complex collages, are vulnerable to damage from traditional frames. A floating frame allows the texture to breathe and be appreciated without interference.
Ultimately, any artwork where the edges are an integral part of the piece, or where a sense of modern elegance is desired, is a perfect candidate for a floating frame. It truly elevates the artwork, making it a focal point in any space.
Floating Frame vs. Traditional Frame: A Quick Comparison
Sometimes, it's helpful to see the differences laid out. While both frame types have their place, understanding their distinct characteristics can help you make the best choice for your particular artwork and aesthetic goals. Here's how a floating frame stacks up against its more conventional cousin:
Feature | Floating Frame | Traditional Frame |
|---|---|---|
| Aesthetic | Creates illusion of art floating, full canvas visible. | Covers edges of canvas, can feel more enclosed. |
| Art Visibility | All edges and sides of canvas are showcased. | Edges are often partially or fully obscured. |
| Depth/Shadow | Emphasizes depth, creates a subtle shadow line. | Can sometimes flatten the art against the wall. |
| Protection | Protects front and sides without touching art surface. | Can press against edges, potentially damaging. |
| Versatility | Ideal for canvases, especially gallery-wrapped, rigid panels, photography. | Suited for various art, often matted for paper, stretched canvas, prints under glass. |
| Medium Best Suited For | Stretched canvases, cradled wood panels, rigid prints, textured art. | Prints, drawings, watercolors (with mat and glass), thin stretched canvases. |
| Cost (DIY) | Highly cost-effective for a custom look. | Can be very expensive for custom sizes/finishes. |
| Focus | Directs attention solely to the artwork itself. | Frame design can sometimes compete with the art. |
Both have their place, of course, but for showcasing the full glory of a stretched canvas, especially those with painted or gallery-wrapped edges, a floating frame is often the superior choice. It truly allows the art to breathe and stand independently, rather than being confined. It's like giving your art the ultimate stage, allowing it to captivate anyone who beholds it. When I consider how an artwork will be viewed in a collector's home, I often think about how the frame can either enhance or detract. A floating frame, in my experience, almost always enhances, bringing a gallery-like gravitas to even the most intimate piece. This nuanced presentation is something I strive for, echoing the careful thought put into how a piece is presented at /den-bosch-museum. It's a deliberate design choice, allowing the viewer's eye to focus on the art itself, rather than being distracted by an ornate or overly decorative frame. This subtlety is incredibly powerful, much like how a well-composed abstract piece [/finder/page/the-definitive-guide-to-understanding-composition-in-abstract-art] commands attention without being overtly busy.

Both have their place, of course, but for showcasing the full glory of a stretched canvas, especially those with painted or gallery-wrapped edges, a floating frame is often the superior choice. It truly allows the art to breathe and stand independently, rather than being confined. It's like giving your art the ultimate stage, allowing it to captivate anyone who beholds it. When I consider how an artwork will be viewed in a collector's home, I often think about how the frame can either enhance or detract. A floating frame, in my experience, almost always enhances, bringing a gallery-like gravitas to even the most intimate piece. This nuanced presentation is something I strive for, echoing the careful thought put into how a piece is presented at /den-bosch-museum.

https://www.flickr.com/photos/fabola/41351098495/, https://creativecommons.org/licenses/by-sa/2.0/
Understanding the Anatomy of Your Floating Frame: The Core Components
Before we dive into the nitty-gritty of tools and materials, let's quickly get familiar with the basic components of a floating frame. This will help you visualize the process and understand why each step is important – it's like learning the vocabulary before you can write a compelling story. Each element plays a crucial, interconnected role in achieving that stunning "floating" effect:

- Outer Frame: This is the most visible part, the perimeter that defines and surrounds your canvas. It's typically constructed from four pieces of wood, precisely cut and joined at mitered corners (perfect 45-degree angles) to form a seamless, elegant rectangle. Think of it as the frame's elegant face, the first impression your art makes. The choice of wood, its profile (the shape of the cross-section – flat, rounded, or beveled), and finish here are paramount to the overall aesthetic, defining the character of the entire presentation. While miters are classic and provide a clean look, some designs might use splined miters or dovetail splines for added decorative and structural strength, especially for heavier canvases. However, for this guide, we'll stick to the foundational miter joint which is both elegant and accessible for DIYers. The width of this outer frame also plays a critical role in the visual balance, much like how a border influences a painting's composition. For instance, a wider profile can give a sense of grandeur to a large piece, while a thinner profile might be chosen for a more delicate or minimalist artwork, creating a visual harmony that I often consider when placing my own works in different settings, such as at [/finder/page/how-to-pair-abstract-art-with-wood-furniture]. Consider also the reveal – the amount of the outer frame that extends beyond the canvas edge. This can be subtle or dramatic, influencing the frame's visual weight. For a truly professional look, ensure the inside edge of your outer frame is perfectly straight and smooth, as this is what defines the float gap.
- Canvas Ledge (or Inner Supports): These are the strips of wood, or sometimes a carefully routed rabbet (a groove along the inside edge), that the canvas actually rests upon. They are securely attached to the inside of the outer frame, forming a recessed shelf. This is the hidden workhorse, providing the structural support for your artwork. Without these, your art would simply fall through! The depth of this ledge determines how far your canvas will be recessed within the frame, controlling the dramatic shadow line. For those with a router, cutting a continuous rabbet directly into the frame pieces creates an even cleaner, more integrated look, eliminating the need for separate ledger strips altogether. You can use any dimensionally stable wood for these ledges – even scrap pieces – as long as they provide solid support and are not visible from the front of the frame. Consistency in their placement is crucial for an even float. For those interested in advanced techniques, pocket hole joinery can also be a clean and strong method for attaching these ledges, offering a robust, hidden connection that further streamlines the frame's internal structure. For optimal longevity, consider using hardwoods for these ledges, especially for heavier canvases, to prevent sagging over time. The precise height of these ledges from the back of the frame is critical for achieving the desired canvas recess, as we'll discuss in the planning section.
- Float Gap: This is the star of the show, the crucial, intentional space between the edges of your canvas and the inside of the outer frame. This precise gap is what creates the captivating "floating" illusion, allowing light and shadow to play around your artwork and enhancing its three-dimensional quality. It’s a subtle dance between light and dark, giving the artwork a sculptural presence. I often experiment with different float gaps to see how it changes the perception of the artwork, sometimes a subtle 1/4 inch for an intimate feel, other times a more dramatic 1/2 inch for a bolder statement, depending on the piece's energy. Beyond aesthetics, this gap also allows for airflow around the canvas, which can be important for the longevity of the artwork, preventing moisture buildup. It also means no part of the artwork's painted surface is obscured or potentially damaged by the frame itself, which is paramount for preservation. The consistency of this gap is key to the professional appearance of your frame, and achieving it requires careful measurement and assembly.
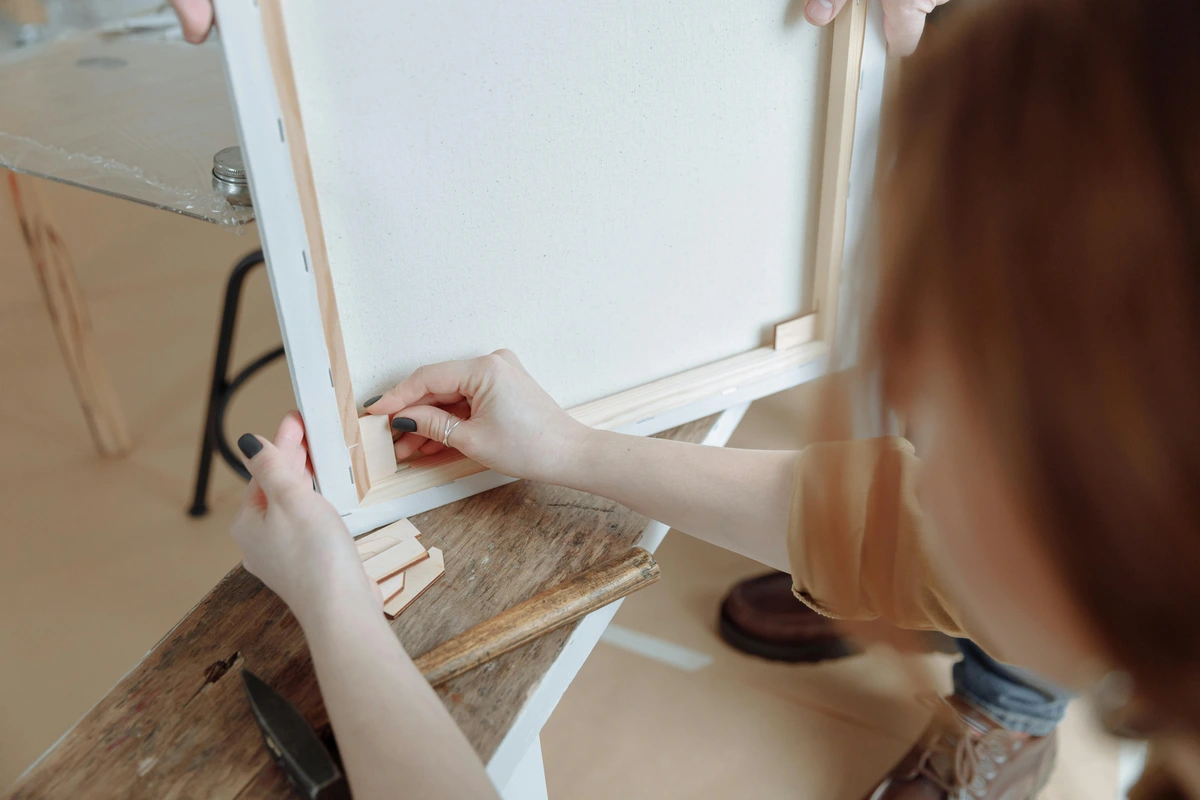
- Mounting Blocks/Hardware: These are the unsung heroes – small, discreet blocks of wood, clips, or specialized brackets used to firmly secure your canvas to the inner ledge of the frame. They ensure your art stays put, safely suspended within its new home, preventing any unwanted movement or damage. We'll explore various options, from simple wood blocks to specialized offset clips, ensuring your art is both secure and easily removable if needed. Choosing the right mounting method ensures longevity and security for your masterpiece, preventing any accidental shifting or warping over time. These elements are designed to be inconspicuous, allowing the artwork to take center stage, and should always be installed with care to avoid damage to the canvas stretcher bars. For added security, especially on larger pieces, consider using security hardware that requires a special tool to remove, which is something I advise for pieces displayed in public spaces.
Floating Frame Anatomy at a Glance
To make it even clearer, here's a quick summary of the components and their roles:
Component | Description | Key Function | Design Impact |
|---|---|---|---|
| Outer Frame | The visible perimeter, typically mitered wood. | Defines shape, provides primary structure. | Aesthetic, visual weight, overall style. |
| Canvas Ledge | Inner strips of wood/rabbet. | Supports the canvas. | Determines canvas recess, shadow line. |
| Float Gap | Intentional space between canvas and outer frame. | Creates floating illusion, allows airflow. | Dimensionality, modern look, art preservation. |
| Mounting Hardware | Blocks, clips, brackets. | Secures canvas to ledges. | Ensures stability, invisible support. |
Understanding these parts will make the whole building process much clearer for you. It's like understanding the basic building blocks of a language before you write a poem; each component plays a specific, vital role in the final, cohesive presentation of your art. This foundational knowledge really sets you up for success when you start making cuts and assembling your frame. You're not just building a box; you're crafting a display solution that enhances the perception of your artwork, a concept I often consider when creating art for [/finder/page/art-for-minimalist-interiors-less-is-more] or [/finder/page/decorating-with-art-in-modern-farmhouse-interiors] spaces. When you understand the 'why' behind each component, the 'how' becomes so much more intuitive and enjoyable. It transforms a simple craft into an act of reverence for your art, something I find deeply satisfying in my own creative journey. It’s the difference between merely putting a painting on a wall and truly presenting it.

Gathering Your Arsenal: Tools & Materials for Your DIY Floating Frame
Alright, let's get down to brass tacks – or should I say, wood and glue! You’re going to need a few essential things to bring your floating frame to life. Please don't be intimidated by the list; many of these are standard tools that many DIY enthusiasts already have tucked away in their workshop. And if not, I consider them excellent investments for countless future projects. Remember, having the right tools makes all the difference, transforming potential frustration into satisfying progress. This isn't just about collecting gadgets; it's about equipping yourself for creative freedom and the joy of making something beautiful with your own hands. I know, my studio is often a beautiful mess, a testament to intense painting sessions, but when it comes to framing, precision is key, and that starts with the right gear.
Now, before we dig in, a quick word from me to you: I know the list can look a bit long, but think of it as assembling your own creative toolkit. You don't need the most expensive version of everything, especially for your first frame. The key is having the right tools for the job, and understanding how to use them safely and effectively. That's what we're going to cover. Ready? And on the topic of readiness, never underestimate the power of careful tool selection and proper safety. I've been in the studio enough to know that a shortcut on safety is rarely worth it, and having the right equipment isn't just about efficiency, it's about peace of mind.
Essential Tools: Building Your Core Workshop

Essential Tools:
- Miter Saw or Hand Saw with Miter Box: This is your absolute best friend for precise 45-degree angle cuts. Whether you opt for a powered miter saw (compound or sliding compound saws offer more versatility, especially for wider boards) or a trusty hand saw with a good miter box, accuracy here is absolutely crucial. Those tight, professional-looking corners? They start right here. My personal preference is a sliding compound miter saw – it makes quick, clean work of longer pieces, but a well-tuned hand saw and miter box are perfectly capable for a first-timer. For powered saws, consider a fine-tooth crosscut blade (typically 60-80 teeth) for cleaner cuts and less tear-out on your precious wood. A general-purpose blade (40 teeth) can work, but a dedicated crosscut blade will give you superior results for visible joinery. Regardless of your choice, ensure your blade is sharp and your angles are precisely calibrated. A test cut on a scrap piece of wood is always a good idea to confirm your 45-degree setting is truly accurate before you start on your frame pieces. Remember, the tighter your miters, the stronger and more beautiful your frame will be. Don't skip this check; a tiny deviation here can throw off your entire frame's squareness, leading to frustrating gaps. For maximum precision, particularly with hand saws, use a backsaw and a well-made miter box that holds the wood firmly.
- Drill Press (Optional but Recommended): While a hand drill is perfectly capable, a drill press offers unparalleled precision for drilling pilot holes, especially for mounting blocks or specialized hardware. It ensures perfectly perpendicular holes, which is key for a clean, professional look and prevents screws from angling incorrectly into your wood. It’s an investment, but a game-changer for repeatable accuracy. If a drill press isn't in your budget, a simple drill guide attachment for your hand drill can significantly improve accuracy for perpendicular holes.
- Block Plane or Chisel (Optional): For those tiny, almost imperceptible adjustments that make a miter joint truly seamless, a sharp block plane or a set of chisels can be invaluable. A few whisper-thin shavings can transform a "pretty good" joint into a "perfect" one. This is a tool for the finer details, but one that can elevate your craftsmanship considerably. I've found that a well-sharpened chisel, even a small one, is invaluable for cleaning out glue squeeze-out in tight corners or for paring down a slightly proud edge.
- Measuring Tape: Sounds obvious, right? But a good quality, reliable, and accurate tape measure is indispensable. Trust me, I've seen projects go awry because of a cheap, flimsy tape that stretches or has inaccurate markings. Look for one with clear markings, both imperial and metric if you prefer, and a sturdy hook that doesn't wiggle. For ultimate precision, a digital measuring tape or a high-quality ruler can be a great asset. When measuring, apply consistent tension and read the measurement directly above the mark to avoid parallax error (where your eye position changes the reading) – this is a subtle but critical detail! And remember the golden rule: Measure twice, cut once – you'll thank yourself later, and so will your wood supply! Investing in a slightly better tape measure is always a wise decision in my book; it's a tool you'll use constantly in any DIY endeavor. For precise small measurements, a steel rule or a caliper can offer superior accuracy compared to a flexible tape measure.
- Pencil or Marking Knife: A simple graphite pencil, or even a carpenter's pencil, is your friend for marking cuts, outlining glue-up positions, and sketching out where your canvas will sit. A sharp, fine line is key, so keep that pencil sharp! For even greater precision, especially on hardwoods or for critical joints, consider a marking knife. It scores a hairline cut into the wood, which is much more accurate than a pencil line, and also helps prevent tear-out (where the wood fibers splinter) when you make your saw cut. I often find the marking knife gives me a cleaner starting point, especially when working on a piece destined for
/buy. When marking, always mark on the waste side of your cut line to preserve your exact dimension. - Combination Square or Speed Square: Essential for ensuring your corners are perfectly square (a true 90-degree angle!), which is vital for assembling a frame that doesn't wobble or look wonky. This tool also helps you mark straight lines and can even be used to set saw blade depths. Always check your square for accuracy before you begin – a quick test against a known straight edge, or another square you trust, can save a lot of heartache down the line. A good square is fundamental to good joinery and a professional-looking finished product. For very large frames, a large framing square is indispensable for checking overall squareness.
- Wood Glue: Ah, the unsung hero! A high-quality wood glue is, surprisingly, often stronger than the wood itself once cured. I usually go for Titebond III for its strength, longer open time, and moisture resistance, especially if the frame might ever be in a slightly humid environment, making it a versatile choice. Other excellent options include PVA wood glues (like Titebond I or II) for general indoor use, or even epoxy-based glues for ultimate strength and gap-filling properties, though they are more complex to work with. For outdoor or high-moisture applications, a polyurethane-based glue (like Gorilla Glue) can also be effective, though it expands as it cures, requiring careful clamping. Apply a thin, even coat to both mating surfaces for the strongest bond; don't go overboard, as too much glue can weaken the joint, cause excessive squeeze-out (which then needs to be cleaned up meticulously with a damp rag before it dries to prevent finish issues), and interfere with finishes. You want just enough to create a continuous film once clamped, usually a small bead down the center of your joint. Give it ample time to cure according to the manufacturer's instructions, as patience here is truly a virtue. Rushing the drying time is a common mistake that can lead to joint failure later on, and trust me, you don't want your beautiful frame coming apart! Always store your glue in a cool, dry place and check its expiration date for optimal performance.
- Clamps: I cannot stress enough how important clamps are – they are your third, fourth, fifth, and sixth hands! You'll need them to hold your frame firmly together while the glue dries. Corner clamps are fantastic for keeping your mitered joints perfectly aligned, but a good set of bar clamps, pipe clamps, or even a heavy-duty strap clamp will also do the trick, pulling everything in tight. The goal is even, consistent pressure across the joint until the glue sets completely. For larger frames, a band clamp that wraps around the entire perimeter can apply incredibly even pressure, which is something I often rely on for those truly expansive pieces. You can never have too many clamps in a workshop, and they are truly invaluable for any gluing operation. For frames, I often use a combination: corner clamps to align the miters, and bar clamps across the frame to apply even pressure from all sides, ensuring everything dries perfectly square and strong. To prevent marring your beautiful wood with clamp jaws, always use cauls – small scraps of wood placed between the clamp and your workpiece. This is one area where a small investment makes a huge difference in the final quality and integrity of your frame. And for smaller, more delicate joints, specialized spring clamps can also provide gentle, quick-acting pressure. Remember, evenly distributed pressure is more important than extreme pressure.
- Brad Nailer (with compressor) or Hammer and Finish Nails: While wood glue provides the ultimate strength, brad nails offer immediate reinforcement, holding pieces in place while that glue sets up. A pneumatic brad nailer (with an air compressor) is faster and leaves smaller holes that are easier to fill, but a good old hammer and finish nails work perfectly well too (just remember to sink those nail heads below the surface with a nail set!). If you're using a hammer, I find a lighter, more controlled tap is better than one big whack, and make sure you're striking the nail head squarely. For miter joints, angle your nails slightly to create a stronger mechanical lock, effectively pinning the joint in two directions and greatly reducing the chance of separation. When choosing nails or brads, consider the thickness of your wood; you want a fastener that will penetrate at least two-thirds into the second piece of wood for maximum holding power, but absolutely not so long they exit the other side! Think about it like a temporary scaffolding until the glue's ultimate strength takes over, preventing any slippage while curing. For a truly hidden finish, consider headless pins which are even smaller than brads and leave almost invisible holes.
- Drill with Countersink Bit: If you're opting for screws – either to attach your canvas, or perhaps for securing your inner ledger strips – a drill with a countersink bit is essential. This magical bit prevents wood splitting by pre-drilling a pilot hole that matches the screw's shank diameter and simultaneously creates a tapered recess (a countersink) so your screw heads sit flush or slightly below the surface. This gives you a truly clean, professional finish, which is something I always strive for in my work, whether it's framing or even when I'm experimenting with materials for [/finder/page/exploring-texture-in-abstract-art:-techniques-and-materials]. Always choose a pilot bit slightly smaller than the screw's root diameter to ensure good thread engagement without splitting the wood. It’s a small step that makes a huge difference in the final look and integrity of your frame. For hardwoods, a tapered countersink bit is often preferred as it matches the angle of most wood screws more precisely.
- Sandpaper (various grits): You'll need a range, from rough (80-100 grit) for initial heavy shaping and removing milling marks, to medium (120-180 grit) for smoothing, and fine (220 grit or even higher, 320-400, for a truly silky feel) for preparing for your finish. Sanding is non-negotiable for a professional look and feel. Trust me, the extra time spent sanding will make all the difference to how your frame takes stain or paint. While hand sanding with a block is effective, especially for intricate details and edges, a random orbital sander can greatly speed up the process for larger, flat areas, just be careful not to oversand edges or create divots. Always sand with the grain of the wood to avoid unsightly scratches, and progress through the grits, cleaning off sanding dust (with a vacuum or compressed air) between each step to reveal any remaining imperfections and prevent coarser grit particles from scratching your finer-sanded surface. A good sanding block can make this process much more consistent and comfortable, especially for ensuring flat surfaces and sharp edges. Think of it as polishing a gem – the more care you put in, the more it shines, and the more evenly your chosen finish will apply. I often finish with a very fine grit (400-600) for a truly luxurious feel, especially on hardwoods destined for a natural finish. Consider also using sanding sponges for contoured edges or intricate profiles, as they conform to shapes more easily than flat sandpaper.
- Safety Gear (Glasses, Mask, Hearing Protection): Please, please, please always protect your eyes! This is not optional. Sawdust, flying splinters, stray nails – your eyes are too important. A good pair of comfortable safety glasses will be your best friend in the workshop. Especially when cutting and sanding, a good quality dust mask (or even a respirator, depending on the material) protects your lungs from fine wood particles. You don't want to breathe that stuff in – your future self will thank you for taking this simple precaution – I once underestimated the dust from sanding and spent the next day with a nagging cough! And for power tools like miter saws or routers, hearing protection is absolutely essential. Loud, repetitive noises can cause permanent damage, so don't skip the ear muffs or earplugs. Safety first, always! I’ve seen enough workshop mishaps to know that prevention is infinitely better than regret. Beyond personal protective equipment, consider good ventilation in your workspace to clear airborne dust and fumes, and if possible, a dedicated dust collection system for your power tools. These measures significantly improve both safety and the quality of your finish. Remember to remove any jewelry or loose clothing when operating power tools, as they can get caught and cause injury.
- Optional: Router with a Rabbeting Bit: For the more advanced DIYer, or someone planning multiple frames, a router with a rabbeting bit can cut a perfect, consistent rabbet (a groove along the inside edge) into your frame members. This eliminates the need to add separate inner ledger strips for the canvas to sit on, creating a very clean, integrated look. It's a fantastic tool to have, but definitely a luxury, not a necessity for a first frame. You can always try it later! If you do use a router, ensure it's securely mounted in a router table for safety and control, or use appropriate jigs and always work against the direction of the bit's rotation to maintain control. Always make shallow passes to avoid tear-out and for a cleaner cut, gradually deepening the rabbet. It’s a technique that truly elevates the craftsmanship and consistency of your frames.
Essential Tools Checklist
To make sure you've got everything you need, here's a handy checklist of the core tools, and some advanced options to consider as you grow your workshop:
Tool | Primary Use | Why It's Essential | Advanced Alternatives/Tips |
|---|---|---|---|
| Miter Saw / Hand Saw & Miter Box | Precise 45-degree cuts for frame corners. | Crucial for tight, professional joints. | Sliding compound miter saw for versatility; fine-tooth crosscut blade for cleaner cuts. |
| Measuring Tape | Accurate measurements. | Prevents errors, ensures proper fit. | Digital tape measure, steel rule, calipers for ultimate precision. |
| Pencil / Marking Knife | Marking cut lines and positions. | More accurate than freehand, prevents tear-out. | Marking knife for hairline precision on critical joints. |
| Combination / Speed Square | Checking for squareness (90-degree angles). | Ensures a perfectly square, non-wobbly frame. | Large framing square for big projects; check calibration regularly. |
| Wood Glue | Strong, permanent joinery. | Often stronger than the wood itself when cured. | Titebond III for moisture resistance; epoxy for gap-filling. |
| Clamps | Holding frame pieces firmly during glue-up. | Essential for even pressure and strong bonds. | Corner clamps, bar clamps, band clamps; use cauls to prevent marring. |
| Brad Nailer / Hammer & Finish Nails | Temporary reinforcement while glue dries. | Prevents slippage, adds initial strength. | Pneumatic brad nailer for speed and smaller holes; angle nails for stronger miter joints. |
| Drill with Countersink Bit | Pre-drilling pilot holes for screws. | Prevents wood splitting, ensures flush screw heads. | Tapered countersink bits for wood screws; proper pilot bit size is crucial. |
| Sandpaper (various grits) | Smoothing wood, preparing for finish. | Essential for a professional, even finish. | Random orbital sander for speed; sanding sponges for contours; sand with the grain. |
| Safety Gear | Protecting eyes, lungs, and ears. | Non-negotiable for all woodworking. | Safety glasses, dust mask/respirator, hearing protection (ear muffs/plugs), good ventilation. |

Materials to Gather:
Before you even think about cutting, let's talk about the raw ingredients. Choosing the right materials is just as important as having the right tools. Think of it as selecting the perfect canvas and paints for your next masterpiece – the quality of the foundation impacts the final result. I'm always meticulous about the materials for my art, whether it's the pigments I choose or the very canvas itself, as you can read about in [/finder/page/canvas-showdown-linen-vs-cotton-for-artists] or [/finder/page/how-to-choose-the-right-canvas-for-acrylic-vs-oil]. The same philosophy applies to your frame.
- Wood Strips/Lumber: This is the skeleton of your frame, the very foundation! The type of wood is entirely up to your aesthetic preference, budget, and desired durability. For your first frame, pine is an excellent, affordable, and easy-to-work-with option. It's forgiving and takes paint well. For a more premium, durable, and visually striking look, consider hardwoods like oak, maple, or walnut. These woods offer richer grains and greater longevity, though they are harder to work with and more expensive. Always choose pieces that are as straight as possible, ideally kiln-dried (to minimize warping), and free of warping, large knots, cracks, or significant defects like cupping (where the board curves across its width) or twisting (where it resembles a propeller). Sight down the length of the boards at the lumberyard – it's a simple trick that saves a lot of headaches! Once home, store your lumber flat and supported to prevent it from warping before you even make your first cut. The width and thickness will depend on the size of your canvas and the visual weight you desire for your frame (I often find 1x2 or 1x3 inch strips, dressed to their actual dimensions, work wonderfully for most canvases). Remember that nominal lumber sizes (like "1x2") are often different from their actual milled dimensions (e.g., 3/4" x 1 1/2"), so always measure your lumber accurately before planning your cuts. This is crucial for precise joinery. Consider also looking for sustainably sourced wood; it's a small choice that makes a big impact, echoing the mindful approach I try to bring to my own art practice. For a truly unique look, don't overlook exotic hardwoods like Wenge or Zebrano, though they come with a higher price tag and require specialized cutting tools.
Wood Type | Pros | Cons | Best For |
|---|---|---|---|
| Pine | Affordable, easy to cut, takes stain/paint well. | Softer, can dent easily. | Beginners, budget-conscious, painted finishes. |
| Poplar | Affordable hardwood, takes paint very well, stable. | Grain can be drab; not ideal for natural finishes. | Painted frames, good strength. |
| Oak | Very strong, beautiful grain, durable. | Harder to cut, more expensive. | Premium, natural wood finishes, heavy art. |
| Maple | Smooth, fine grain, very durable. | Hard to cut, expensive, can be tricky to stain evenly. | Modern, sleek, natural wood finishes. |
| Walnut | Rich, dark color, beautiful grain, strong. | Very expensive, harder to find. | Luxury, statement pieces, natural finishes. |

0. Calculating Your Lumber Needs: Avoiding Waste
Before you even step foot in the lumberyard, you'll want to have a good estimate of how much wood you'll need. This saves trips and money. Remember your cut list? Add up the total length for your outer frame pieces and inner ledge pieces. Always add at least 10-15% extra for mistakes, test cuts, or if you encounter unexpected defects in the wood. It’s better to have a little extra than to run short mid-project, which I’ve learned from my own fair share of miscalculations!
- Canvas: Naturally, you'll need the star of the show – the art piece you’re framing! Measure it incredibly carefully, as every millimeter truly counts. Don't rely on stated dimensions; measure the actual canvas multiple times across its width and height. This precision will pay off in a perfectly fitted frame. Consider if your canvas is a gallery-wrapped piece (where the artwork continues around the sides) or has painted edges that you want to showcase. This will influence your float gap and how the canvas sits within the frame. If you're stretching your own canvas, you might find [/finder/page/how-to-stretch-a-canvas-for-painting] incredibly useful, as proper stretching is the first step to a perfect frame.
Fasteners and Adhesives: The Hidden Strength
Beyond the wood itself, the materials you use to join and secure your frame are absolutely critical. Think of them as the unseen anchors that give your frame its integrity and longevity. I've learned that investing in good quality fasteners and glues saves countless headaches down the line.
Fastener/Adhesive | Primary Use | Benefits | Considerations |
|---|---|---|---|
| Wood Glue (PVA) | Permanent bonding of wood joints. | Stronger than wood itself, easy to clean up. | Requires clamping; sensitive to moisture (Titebond III is more resistant). |
| Brad Nails / Finish Nails | Temporary reinforcement for glue-ups. | Holds pieces while glue dries, minimal visibility. | Pre-drill for hardwoods; use nail set for flush finish; angle for miter strength. |
| Screws | Securing ledges, mounting canvas. | Strong, removable, good for structural integrity. | Always pre-drill and countersink; choose correct length to avoid piercing canvas. |
| Pocket Hole Screws | Hidden joinery for ledges/cross-bracing. | Strong, clean, hidden connections. | Requires specialized jig; pilot hole and countersink in one step. |
| Epoxy Resin | Ultimate strength, gap filling. | Excellent for difficult joints, highly durable. | More complex to mix and apply; longer cure times; can be expensive. |
Finishing Touches: Beyond the Wood
This is where your frame truly comes to life, taking on its final character and gaining vital protection. The finish is not just about aesthetics; it's about preserving your craftsmanship and complementing your art. It’s a step I approach with as much care as the final glaze on a painting.
- Small Wood Blocks/Scrap Wood: These little guys are vital for creating the inner ledges upon which your canvas will rest. You can use smaller strips of the same wood as your frame, or even sturdy scrap wood (like 1/4" or 1/2" thick plywood, or even another 1x2 ripped down). Just ensure they are dimensionally stable and cut cleanly to the appropriate size. The width isn't critical, but consistency is. If you're using scrap wood, make sure it's free of splinters and blemishes, as these will be holding your precious artwork. Alternatively, some builders prefer to router a rabbet directly into the frame pieces, eliminating the need for separate ledger strips altogether – a very clean option if you have the tools! This is where careful planning in the tool section, contemplating the router, really pays off. For a truly minimalist approach, some artists even use rigid foam core strips, though I prefer the durability of wood. Consider using hardwood strips for ledges, especially for heavier canvases, as they offer superior long-term stability and resistance to compression.
- Wood Conditioner (Optional but Recommended for Staining): If you plan to stain your frame, a wood conditioner is an often-overlooked secret weapon. It helps pre-treat porous woods (like pine or maple) to ensure an even absorption of stain, preventing blotchiness and streaks by sealing the most porous fibers. Trust me, a little extra step here saves a lot of heartache later, particularly on woods notorious for uneven stain absorption, such as birch or certain grades of fir. It’s like priming a canvas before painting – absolutely essential for a smooth, consistent finish that truly showcases the wood's natural beauty. For very difficult woods, a thin coat of shellac (diluted with denatured alcohol) can also act as an excellent, albeit slightly more involved, conditioner.
- Wood Filler: For those inevitable small gaps, dings, or nail holes, wood filler is your best friend for a seamless, professional finish. There are various types – latex-based for easy cleanup and painting, epoxy-based for stronger, more durable repairs, or even stainable wood putty that can be tinted to match your wood. Choose one that matches your intended finish (light or dark), apply it sparingly with a putty knife, forcing it into the grain, let it dry completely (which can take several hours depending on thickness), and then sand it flush. It's a lifesaver for achieving that flawless, polished look, making minor imperfections disappear as if by magic. I've learned that even the most meticulous woodworker needs wood filler sometimes! For small hairline gaps in miters, a mixture of fine sawdust from your frame wood and wood glue can create a nearly invisible repair if done carefully. Always apply wood filler in thin layers, building it up if necessary, to ensure proper drying and minimal shrinkage.
- Tack Cloth (Essential for Finishing): This sticky, resin-impregnated cloth is invaluable for removing fine dust particles from your sanded wood surface right before you apply any stain or paint. It picks up what your vacuum and air compressor miss, ensuring a truly pristine surface for your finish to adhere to. Don't skip this step! It’s the final, crucial sweep that makes all the difference between a good finish and a great one. Little dust nibs can ruin an otherwise perfect coat of varnish. Make sure to unfold the tack cloth completely and refold it to expose a fresh surface as you work, to avoid redepositing dust.

- Sandpaper (various grits): Yes, it's a tool, but you'll consume it like a material! Having plenty on hand, in various grits, is absolutely crucial for achieving that silky-smooth finish. Don't skimp on this step – a well-sanded frame is a joy to behold and takes finish beautifully. Remember, the quality of your sanding directly impacts the final appearance of your chosen finish. Think of it as refining the very skin of your frame, preparing it for its protective layer. And always sand with the grain, not against it – trust me, those cross-grain scratches will haunt you!
Finishing Material | Purpose | Application Notes | Essential for... |
|---|---|---|---|
| Wood Conditioner | Promotes even stain absorption. | Apply to porous woods before staining; follow manufacturer's drying times. | Preventing blotchiness on softwoods. |
| Wood Filler / Putty | Fills gaps, nail holes, imperfections. | Apply sparingly, let dry completely, sand flush; match to wood/finish. | Achieving a flawless, seamless surface. |
| Tack Cloth | Removes fine dust before finishing. | Unfold, refold to fresh surface; don't use with water-based finishes. | A truly pristine, dust-free finish. |
| Stain, Paint, Varnish | Colors, protects, defines aesthetic. | Test on scrap; apply thin, even coats; allow ample drying time. | Preserving wood, enhancing visual appeal. |
| D-rings, Picture Wire, etc. | Securely hanging the finished frame. | Choose appropriate for weight/wall type; pre-drill pilot holes. | Safe and stable display of your artwork. |
| Paintbrushes/Rollers/Sprayer | Applying chosen finish. | Use high-quality tools; clean immediately after use; use different types for different finishes. | Smooth, even, professional finish application. |
| Mineral Spirits / Cleaner | Cleaning tools, minor finish cleanup. | Use specific cleaner for your finish type; follow safety guidelines. | Maintaining tools and workspace cleanliness. |
0. Calculating Your Lumber Needs: Avoiding Waste
Before you even step foot in the lumberyard, you'll want to have a good estimate of how much wood you'll need. This saves trips and money. Remember your cut list? Add up the total length for your outer frame pieces and inner ledge pieces. Always add at least 10-15% extra for mistakes, test cuts, or if you encounter unexpected defects in the wood. It’s better to have a little extra than to run short mid-project, which I’ve learned from my own fair share of miscalculations!
1. Accurate Measurements: The Foundation of Your Frame
This step is non-negotiable, truly. I often say that a beautiful frame is built on the backbone of accurate measurements. You absolutely need precise measurements of your canvas to ensure your frame fits perfectly and that beautiful, consistent "float" gap is achieved. Remember, a millimeter off here can mean a visible gap or a tight squeeze later. I've learned from experience that rushing this stage leads to headaches down the line. It's like painting; a solid foundation makes all the difference. When I'm selecting a canvas for a new piece, I'm already thinking about its final presentation, even if that's months away! This stage is just as important as choosing the right [/finder/page/how-to-apply-gesso-to-canvas-a-beginners-guide] for your canvas, and often, the quality of your canvas stretcher bars plays a role in how true those measurements will be.
2. Sketching and Design Considerations: Visualizing Your Vision
Before any cuts, take a moment to sketch out your frame. Seriously, grab a pencil and paper! This isn't about being an architectural draftsman; it's about visualizing how the frame will interact with your artwork and your space.
- Proportions: Consider the overall proportions of your framed art. Will a thick, chunky frame overwhelm a delicate piece, or will a slender frame get lost around a large, bold canvas? There’s no hard rule, but generally, larger art can handle a wider frame, and smaller art often benefits from a more delicate one.
- Finish Harmony: Think about the wood type and finish you've chosen. Does it complement the colors and style of your artwork? A dark, rich walnut might accentuate the vibrant hues of an abstract piece, while a light, natural maple could enhance a minimalist landscape.
- Room Aesthetic: Also, how will the framed piece look in its intended environment? Does it align with the aesthetic of your home, whether it's a modern farmhouse interior [/finder/page/decorating-with-art-in-modern-farmhouse-interiors] or a minimalist living room [/finder/page/decorating-with-abstract-art-in-a-minimalist-living-room-creating-impact-with-simplicity]? The frame is an extension of both the art and the room. Think about how the frame's color and texture will interact with your existing decor and lighting – a dark frame can recede, making the art pop, while a lighter frame might feel more airy and integrated into a brighter space. I often consider [/finder/page/the-art-of-display:-how-to-light-and-position-abstract-art-for-maximum-impact] when planning the final display.
3. Choosing Your "Float" Gap and Frame Depth
This is where you get to make some key design decisions that really impact the aesthetic. Think of it as deciding the spacing in a composition, something I do daily when creating abstract art for /buy or for shows at /den-bosch-museum.
- The Float Gap: This is the small, yet incredibly significant, space between your canvas and the inner edge of the frame. It's what gives the illusion of your artwork floating. I typically recommend a 1/4-inch (0.25") float gap for most canvases – it's a classic, elegant choice that provides enough separation without being overly dramatic, creating a subtle, clean shadow line. However, for a larger canvas or a very bold piece, you might go up to 3/8 inch or even 1/2 inch to maintain visual balance, giving the piece more breathing room and a grander presence. Experiment by holding a ruler or a piece of cardboard next to your canvas to visualize different gaps. This gap is not just aesthetic; it also prevents the frame from touching the artwork, which is vital for preserving delicate surfaces or textured pieces, ensuring their longevity and allowing for better air circulation around the canvas.
- Frame Depth & Canvas Recess: This relates directly to your canvas's thickness. You want your frame to be at least as deep as your canvas, and ideally, a bit deeper, so the canvas sits slightly recessed from the front edge of the frame. I usually aim for the canvas to be set back by about 1/8 to 1/4 inch from the front face of the outer frame. This creates a compelling shadow line and physically protects the artwork's edges from accidental bumps. So, if your canvas is 1.5 inches deep, your frame material should ideally be at least 1.5 inches deep, perhaps 1.75 inches for that perfect recessed look. If your chosen wood isn't deep enough, you can add extra strips of wood to the back of the inner ledges to achieve the desired depth, ensuring the frame provides both aesthetic depth and practical protection. The interplay between the canvas's thickness, the float gap, and the frame's depth ultimately defines the artwork's presence and how it commands attention on the wall, influencing how light interacts with the piece, a concept I explore in my guide on [/finder/page/the-art-of-display:-how-to-light-and-position-abstract-art-for-maximum-impact}].
4. Calculating Your Wood Cuts: The Math Made Simple (And Critical!)
This is where many people get tripped up, but it's straightforward once you understand the logic. You'll be cutting four pieces for the outer frame and four for the inner ledges. Precision here is paramount; a small error in your calculations or cuts can lead to ill-fitting joints or an uneven float gap. Take your time, double-check your numbers, and remember those golden rules of measuring! I can't tell you how many times I've almost rushed this step, only to catch myself and realize I was about to create a headache for future me.
- Stain, Paint, or Varnish: Your choice of finish will truly define the final look of your frame, giving it character and protecting the wood. From rich oil-based stains that highlight the natural grain, to vibrant latex or acrylic paints that complement your artwork, or clear polyurethane or lacquer varnishes that offer subtle, durable protection – the options are endless. There are also specialized finishes like shellac, which provides a beautiful amber tone and is easy to repair, or wax finishes for a very natural, hand-rubbed feel. Always, always, always test your chosen finish on a scrap piece of your chosen wood first! For more on finishes, you might find my guide on [/finder/page/definitive-guide-to-paint-types-for-artists] helpful, or perhaps [/finder/page/how-to-varnish-an-acrylic-painting] or [/finder/page/how-to-varnish-an-oil-painting-a-step-by-step-guide] for specific application techniques. Consider the overall aesthetic of your artwork and your space; a frame can either subtly enhance or boldly contrast with the piece it holds. Remember to apply thin, even coats, and allow adequate drying time between coats for the best results – rushing this stage is a common rookie mistake and can lead to uneven, sticky, or brittle finishes.
- D-rings, Picture Wire, or French Cleat: For hanging your finished masterpiece securely, you'll need appropriate hardware. D-rings (or screw eyes) combined with picture wire are a classic choice, offering flexibility in hanging height. Alternatively, consider sawtooth hangers for smaller, lighter frames, or even a French cleat system for heavier pieces or when you want the frame to sit perfectly flush against the wall. Always choose hardware appropriate for the weight of your framed art and the wall it will hang on, and remember to use appropriate wall anchors for drywall. Always pre-drill pilot holes for screws to prevent splitting the wood, and ensure all hardware is rated for the weight of your finished piece. Safety first – your art deserves to be displayed securely! If you're unsure about hanging methods, a quick search for "how to hang heavy artwork" can provide even more specialized guidance, though for most DIY frames, D-rings and wire are perfectly adequate when installed correctly. You don't want your beautiful art, or your beautiful frame, taking an unexpected tumble, potentially damaging both the artwork and your wall!
- Paintbrushes, Rollers, or Spray Equipment: The specific tools for applying your chosen finish will depend on the finish itself. High-quality natural bristle brushes are excellent for oil-based stains and varnishes, while synthetic brushes work best for water-based paints and polys. Foam rollers can provide a smooth, even finish on larger, flat surfaces for paint, and for the ultimate smooth, factory-like finish, consider investing in a HVLP (High Volume Low Pressure) spray gun, though this is definitely a more advanced option requiring practice and proper ventilation. Always use clean, dedicated applicators for each type of finish to prevent contamination.
- Mineral Spirits or Appropriate Cleaner: You'll need the right cleaner for your chosen finish – mineral spirits for oil-based products, or simply water and soap for water-based ones. This is for cleaning your brushes and tools, and occasionally for minor cleanup during the finishing process. Always check the manufacturer's recommendations for proper cleanup and disposal of solvents.
Planning Your Floating Frame: Measurements, Materials, and Mindset
Before you even think about picking up a saw, planning is absolutely paramount. Trust me, a little extra time spent now will save you a lot of headaches (and wasted wood) later. This is where you become the architect of your artwork's new home, ensuring every detail is considered before any cuts are made. I've often said that planning is 90% of the battle, especially when you're aiming for that crisp, professional finish that really makes a piece, like one of my abstracts from /buy, sing. This stage is where your vision truly takes shape, long before you even touch a tool.
0. Material Sourcing Strategy: Where to Find Your Lumber
Finding the right wood is half the battle, and it's not always as simple as picking up a board at the nearest home improvement store. Here's what I've learned:
- Local Lumberyards vs. Big Box Stores: For higher quality, more diverse wood species, and often better advice, I always recommend a local lumberyard. They typically have kiln-dried hardwoods and staff who know their wood. Big box stores are great for common softwoods like pine, especially for practice or budget projects, but selection can be limited, and quality can vary wildly.
- Reclaimed Wood: For a unique, rustic, or eco-conscious aesthetic, consider reclaimed wood. Old barn wood, pallet wood (carefully check for chemicals or nails!), or salvaged furniture pieces can be transformed. Just be prepared for extra prep work (denailing, sanding, milling) and potential challenges with consistency. It's a rewarding process, though, giving new life to forgotten materials.
- Checking for Quality: Regardless of where you buy, always inspect each piece of wood carefully. Sight down its length to check for warps, twists, and bows. Look for excessive knots, cracks, or insect damage. Tap the wood – a clear, resonant sound usually indicates good density and fewer internal defects. Spend a few extra minutes now, and you'll save hours of frustration later.
1. Accurate Measurements: The Foundation of Your Frame
This step is non-negotiable, truly. I often say that a beautiful frame is built on the backbone of accurate measurements. You absolutely need precise measurements of your canvas to ensure your frame fits perfectly and that beautiful, consistent "float" gap is achieved. Remember, a millimeter off here can mean a visible gap or a tight squeeze later. I've learned from experience that rushing this stage leads to headaches down the line. It's like painting; a solid foundation makes all the difference. When I'm selecting a canvas for a new piece, I'm already thinking about its final presentation, even if that's months away! This stage is just as important as choosing the right [/finder/page/how-to-apply-gesso-to-canvas-a-beginners-guide] for your canvas, and often, the quality of your canvas stretcher bars plays a role in how true those measurements will be.
2. Sketching and Design Considerations: Visualizing Your Vision
Before any cuts, take a moment to sketch out your frame. Seriously, grab a pencil and paper! This isn't about being an architectural draftsman; it's about visualizing how the frame will interact with your artwork and your space.
- Proportions: Consider the overall proportions of your framed art. Will a thick, chunky frame overwhelm a delicate piece, or will a slender frame get lost around a large, bold canvas? There’s no hard rule, but generally, larger art can handle a wider frame, and smaller art often benefits from a more delicate one.
- Finish Harmony: Think about the wood type and finish you've chosen. Does it complement the colors and style of your artwork? A dark, rich walnut might accentuate the vibrant hues of an abstract piece, while a light, natural maple could enhance a minimalist landscape.
- Room Aesthetic: Also, how will the framed piece look in its intended environment? Does it align with the aesthetic of your home, whether it's a modern farmhouse interior [/finder/page/decorating-with-art-in-modern-farmhouse-interiors] or a minimalist living room [/finder/page/decorating-with-abstract-art-in-a-minimalist-living-room-creating-impact-with-simplicity]? The frame is an extension of both the art and the room. Think about how the frame's color and texture will interact with your existing decor and lighting – a dark frame can recede, making the art pop, while a lighter frame might feel more airy and integrated into a brighter space. I often consider [/finder/page/the-art-of-display:-how-to-light-and-position-abstract-art-for-maximum-impact] when planning the final display.

- Measure Your Canvas Carefully (Width & Height): Using your reliable measuring tape, measure the exact width and height of your stretched canvas. Don't just rely on the stated size (e.g., "16x20 inches"); variations can and do occur due to manufacturing tolerances or even subtle warping over time! Measure in at least three different spots along each dimension (top, middle, bottom for width; left, middle, right for height) and use the largest measurement. This accounts for any slight bowing or inconsistencies in the canvas stretcher bars, ensuring your frame will accommodate its true dimensions. Write these down immediately, clearly labeling them as 'Actual Canvas Width' and 'Actual Canvas Height'. Precision here means the difference between a snug fit and a frustrating struggle, something I’ve learned from countless hours in the studio.
- Measure Canvas Depth (Thickness): Crucially, measure the thickness (depth) of your canvas, from the front surface to the back edge. This measurement will directly influence the depth of your frame material and how much of your canvas will sit recessed within the frame. My canvases are typically 1.5 inches deep, but yours might vary. A canvas that protrudes past the back of the frame can look unfinished, so get this right! Knowing this depth also helps you select the appropriate length for your mounting screws, ensuring they are long enough to securely fasten the canvas without penetrating the front surface. This measurement also dictates how prominently your artwork will sit within the frame – too shallow, and it might look swallowed; too deep, and it loses that intimate connection to the frame, sometimes even creating an awkward shadow.
3. Choosing Your "Float" Gap and Frame Depth
This is where you get to make some key design decisions that really impact the aesthetic. Think of it as deciding the spacing in a composition, something I do daily when creating abstract art for /buy or for shows at /den-bosch-museum.
- The Float Gap: This is the small, yet incredibly significant, space between your canvas and the inner edge of the frame. It's what gives the illusion of your artwork floating. I typically recommend a 1/4-inch (0.25") float gap for most canvases – it's a classic, elegant choice that provides enough separation without being overly dramatic, creating a subtle, clean shadow line. However, for a larger canvas or a very bold piece, you might go up to 3/8 inch or even 1/2 inch to maintain visual balance, giving the piece more breathing room and a grander presence. Experiment by holding a ruler or a piece of cardboard next to your canvas to visualize different gaps. This gap is not just aesthetic; it also prevents the frame from touching the artwork, which is vital for preserving delicate surfaces or textured pieces, ensuring their longevity and allowing for better air circulation around the canvas.
- Frame Depth & Canvas Recess: This relates directly to your canvas's thickness. You want your frame to be at least as deep as your canvas, and ideally, a bit deeper, so the canvas sits slightly recessed from the front edge of the frame. I usually aim for the canvas to be set back by about 1/8 to 1/4 inch from the front face of the outer frame. This creates a compelling shadow line and physically protects the artwork's edges from accidental bumps. So, if your canvas is 1.5 inches deep, your frame material should ideally be at least 1.5 inches deep, perhaps 1.75 inches for that perfect recessed look. If your chosen wood isn't deep enough, you can add extra strips of wood to the back of the inner ledges to achieve the desired depth, ensuring the frame provides both aesthetic depth and practical protection. The interplay between the canvas's thickness, the float gap, and the frame's depth ultimately defines the artwork's presence and how it commands attention on the wall, influencing how light interacts with the piece, a concept I explore in my guide on [/finder/page/the-art-of-display:-how-to-light-and-position-abstract-art-for-maximum-impact}].
4. Calculating Your Wood Cuts: The Math Made Simple (And Critical!)
This is where many people get tripped up, but it's straightforward once you understand the logic. You'll be cutting four pieces for the outer frame and four for the inner ledges. Precision here is paramount; a small error in your calculations or cuts can lead to ill-fitting joints or an uneven float gap. Take your time, double-check your numbers, and remember those golden rules of measuring! I can't tell you how many times I've almost rushed this step, only to catch myself and realize I was about to create a headache for future me.

- Outer Frame Pieces (Mitered):
- For each side, you need to account for the canvas dimension PLUS two times the desired float gap PLUS two times the actual width of your frame material. Remember, a nominal 1x2 is actually 0.75" x 1.5" (or similar, always measure your lumber!).
- Formula for Outer Frame Short Sides:
Canvas Width + (2 * Float Gap) + (2 * Frame Material ACTUAL Width) - Formula for Outer Frame Long Sides:
Canvas Height + (2 * Float Gap) + (2 * Frame Material ACTUAL Width) - Example: For a 16"x20" canvas, 1/4" float gap, and 1.5" wide frame material (actual dimension of a 1x2, typically):
- Short sides:
16" + (2 * 0.25") + (2 * 1.5") = 16" + 0.5" + 3" = 19.5" - Long sides:
20" + (2 * 0.25") + (2 * 1.5") = 20" + 0.5" + 3" = 23.5"
- Important Note: These measurements are for the long point of your 45-degree miter cuts. This is absolutely crucial when using a miter saw. Double-check your saw's settings and make test cuts on scrap wood to verify your angles! Each pair of opposite sides should be exactly the same length to ensure a perfectly square frame. When measuring, place your tape measure on the long point of the miter. Don't forget that you'll need two pieces of each length (two short, two long). A good guide on [/finder/page/the-ultimate-guide-to-framing-your-artwork] can further clarify these concepts.
- Inner Ledge Pieces:
- These support the canvas. They need to be cut to fit inside the outer frame, creating the float gap. Since they are hidden, they don't require mitered corners and can be cut at straight 90-degree angles. However, ensure these 90-degree cuts are perfectly square to guarantee maximum contact and stability for your artwork.
- Formula for Inner Ledge Short Sides:
Canvas Width + (2 * Float Gap) - Formula for Inner Ledge Long Sides:
Canvas Height + (2 * Float Gap) - Example: For a 16"x20" canvas, 1/4" float gap:
- Short sides:
16" + (2 * 0.25") = 16.5" - Long sides:
20" + (2 * 0.25") = 20.5"
- Note: These will be straight, 90-degree cuts. The width of these ledger strips should be narrow enough so they don't show from the front, but wide enough to provide a stable resting place for your canvas. I usually cut them to about 3/4" to 1" wide, ensuring they offer ample support without being visible.

Make a detailed cut list. Double-check your numbers. This is where patience pays off! And speaking of patience, a truly square frame begins and ends with precise cuts. One trick I've learned is to cut one piece, then use it as a template for its opposite. This helps ensure that your opposing sides are identical, which is absolutely critical for a perfectly square frame. Even a fractional difference can compound across the four corners, leading to frustrating gaps or a parallelogram-shaped frame. I hope these answers provide clarity and encourage you to embark on this rewarding project. Remember, every step is a learning opportunity, and the end result – a beautifully framed piece of art – is worth every bit of effort. Sketch it out if you need to, write down every dimension for every piece. This attention to detail now saves immense frustration later, and believe me, I've learned that the hard way more times than I care to admit. It’s like planning a complex painting – every layer builds on the last, and a solid underpainting (or, in this case, accurate measurements) is everything.
Conclusion: Your Art, Elevated by Your Own Hands
You've embarked on a truly rewarding journey, not just of building a frame, but of deepening your connection to your art. Crafting a floating frame isn't merely a DIY project; it's an act of care, precision, and artistic extension. It allows your canvas to breathe, to command attention, and to present itself with a gallery-worthy sophistication that truly makes it sing. From selecting the perfect wood to the final polish, every step you take imbues your artwork with a unique presentation that speaks volumes about its importance. I believe that every piece of art, whether it's a spontaneous creation or a carefully planned masterwork from my collection at [/buy], deserves this level of thoughtful display. So go forth, create, build, and let your art float, captivating all who behold it. The satisfaction of seeing your masterpiece beautifully presented, knowing you crafted its stage with your own hands, is a profound and lasting joy.
The Step-by-Step Build Process: Bringing Your Frame to Life
Alright, you've planned, you've measured, you've gathered your tools and materials. Now for the exciting part: actually building your floating frame! This is where all that careful preparation pays off. Approach each step with intention, and you'll find the process incredibly rewarding. Remember, patience is your best tool here. I always say that the act of making, of building something with your own hands, is as much a part of the art as the final product itself. There’s a quiet satisfaction in seeing your vision come to life, piece by deliberate piece.

1. Preparing Your Workspace: Set Yourself Up for Success
Before you make your first cut, take a moment to set up your workspace. A clean, well-organized, and well-lit area is crucial for safety and accuracy. Clear away any clutter, ensure good ventilation (perhaps even consider a dust collection system for prolonged work), and lay out your tools within easy reach. This isn't just about neatness; it's about creating a flow that minimizes distractions and maximizes efficiency. Think about where your saw dust will go, and make sure you have enough room to safely handle long pieces of lumber, especially when making those critical miter cuts. And of course, don't forget to put on all your safety gear now! My studio can be a whirlwind of creative chaos when I'm in the thick of a painting, but for a framing project, I become a stickler for order – it truly makes a difference in both the outcome and your peace of mind, and the quality of your finished product. I always lay down a protective mat or old cardboard on my workbench to prevent accidental scratches or glue spills on my precious workspace. Consider also having a dedicated cleanup station with damp rags and paper towels readily available, especially for glue squeeze-out – that's a mistake you only make once before realizing how critical immediate cleanup is! A well-lit workspace, ideally with natural light, helps reduce eye strain and ensures you can clearly see your marks and cuts.
2. Making Your Cuts: Precision is Everything
This is where the magic (or the frustration, if you rush!) happens. With your cut list handy and your saw set to a precise 45-degree angle (for the outer frame), make your cuts carefully. Remember the "measure twice, cut once" mantra! Cut the four outer frame pieces first, ensuring each miter is perfect. Then, switch to 90-degree cuts for your four inner ledge pieces. If you're using a hand saw and miter box, take slow, even strokes, letting the saw do the work, using your body weight to maintain control. With a power miter saw, allow the blade to come up to full speed before cutting and ensure the wood is firmly held against the fence – this prevents kickback and ensures a clean, accurate cut. For delicate woods or to prevent tear-out (where the wood fibers splinter at the cut edge), consider using a zero-clearance insert on your miter saw, or backing your cut with a sacrificial piece of wood to support the fibers. For hardwoods, slower, controlled cuts are often best, while softwoods can be cut a bit faster. Make a test cut on scrap wood for each setting before cutting your good lumber. This is where a little extra time ensures a perfectly square frame. I've learned that a slightly dull blade can cause tear-out, so make sure yours is sharp, and if it's a miter saw, ensure the blade guard is functioning properly. Safety first, always! Another pro tip: when using a miter saw, always raise the blade fully after a cut before bringing it back forward to clear the workpiece; this helps prevent the blade from catching and causing kickback. For repeatable precision, especially when cutting identical lengths, set up a stop block on your saw fence. This eliminates measuring each piece individually, drastically improving consistency and speed.
3. Assembling the Outer Frame: Bringing the Pieces Together
Now, it's time to join those mitered corners. Before applying any glue, I always recommend a dry-fit of all four outer frame pieces. This ensures your cuts are accurate and the joints meet perfectly. If they don't, you have a chance to make minor adjustments now, before things get messy. Once you're satisfied, apply a thin, even bead of wood glue to both mating surfaces of each miter joint. Press them together firmly, ensuring they are perfectly aligned. This is where your clamps become invaluable! Use corner clamps to hold the 45-degree angles tightly, and bar clamps across the entire frame to apply even pressure while the glue dries. As you clamp, use a framing square or a large speed square to check that your frame is perfectly square (all 90-degree corners). Slight adjustments in clamping pressure can often correct minor deviations. If using brad nails, drive one or two nails through each joint, angling them slightly for added strength, while the glue is still wet. Wipe away any glue squeeze-out with a damp cloth immediately – dried glue is much harder to remove and can affect your finish. Let the glue cure completely, ideally overnight, before moving on. Patience here truly pays off with a rock-solid frame. Remember, the glue does the heavy lifting structurally; the nails are just there to hold it while the glue cures. Don't be shy with the clamping pressure, but also don't over-tighten to the point of deforming the wood. For an even stronger and more professional joint, especially on larger frames, consider incorporating biscuits or splines into your mitered corners. These offer significant mechanical reinforcement, preventing racking and ensuring long-term stability, though they do require specialized tools like a biscuit joiner or a table saw with a spline jig. Another pro tip: apply a small amount of glue to a scrap piece and test the open time – how long you have to position pieces before the glue starts to set – especially if you're working in a warm or dry environment.
4. Attaching the Inner Ledgers: Creating the "Float"
Once your outer frame is solid and dry, it's time to install the inner ledger strips. These are the pieces that your canvas will rest on, creating that signature float gap. Place your canvas face-down inside the outer frame. Now, position your inner ledger strips against the back of the canvas, ensuring that the desired float gap is consistent around all four sides. This is a critical step for visual appeal, so use small, consistent spacers (like stacks of coins, strips of cardboard, custom-cut blocks of wood, or even specialized 'float keys') to maintain an even gap. I like to use at least two spacers per side to ensure consistent spacing. Once positioned correctly, secure the ledger strips to the inner edge of the outer frame. Use a bead of wood glue for a strong bond and then either brad nails (driven from the outside in, being careful not to penetrate the front of your frame!) or screws (pre-drilled and countersunk) for added security. Alternatively, for a completely hidden fastening method, pocket hole screws can be used from the back of the ledger strips into the outer frame, creating a very clean and strong joint. Make sure the top surface of your ledgers is at a height that allows your canvas to sit recessed by your chosen amount – typically 1/8" to 1/4" from the front face of the frame. I often dry-fit everything first, marking the positions with a pencil, to ensure everything lines up perfectly before committing with glue and fasteners. This pre-visualization is key to a flawless float and ensures your canvas sits perfectly, truly enhancing the "floating" illusion. For larger frames, consider adding a central cross-brace between the ledger strips to prevent any bowing or sagging over time, especially with heavier canvases.
5. Sanding and Finishing: The Polished Look
This is where you transform rough lumber into a refined display. Start with a medium-grit sandpaper (120-150 grit) to smooth out any rough spots, glue residue, or minor imperfections. Work your way up to finer grits (220-320 grit) for a silky-smooth finish. For open-grain woods (like oak), consider using a grain filler after your initial sanding to achieve a truly smooth, glass-like surface, especially if you're aiming for a high-gloss finish. Always sand with the grain. After each grit, I recommend wiping down the surface with a clean cloth or blowing with compressed air to remove sanding dust before moving to the next finer grit; this prevents coarser particles from scratching the finer surface you just achieved. After final sanding, use a tack cloth to meticulously remove all dust – this is crucial for a flawless finish; even microscopic dust particles can ruin an otherwise perfect coat of finish! Now, apply your chosen stain, paint, or varnish according to the manufacturer's instructions. Remember to apply thin, even coats, allowing adequate drying time between each. If staining, consider using a wood conditioner first for blotch-prone woods like pine or maple. For painted finishes, a good quality primer will ensure better adhesion and a more durable topcoat. The finish not only protects the wood but also dramatically enhances its beauty, making your frame truly shine. I often spend as much time on the finishing of a frame as I do on a painting's final layers; it’s that important. For specific guidance on finishes, you might want to look at [/finder/page/definitive-guide-to-paint-types-for-artists] or even general art maintenance at [/finder/page/cleaning-different-types-art]. For a truly mirror-like finish, consider wet sanding with extremely fine grits (1000-2000) between the final coats of varnish, using a lubricant like mineral spirits or water.

6. Mounting Your Canvas: The Final Fit
With your frame finished and thoroughly dry, it's time to install your artwork. Carefully place your canvas face-down into the frame, resting it on the inner ledges. Ensure the float gap is still even all around. Now, you'll secure the canvas to the ledges using small mounting blocks or specialized offset clips. These are usually small L-shaped brackets (offset clips) or wooden blocks that screw into the canvas stretcher bar and into the frame's inner ledge. Offset clips are often preferred as they provide a bit of flexibility for canvas expansion/contraction and can be easier to remove if you ever need to take the artwork out of the frame. Attach them at several points around the perimeter (typically two per side for smaller frames, four or more for larger ones, ensuring even distribution of weight) to hold the canvas firmly in place without putting undue pressure on the artwork itself. Ensure the screws aren't too long, to avoid poking through the front of your canvas or frame! Always pre-drill pilot holes for these screws to prevent splitting the stretcher bars. This step is about securing your precious artwork without damaging it – a delicate balance that requires attention to detail. I always double-check screw lengths, because a small oversight here can be heartbreaking. For added security, especially for very heavy canvases, consider using heavier-gauge offset clips or more numerous mounting blocks.
7. Adding Hanging Hardware: Displaying Your Masterpiece
The very last step is to add the hanging hardware. For most frames, I recommend attaching D-rings (or screw eyes) about one-third of the way down from the top of the frame on each side. Then, string a robust picture wire between them, leaving a slight slack. The wire should form a gentle curve when held taut, but not so much that the top of the frame tilts forward. For heavier pieces, a French cleat offers superior support and keeps the frame perfectly flush with the wall, and is ideal for secure mounting on various wall types, including plaster or drywall with appropriate anchors. Always choose hardware rated for the weight of your artwork, and secure it properly into the sturdy parts of your frame. Use a level when hanging to ensure your beautifully framed art is perfectly straight on the wall – it's the finishing touch that makes all the difference! If you're looking for more general framing advice, [/finder/page/qa-with-an-expert-art-framer] might offer some additional insights, including tips for different wall materials. Just remember, a perfectly hung piece is a joy to behold, and a crooked one can subtly annoy you every single day!
Advanced Techniques for the Avid DIYer
Once you’ve mastered the basics, there are always ways to push your craftsmanship further. For those of you, like me, who enjoy diving deeper into the nuances of woodworking and artistic presentation, here are a few advanced techniques to consider. These are not necessary for a beautiful first frame, but they can truly elevate your next project to gallery-quality levels.
1. Router-Cut Rabbets for Integrated Ledgers
Instead of attaching separate ledger strips, a router can create a continuous rabbet (a step-shaped groove) directly into the back inside edge of your outer frame pieces. This creates a seamlessly integrated ledge for your canvas.
- Tools Required: Router (plunge or fixed base), rabbeting bit set (with various bearings for different rabbet depths), router table (highly recommended for safety and control) or a straightedge guide.
- Process: After milling your outer frame pieces, set up your router with the appropriate rabbeting bit. Make shallow passes, gradually increasing the depth until you achieve the desired rabbet depth. Ensure consistent pressure and feed rate for a smooth, even cut. This method results in a very clean, professional aesthetic, as there are no visible ledger strips or fasteners from the side.
2. Splined or Dovetail Miter Joints for Unrivaled Strength
While glue and brad nails are sufficient for most frames, for very large, heavy, or heirloom pieces, reinforcing your miter joints mechanically adds significant strength and prevents racking over time.
- Splined Miters: After gluing your mitered frame together, cut narrow slots across the miter joint (e.g., using a biscuit joiner or a table saw with a spline jig). Thin strips of contrasting hardwood (splines) are then glued into these slots, creating a strong mechanical interlock and often a beautiful decorative element. These can be visible or hidden depending on your design.
- Dovetail Splines: Similar to splines, but with a dovetail shape, offering even greater resistance to pulling apart. This requires a specialized dovetail spline jig and router bit, but the strength and aesthetic are exceptional.
3. Custom Profiles and Milled Stock
For truly bespoke frames, consider milling your own lumber to create unique profiles or to achieve precise dimensions not available in standard stock. This opens up a world of design possibilities.
- Tools Required: Jointer, planer, table saw, router (with various profile bits).
- Process: Start with rough lumber and use the jointer to flatten one face and one edge. Then, use the planer to bring the boards to a consistent thickness. Finally, rip to width on the table saw and use a router to add decorative profiles (e.g., ogees, chamfers, coves) to the edges of your frame material. This level of customization allows you to perfectly match the frame's aesthetic to your artwork's unique character.

Troubleshooting Common Issues: When Things Go Sideways (They Sometimes Do!)
Even with the best planning, sometimes things don't go exactly as expected. Don't worry, it's part of the learning process! I've had my share of unexpected challenges in my studio, and learning to troubleshoot is as important as learning to build. Think of it not as a failure, but as a crucial lesson that builds your skill and patience. Here are some common hiccups and how to fix them:
0. Splitting Wood During Fastening
- Problem: Your wood splits or cracks when you drive in a nail or screw.
- Cause: Not pre-drilling pilot holes, pilot hole is too small, or driving fasteners too close to an edge or end grain.
- Solution: Always pre-drill pilot holes for screws, ensuring the drill bit is slightly smaller than the screw's shank (the smooth part) but larger than the threaded root. For nails, a tiny pilot hole can also help, especially in hardwoods. Avoid driving fasteners too close to the end grain or very narrow strips of wood. If a split occurs, you can sometimes repair it by injecting wood glue into the crack and clamping it tightly, then filling any remaining gap with wood filler. Prevention is definitely key here! For very brittle or thin pieces of wood, using a bit of tape over the area where the fastener enters can sometimes provide enough support to prevent splitting.
1. Gaps in Mitered Corners
- Problem: After gluing and clamping, you notice small gaps at your 45-degree corner joints.
- Cause: Imperfect 45-degree cuts, uneven clamping pressure, or not enough glue.
- Solution: For tiny gaps, wood filler is your best friend. Choose a color that matches your wood or intended finish, apply it generously, let it dry, and sand flush. For larger gaps, you might need to carefully recut the pieces if the glue hasn't fully cured, or embrace the 'rustic' look! Prevent this by always making test cuts and ensuring clamps apply even pressure from all directions. A mixture of fine sawdust from your frame wood and wood glue can also create an effective and less noticeable filler for small gaps, especially if you plan a clear finish.
2. Uneven Float Gap
- Problem: The space between your canvas and the frame is wider on one side than another.
- Cause: Inaccurate cutting of inner ledger strips, uneven attachment of ledgers, or a warped canvas stretcher bar.
- Solution: If the frame is already assembled, you might carefully sand down the proud ledger, or add thin shims (small pieces of wood or cardboard) behind the canvas on the narrower side. For future projects, double-check all ledger measurements and use consistent spacers during attachment. Always measure your canvas in multiple spots to detect any warp before you start building the frame. For very minor adjustments, the offset clips or mounting blocks can sometimes be slightly repositioned.
3. Warped Frame
- Problem: Your finished frame isn't perfectly flat or square.
- Cause: Warped lumber, uneven drying of glue, or improper clamping.
- Solution: For minor warps, sometimes re-clamping with strong, even pressure while the glue sets can help. For more significant warps, it's often a matter of prevention: selecting straight lumber, storing it properly, and allowing glue to cure completely under sufficient clamping pressure. If it's severely warped, it might unfortunately mean starting over with new lumber. Always use a large, flat, known-square surface (like a sheet of plywood on sawhorses or a large workbench) for assembly and clamping to ensure your frame dries flat.
4. Finish Flaws (Blotchiness, Streaks, Dust Nibs)
- Problem: Your stain looks uneven, paint has streaks, or there are tiny bumps (dust nibs) in your varnish.
- Cause: Uneven wood porosity (for stain), improper application technique (too thick, uneven strokes), or dust on the surface before finishing.
- Solution:
- Blotchy Stain: Always use a wood conditioner on blotch-prone woods like pine or maple. For existing blotches, you can try sanding back gently and re-applying conditioner and stain, or opting for paint instead.
- Streaks: Apply finishes in thin, even coats, brushing or rolling with the grain consistently. Lightly sand between coats with a very fine grit (e.g., 320-400) to remove imperfections.
- Dust Nibs: The culprit is usually dust! Meticulously clean your workspace, use a tack cloth before each coat of finish, and apply finishes in a dust-free environment if possible. For existing nibs, a very light sanding with fine grit and then re-applying a thin topcoat can often fix it.
4. Finish Flaws (Blotchiness, Streaks, Dust Nibs)
- Problem: Your finish looks thick, gummy, or shows brush marks.
- Cause: Applying too much finish in one coat, not allowing enough drying time between coats, or using the wrong type of applicator for the finish.
- Solution: This is a common issue! Always apply multiple thin coats rather than one thick one. Read the product instructions for recommended coat thickness and drying times – rushing will almost always lead to problems. If it's still wet, you might be able to smooth it out with more finish (check product instructions), but if it's cured and gummy, you'll likely need to sand it back significantly and restart the finishing process with thinner coats. Using the right brush or roller for your specific finish type also makes a huge difference. For brush marks, using a flow enhancer or paint extender with your paint can help it level out before drying.
- Problem: Your stain looks uneven, paint has streaks, or there are tiny bumps (dust nibs) in your varnish.
- Cause: Uneven wood porosity (for stain), improper application technique (too thick, uneven strokes), or dust on the surface before finishing.
- Solution:
- Blotchy Stain: Always use a wood conditioner on blotch-prone woods like pine or maple. For existing blotches, you can try sanding back gently and re-applying conditioner and stain, or opting for paint instead.
- Streaks: Apply finishes in thin, even coats, brushing or rolling with the grain consistently. Lightly sand between coats with a very fine grit (e.g., 320-400) to remove imperfections.
- Dust Nibs: The culprit is usually dust! Meticulously clean your workspace, use a tack cloth before each coat of finish, and apply finishes in a dust-free environment if possible. For existing nibs, a very light sanding with fine grit and then re-applying a thin topcoat can often fix it.
5. Canvas Movement or Sagging
- Problem: Your canvas shifts within the frame or sags over time.
- Cause: Insufficient mounting hardware, loose stretcher bars, or environmental factors (humidity/temperature).
- Solution: Ensure you're using enough mounting blocks or offset clips, and that they are securely fastened into the stretcher bars and ledges. For stretched canvases, a professional framer can sometimes re-tension the canvas. Preventing extreme humidity fluctuations in the hanging environment also helps. If your stretcher bars are loose, consider adding corner keys or cross-braces if the canvas design allows.
Troubleshooting at a Glance
Problem | Common Causes | Quick Fix / Prevention |
|---|---|---|
| Splitting Wood | No pilot holes, too close to edge/end grain. | Always pre-drill; choose correct bit size; avoid edges. |
| Gaps in Mitered Corners | Imperfect cuts, uneven clamping. | Wood filler (sawdust+glue for small gaps); ensure accurate cuts and even clamping. |
| Uneven Float Gap | Inaccurate ledgers, warped canvas. | Shim behind canvas; double-check ledger measurements; inspect canvas for warp. |
| Warped Frame | Warped lumber, improper glue-up/clamping. | Select straight lumber; proper storage; ensure even clamping on flat surface. |
| Finish Flaws (Streaks, Nibs) | Dust, uneven application, no conditioner. | Tack cloth; thin, even coats; wood conditioner for porous woods. |
| Canvas Movement/Sagging | Insufficient mounting, loose stretcher bars. | Secure mounting clips; ensure proper canvas tension; stable environment. |
Learning from these challenges is part of becoming a skilled DIYer. Don't be discouraged; every mistake is a step closer to perfection!

Learning from these challenges is part of becoming a skilled DIYer. Don't be discouraged; every mistake is a step closer to perfection!
Care and Maintenance: Keeping Your Frame Looking Its Best
Your handmade floating frame is an investment in your art's presentation, and a little care goes a long way in preserving its beauty. It’s like tending to a cherished garden – a little consistent effort ensures it flourishes. This dedication extends to how I care for my own artwork, whether it’s a delicate watercolor or a bold acrylic, ensuring it maintains its vibrancy for years to come. Think of this section as your long-term plan for preserving both your beautiful frame and the precious art it holds.
- Cleaning: For stained or varnished frames, a soft, dry cloth or a microfiber cloth is usually sufficient to dust. For painted frames, a slightly damp cloth can be used, but always ensure it's just damp, not wet, and avoid harsh chemical cleaners which can damage the finish, causing discoloration or stripping. Always test in an inconspicuous area first – I've learned this the hard way with a cleaner that was a little too aggressive on a piece destined for
/den-bosch-museum! For advice on cleaning artwork itself, you might find my thoughts on [/finder/page/how-to-clean-and-care-for-acrylic-paintings] or [/finder/page/how-to-clean-and-care-for-oil-paintings] helpful. For stubborn grime, a very mild soap solution (like diluted dish soap) can be used, but always wipe immediately with a clean, damp cloth and then dry thoroughly. - Environment: Wood is a natural material and can react significantly to changes in humidity and temperature. Avoid hanging your framed art in areas with extreme fluctuations (like direct sunlight, above a radiator, near an air conditioning vent, or in a very humid bathroom) to prevent warping or cracking of the wood, loosening of joints, and potential damage to your artwork. Extreme changes can even affect the canvas itself, leading to slackening or cracking of the paint layer over time, which is something no artist wants to see! Think of your art's environment like a comfortable home; it needs stability. Ideally, maintain a relatively consistent temperature and humidity level (e.g., 68-72°F and 45-55% relative humidity) to preserve both the frame and the artwork. You might even consider a small humidifier or dehumidifier in areas prone to extremes. Additionally, consider the impact of UV light. Direct sunlight can cause pigments in your artwork to fade over time and can also degrade wood finishes. If you can't avoid a sunny spot, consider using museum-quality glazing (though not directly applicable to floating canvases, the principle of UV protection remains) or a UV-resistant varnish on your canvas, particularly if it's an acrylic piece, which I discuss in [/finder/page/how-to-varnish-an-acrylic-painting]. For very valuable pieces, specialized UV-filtering films can be applied to windows to minimize sun exposure without sacrificing natural light.
- Inspection: Periodically check your hanging hardware and mounting blocks to ensure they are still secure, especially for larger or heavier pieces. A quick check every few months can prevent unexpected accidents and ensure your masterpiece remains safely on display. It's a small habit that provides great peace of mind. Pay particular attention to screws, wire tension, and wall anchors, ensuring they haven't loosened or shown signs of wear.
- Minor Repairs: For small dings, scratches, or minor imperfections that inevitably happen over time, a bit of wood filler and a touch-up with your original finish can work wonders. Keep a small amount of your frame's finish on hand for these moments. For deeper scratches, you might need to lightly sand the area before applying filler and finish. Don't be afraid to maintain your frame; it's part of keeping your art looking its best for years to come. For painted frames, a small artist's brush can be used for precise touch-ups.
Frequently Asked Questions (FAQ): Your Floating Frame Queries Answered
I get a lot of questions about floating frames, both from students in my workshops and from collectors admiring my art at /den-bosch-museum, so I've put together some of the most common ones here to help you out. Think of this as a quick reference guide for when those little doubts pop up – because we all have them! It’s completely normal to have questions, and the more you ask, the more you learn, which is a philosophy I embrace in my own creative journey.

Q: Can I use a floating frame for artwork on paper or prints?
A: Generally, no, not directly. Floating frames are specifically designed for stretched canvases or rigid panels (like cradled wood panels, or acrylic prints) because they provide support from the sides and back, allowing the edges to be visible. Artwork on paper, prints, or photographs typically requires a different framing approach, involving a mat and glass for protection from dust, UV light, and environmental damage. If you're looking to frame prints or works on paper, you might find my guide on [/finder/page/how-to-mat-artwork-for-framing-a-step-by-step-guide] incredibly helpful. It’s all about matching the presentation method to the artwork's needs – a concept I apply whether I’m hanging a delicate drawing or a bold, heavy sculpture – ensuring both aesthetic appeal and crucial preservation.
Q: What about non-standard canvas shapes (circular, oval, polygonal)?
A: Framing non-rectangular canvases presents a delightful challenge and a chance to truly customize! For these, the principles of floating frames remain similar, but the execution of cuts becomes much more complex, often requiring specialized tools like a band saw for curves or precise jigs for intricate angles. The 'float gap' still applies, but you'll need to meticulously transfer the canvas's unique shape to your frame material. This is where advanced woodworking skills or a professional referral might come in handy, but for the adventurous DIYer, it's an incredibly rewarding project! It’s like sculpting a frame to truly embrace the artwork’s unique form.
Q: What about non-standard canvas shapes (circular, oval, polygonal)?
A: Framing non-rectangular canvases presents a delightful challenge and a chance to truly customize! For these, the principles of floating frames remain similar, but the execution of cuts becomes much more complex, often requiring specialized tools like a band saw for curves or precise jigs for intricate angles. The 'float gap' still applies, but you'll need to meticulously transfer the canvas's unique shape to your frame material. This is where advanced woodworking skills or a professional referral might come in handy, but for the adventurous DIYer, it's an incredibly rewarding project!
Q: How do I know what size frame material to choose?
A: The width and depth of your frame material depend largely on the size of your canvas and the overall aesthetic you're aiming for. For smaller canvases (say, up to 18x24 inches), 1x2 inch lumber (which is actually about 3/4" x 1 1/2") often works well, offering a sleek, minimalist look without overpowering the art. For larger or heavier canvases, you might want to opt for 1x3 or even 1x4 inch material for a more substantial look, greater structural stability, and a better visual balance. Consider the visual balance: a delicate piece might be overpowered by a very chunky frame, and vice versa. Trust your eye, and when in doubt, hold up different widths of scrap wood next to your canvas to see what feels right. It’s a design decision, after all, and a critical one for the artwork's final presentation!
Q: Can I use a floating frame for multiple small canvases (a diptych/triptych)?
A: Yes, absolutely! This is a fantastic way to create a cohesive display for a series of related artworks. You have a couple of options. You can build individual floating frames for each canvas and then arrange them on the wall with intentional spacing. Alternatively, for a more integrated look, you could build one large floating frame with internal dividers that create separate compartments for each canvas, maintaining that consistent float gap around each piece. This really unifies the collection and transforms separate pieces into a single, impactful artistic statement, a technique I sometimes use for smaller abstract series from my /buy collection.
Q: How do I deal with very large or heavy canvases?
A: For very large or heavy canvases, your approach to both frame construction and hanging needs to be more robust. I would definitely recommend using a thicker, stronger hardwood for the frame (e.g., oak or walnut) and reinforcing the mitered joints with splines or biscuits for added strength, not just glue and brads. Internally, you might need to add cross-bracing to the frame itself to prevent racking. For hanging, a French cleat system is almost always the best choice for heavy artwork, as it distributes the weight evenly across a large section of the wall. Always ensure your wall anchors are appropriate for the weight and type of wall. Don't take chances with heavy art; it's an investment in safety and preservation.
Q: What if I don't have all the power tools?
A: Don't let a lack of power tools deter you! A floating frame can absolutely be built with hand tools. Instead of a miter saw, a good quality hand saw with a miter box will give you accurate 45-degree cuts. A hand drill and a set of sharp chisels can substitute for a drill press and router. The process might take a little longer and require a bit more physical effort, but the satisfaction of creating something beautiful with traditional methods is immense. Focus on sharp tools, careful measurements, and consistent technique, and you'll achieve excellent results. Think of it as a connection to the craftsmanship of the past!
Q: How do I choose the right wood for a specific aesthetic (e.g., modern, rustic)?
A: The wood type you choose plays a massive role in the final aesthetic of your frame. For a modern, minimalist look, I often lean towards smooth, fine-grained hardwoods like maple or poplar, often finished with a clear coat or a simple black/white paint. The goal is clean lines and minimal distraction. For a rustic or traditional feel, open-grained woods like oak or even reclaimed pine, with a warm stain or a distressed finish, can be perfect. The texture and natural imperfections of the wood become part of the charm. If your art has a strong industrial aesthetic [/finder/page/decorating-with-art-in-industrial-interiors], you might even consider incorporating metal elements or a very raw, unfinished wood look. Always let the artwork and your interior design be your guide, as the frame should truly feel like an extension of both.
Q: What's the easiest way to get perfectly mitered corners?
A: Patience and a sharp blade are absolutely key! Whether you're using a hand miter box or a power miter saw, always make a test cut on a scrap piece of the same lumber to check your 45-degree angle. Adjust if necessary, as even a half-degree off can create a noticeable gap that's difficult to conceal later. When gluing, use good quality corner clamps and band clamps to hold everything tight and perfectly aligned while the glue cures. A useful trick is to use a small block plane or a very sharp chisel to make microscopic adjustments to a miter cut if it's not quite perfect. Sometimes, a touch of wood filler can hide tiny imperfections, but aim for perfection from the cut stage. I find practicing on cheap pine scraps before moving to your good lumber makes a huge difference. Don't rush it; those perfect corners are the hallmark of a professional-looking frame, elevating it from homemade to handcrafted.

Q: What's the best way to choose a finish (stain, paint, varnish) for my floating frame?
A: This is where you get to express your personal style and truly complement your artwork! Consider the dominant colors, mood, and texture of your painting. For a natural, organic feel, a clear varnish or a light stain that enhances the wood's natural grain is wonderful, especially if you've chosen a beautiful hardwood like oak or walnut. For a bold, contemporary look, a solid paint color (black, white, or a hue pulled directly from your artwork) can make the piece pop and define the artwork's boundaries. Always test your chosen finish on a scrap piece of the exact wood you're using for your frame, as different woods absorb finishes differently, and a color that looks one way on a swatch can look entirely different on your specific lumber. For more in-depth advice on types of paints and finishes, you can explore [/finder/page/definitive-guide-to-paint-types-for-artists] or even [/finder/page/how-to-varnish-an-acrylic-painting] for specific application techniques. The frame should support the art, not compete with it, unless that's your specific artistic intention, creating a conversation between the frame and the canvas!
Q: What's the environmental impact of wood choices?
A: That's a really important question, and something I think about deeply in my own artistic practice. When choosing wood, you can make environmentally conscious decisions. Look for sustainably sourced wood certified by organizations like the Forest Stewardship Council (FSC). This ensures the wood comes from responsibly managed forests. Reclaimed wood, as we discussed, is another excellent eco-friendly option as it repurposes existing materials. Avoid exotic hardwoods from unsustainable sources. Making mindful choices about your materials is just another way to connect with your craft and the world around us, much like how I consider the longevity and impact of the materials in my paintings.
Q: Can I use reclaimed wood?
A: Absolutely, and I encourage it if you're up for the challenge! Reclaimed wood can add incredible character and a unique story to your frame. Just be aware that it often requires more prep work: carefully removing old nails or screws, thorough cleaning, and potentially planing or sanding to achieve consistent dimensions. Always check for rot or insect damage. The irregularities of reclaimed wood can also present challenges for perfect miter joints, but the rustic charm it imparts is often well worth the extra effort. It's a wonderful way to practice sustainable crafting and create a truly one-of-a-kind display for your art.
Q: How do I choose the right wood for a specific aesthetic (e.g., modern, rustic)?
A: The wood type you choose plays a massive role in the final aesthetic of your frame. For a modern, minimalist look, I often lean towards smooth, fine-grained hardwoods like maple or poplar, often finished with a clear coat or a simple black/white paint. The goal is clean lines and minimal distraction. For a rustic or traditional feel, open-grained woods like oak or even reclaimed pine, with a warm stain or a distressed finish, can be perfect. The texture and natural imperfections of the wood become part of the charm. If your art has a strong industrial aesthetic [/finder/page/decorating-with-art-in-industrial-interiors], you might even consider incorporating metal elements or a very raw, unfinished wood look. Always let the artwork and your interior design be your guide, as the frame should truly feel like an extension of both.
Q: What's the easiest way to get perfectly mitered corners?
A: Patience and a sharp blade are absolutely key! Whether you're using a hand miter box or a power miter saw, always make a test cut on a scrap piece of the same lumber to check your 45-degree angle. Adjust if necessary, as even a half-degree off can create a noticeable gap that's difficult to conceal later. When gluing, use good quality corner clamps and band clamps to hold everything tight and perfectly aligned while the glue cures. A useful trick is to use a small block plane or a very sharp chisel to make microscopic adjustments to a miter cut if it's not quite perfect. Sometimes, a touch of wood filler can hide tiny imperfections, but aim for perfection from the cut stage. I find practicing on cheap pine scraps before moving to your good lumber makes a huge difference. Don't rush it; those perfect corners are the hallmark of a professional-looking frame, elevating it from homemade to handcrafted.
Q: What's the best way to choose a finish (stain, paint, varnish) for my floating frame?
A: This is where you get to express your personal style and truly complement your artwork! Consider the dominant colors, mood, and texture of your painting. For a natural, organic feel, a clear varnish or a light stain that enhances the wood's natural grain is wonderful, especially if you've chosen a beautiful hardwood like oak or walnut. For a bold, contemporary look, a solid paint color (black, white, or a hue pulled directly from your artwork) can make the piece pop and define the artwork's boundaries. Always test your chosen finish on a scrap piece of the exact wood you're using for your frame, as different woods absorb finishes differently, and a color that looks one way on a swatch can look entirely different on your specific lumber. For more in-depth advice on types of paints and finishes, you can explore [/finder/page/definitive-guide-to-paint-types-for-artists] or even [/finder/page/how-to-varnish-an-acrylic-painting] for specific application techniques. The frame should support the art, not compete with it, unless that's your specific artistic intention, creating a conversation between the frame and the canvas!
Q: What's the environmental impact of wood choices?
A: That's a really important question, and something I think about deeply in my own artistic practice. When choosing wood, you can make environmentally conscious decisions. Look for sustainably sourced wood certified by organizations like the Forest Stewardship Council (FSC). This ensures the wood comes from responsibly managed forests. Reclaimed wood, as we discussed, is another excellent eco-friendly option as it repurposes existing materials. Avoid exotic hardwoods from unsustainable sources. Making mindful choices about your materials is just another way to connect with your craft and the world around us, much like how I consider the longevity and impact of the materials in my paintings.
Q: How do I deal with minor imperfections in the wood before finishing?
A: Even with careful selection, wood can have small knots, dings, or minor gouges. The key is to address these before you apply any finish. For small divots, wood filler is your best friend. Apply it, let it dry, and sand it flush. For small knots or areas of sap, a sanding sealer or knot-sealing primer can prevent them from bleeding through your chosen finish over time. For more significant defects that you don't want to embrace as "character," sometimes replacing the board entirely is the best option. Remember, the better your surface preparation, the more professional and lasting your finish will be – it's like preparing a canvas, where an even, smooth ground makes all the difference! For hairline cracks, a mixture of fine sawdust and wood glue can often create an invisible repair.
Q: Can I paint my canvas edges before framing?
A: Absolutely, and I highly recommend it, especially for gallery-wrapped canvases! Painting the edges of your canvas a complementary or contrasting color can be a beautiful design choice that enhances the floating effect. Since the float gap exposes the sides of your canvas, this becomes an integral part of the overall presentation, acting as a subtle continuation or a deliberate break. I often extend the painting around the edges of my canvases, or use a solid color that picks up a subtle hue from the artwork, creating an unexpected depth. Just make sure the paint is fully cured before mounting it into your frame – you don't want any sticky surprises or smudges! This is a simple but effective way to add another layer of artistic intention to your framed piece. For added protection, consider applying a coat of varnish to the painted edges as well.
Q: Is it really cheaper to build my own floating frame?
A: For custom sizes or for a high-quality wood finish, building it yourself is almost always significantly cheaper than professional custom framing. Ready-made frames can be less expensive, but they rarely offer the precise fit, material choice, and custom finish that a DIY frame provides. The cost savings become even more significant for larger or non-standard canvas sizes, where professional framing costs can skyrocket into the hundreds or even thousands of dollars. You're effectively paying for labor and overhead when you go to a professional framer. Plus, there's the immense satisfaction of saying, "I made that!" – a sense of accomplishment that money can't buy, and one that resonates deeply with me as an artist. It’s an investment in your skills and your art, yielding both financial and personal returns. Don't forget to factor in the cost of tools, though many are a one-time investment for a lifetime of projects.
Q: What if my wood warps after I cut it?
A: This can definitely be frustrating! The best defense against warping is careful selection of your lumber at the store – look for straight, kiln-dried pieces. Once cut, store your wood flat in a stable environment, away from direct sunlight or extreme temperature changes. If a piece does warp, for minor bends, you might try clamping it straight while the glue dries, but for significant warps, it's often best to re-cut with new, straighter stock. Sometimes, the initial cuts can release internal stresses in the wood, causing a slight warp, which is why testing your lumber before final assembly is always a good idea. It's a reminder that even with the best plans, wood has a mind of its own sometimes! You can also try to sticker (place small strips of wood between layers) your cut pieces during storage to ensure even airflow, minimizing the chance of warping.
Q: What's the best way to store unfinished lumber?
A: Proper storage of lumber, especially before it's cut and joined, is critical to prevent warping and ensure stability. Always store your lumber flat on a level surface, ideally with evenly spaced stickers (small strips of wood) placed beneath it to allow for airflow on all sides. This prevents moisture from being trapped and ensures the wood dries evenly. Keep it in an environment with stable temperature and humidity, away from direct sunlight or drafts. If you're storing it for an extended period, you might even consider wrapping it loosely in plastic to help stabilize its moisture content. Just like a canvas, lumber needs to be cared for properly before it becomes art! Avoid storing lumber directly on concrete floors, as it can absorb moisture from the ground.

Q: How long does the whole process take?
A: This is a great question, and it really depends on your experience level and how complex your frame is! For a first-timer building a simple floating frame for a medium-sized canvas, I'd estimate 4-8 hours of actual working time, spread over at least two days to allow for glue drying and finish curing. The glue-up alone typically needs 12-24 hours to fully cure, and multiple coats of finish can add several more hours (or days, depending on humidity) of drying time. More experienced DIYers might complete it faster, but rushing will almost certainly lead to mistakes and a less refined final product. Remember, patience is key, especially during drying and finishing stages. Enjoy the process rather than focusing solely on the clock! The journey of creation is as important as the destination. Breaking the process into manageable chunks, with dedicated drying times, can make it feel less daunting.
Q: How do I choose the right hanging hardware for my wall type?
A: This is crucial for safely displaying your art! For plaster or drywall, if hanging directly into a stud (the vertical wooden or metal beams within your wall), long screws are ideal. If no stud is available, you absolutely must use appropriate wall anchors designed for your wall material and the weight of your frame. Toggle bolts (for hollow walls) or self-drilling drywall anchors are excellent for heavier frames on drywall. For concrete or brick walls, you'll need a hammer drill and specialized masonry anchors. Always ensure your chosen hardware is rated for the specific weight of your framed artwork, and err on the side of caution with heavier-duty options. Never just put a nail into drywall for anything but the lightest pieces – that's an accident waiting to happen! For more specialized advice, consulting a hardware store expert is always a good idea, as wall construction varies greatly, and your art deserves to be secure. Remember that the hanging hardware on the frame itself also needs to be compatible with your wall hardware – for example, a French cleat requires a mating cleat on the wall.
Q: Can I use different types of wood for the outer frame and inner ledges?
A: Yes, absolutely! Many people choose a beautiful, often more expensive hardwood for the outer visible frame (e.g., walnut or maple) and then use a more economical softwood (like pine) or even sturdy plywood strips for the inner ledges, as these won't be visible from the front. Just ensure that whatever wood you choose for the ledges is dimensionally stable, free of significant defects, and strong enough to support your canvas. This is a clever way to save a bit on material costs without compromising the visual appeal of your finished frame, allowing you to invest more in the visible components. It’s a smart way to be resourceful, which is a trait I often bring into my own creative practice, experimenting with unexpected materials and finding beauty in the overlooked.
FAQ Summary Table
Question Category | Key Takeaway | Additional Insights |
|---|---|---|
| Art Compatibility | Ideal for stretched canvas/rigid panels. | Not for paper art; requires different framing (mat/glass). |
| Customization | Possible for non-standard shapes. | Requires advanced tools/skills; highly rewarding. |
| Wood Selection | Depends on canvas size, desired aesthetic, budget. | Consider visual balance, durability; softwoods for beginners, hardwoods for premium look. |
| Multiple Canvases | Can frame individually or with integrated dividers. | Creates cohesive display; unifies a series. |
| Large/Heavy Canvases | Requires stronger wood, reinforced joints, French cleat. | Prioritize safety and structural integrity. |
| Tool Accessibility | Hand tools are viable alternatives to power tools. | Focus on sharp tools, careful measurements, consistent technique. |
| Finish Choice | Personal style, complements artwork/room aesthetic. | Test on scrap; thin coats; protects and enhances wood. |
| Environmental Impact | Choose sustainably sourced or reclaimed wood. | Mindful choices connect craft to world. |
| Imperfections | Address before finishing with filler/sealer. | Better surface prep leads to professional, lasting finish. |
| Canvas Edges | Paint for cohesive look; varnish for protection. | Integral part of presentation; ensure fully cured. |
| Cost Savings | Significantly cheaper than professional custom framing. | Factor in tool costs; immense satisfaction. |
| Warping Wood | Select kiln-dried, store flat, sticker pieces. | Prevention is key; minor warps sometimes fixable with clamping. |
| Process Time | 4-8 working hours spread over days. | Patience for drying/curing is crucial; break into chunks. |
| Hanging Hardware | Match to wall type and frame weight. | Pre-drill; toggle bolts for drywall, masonry anchors for brick. |
| Mixed Wood Types | Economical for hidden ledges; beautiful for outer frame. | Resourceful way to save cost without compromising aesthetics. |
Make a detailed cut list. Double-check your numbers. This is where patience pays off!


